Amazon Web Services (AWS) has always stood first for providing a variety of services offering flexibility for managing your AWS infrastructure. With another in line, AWS has the popular service in the AWS cloud that is Elastic Beanstalk.
AWS Elastic Beanstalk is a service that helps in deploying and managing applications in the AWS Cloud. For this, you don’t even have to learn about the infrastructure for running those applications. Interesting, right? Now, let’s make it more interesting by getting into the core of Elastic Beanstalk.
In this blog, we will learn about AWS Elastic Beanstalk with its benefits, features, and how to get started with it. So, let’s begin.
AWS Elastic Beanstalk: Overview
AWS Elastic Beanstalk is a simple service used for deploying and scaling web applications. This service is designed with various languages like Java, .NET, PHP, Node.js, Python, Ruby, Go, and Docker. And, it works on familiar servers like Apache, Nginx, Passenger, and IIS. To better understand Elastic Beanstalk let’s divide its details into suitable points.
- Firstly, you can simply upload your code and Elastic Beanstalk automatically handles the deployment from:
- capacity provisioning
- load balancing
- auto-scaling to application health monitoring.
- This helps you take full control over the AWS resources powering your application and can access the underlying resources at any time.
- Secondly, AWS Elastic Beanstalk has the ability to reduces management complexity without restricting choice or control.
- Thirdly, it has the support of various languages which helps while deploying your application. In which, Elastic Beanstalk creates the selected supported platform version and provisions one or more AWS resources like Amazon EC2 instances, for running your application.
- Fourthly, you have the option to interact with Elastic Beanstalk by using:
- the Elastic Beanstalk console
- the AWS Command Line Interface (AWS CLI)
- eb (This is a high-level CLI designed specifically for Elastic Beanstalk.)
- Lastly, Elastic Beanstalk lets you perform deployment tasks like:
- switching the size of your fleet of Amazon EC2 instances
- monitoring application from the Elastic Beanstalk web interface.
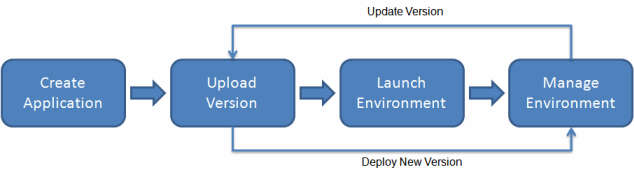
Further, for using Elastic Beanstalk,
- Firstly, you create an application
- Secondly, uploading an application version in the form of an application source bundle to Elastic Beanstalk
- Thirdly, provide some information about the application.
- After that, Elastic Beanstalk automatically launches an environment and creates and configures the AWS resources required for running code.
Workflow of Elastic Beanstalk
Benefits of AWS Elastic Beanstalk
- Firstly, Elastic Beanstalk is the fastest and simplest way for deploying applications on AWS. For uploading an application, you simply use:
- The AWS Management Console
- A Git repository
- An integrated development environment (IDE)
- Secondly, it helps in provisioning and operating the infrastructure and for managing the application stack (platform). This eliminates the time spending on developing the expertise. That is to say, you can focus on writing code rather than spending time managing and configuring servers, databases, load balancers, firewalls, and networks.
- Thirdly, Elastic Beanstalk has the ability to automatically scaling applications up and down depending on your application’s specific requirement using easily adjustable Auto Scaling settings.
- Lastly, in this, you have the option to select the AWS resources like Amazon EC2 instance type. Additionally, Elastic Beanstalk lets you take over full control of the AWS resources powering your application.
In the next section, we will be discussing the features of AWS Elastic Beanstalk that make it a unique and usable service in the market.
What are the features of AWS Elastic Beanstalk?
We know that AWS Elastic Beanstalk is the easiest way for getting web applications up and running on AWS. However, developers have to simply upload application code. Then, the service automatically handles all the details including resource provisioning, load balancing, auto-scaling, and monitoring. But, this is not just it! Let’s learn about the other areas using its features.
1. Wide Selection of Application Platforms
- AWS Elastic Beanstalk supports web applications written in top programming languages and frameworks. This needs no code changes for going from the development machine to the cloud. However, you have the option to select a variety of application platforms like Java, .NET, Node.js, PHP, Ruby, Python, Go, and Docker to deploy your web applications.
2. Variety of Application Deployment Options
AWS Elastic Beanstalk provides access for deploying your code through:
- AWS Management Console,
- Elastic Beanstalk Command Line Interface
- Visual Studio
- Eclipse.
- Further, you can select from multiple deployment policies like all at once, rolling, rolling with an additional batch, immutable, and blue/green.
3. Monitoring
A unified user interface in AWS Elastic Beanstalk has the option for monitoring and managing the health of applications.
Application Health
Elastic Beanstalk collects more than 40 key metrics and attributes for determining the health of the application. Moreover, the Elastic Beanstalk Health Dashboard gives access for:
- visualizing overall application health
- customizing application health checks, health permissions, and health reporting in one unified interface.
Monitoring, Logging, and Tracing
- Elastic Beanstalk is combined with both AWS X-Ray and Amazon CloudWatch. That is to say, you can hold the monitoring dashboard for viewing key performance metrics like latency, CPU utilization, and response codes. Further, using this you can also set up CloudWatch alarms for getting notified when metrics exceed the chosen thresholds.
4. Management and Updates
- You get the option to choose to have AWS Elastic Beanstalk automatically update to the latest version of your Elastic Beanstalk environment using Managed Platform Updates. Moreover, the Immutable deployment mechanism makes sure that these updates for new patches and minor platform versions are done in a secure manner for minimizing the impact on end-users impact.
5. Scaling
- AWS Elastic Beanstalk supports Elastic Load Balancing and Auto Scaling for automatically scaling your application in and out depending on your application’s specific requirements. In addition, multiple availability zones provide an option for improving application reliability and availability by running in more than one zone.
6. Customization
- With AWS Elastic Beanstalk, you have access to select the AWS resources like Amazon EC2 instance type including Spot instance. Additionally, Elastic Beanstalk lets you take full control over the AWS resources powering your application.
7. Compliance
- AWS Elastic Beanstalk meets the standards for ISO, PCI, SOC 1, SOC 2, and SOC 3 compliance along with the standards for HIPAA eligibility. That is to say, the applications running on Elastic Beanstalk can process regulated financial data or protected health information (PHI).
Above we have got all the details, benefits, and unique features of AWS Elastic Beanstalk. Moving on, now we will learn and understand how to get started with this service. This part will cover various portions, let’s understand them.
Getting started using Elastic Beanstalk
For a better understanding of using Elastic Beanstalk, we will start in a stepwise manner.
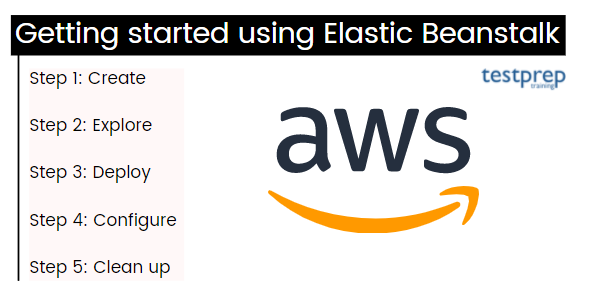
1. Creating an example application
In this, we will create a new application starting from a preexisting example application. With Elastic Beanstalk, you get to choose the platform for creating applications. As it has the support of platforms for different programming languages, application servers, and Docker containers.
Creating an application and an environment
For creating an example application, use the Create a web app console wizard. This creates an Elastic Beanstalk application and launches an environment within it. However, an environment refers to the collection of AWS resources needed for running your application code.
For creating an example application:
- Firstly, open the Elastic Beanstalk console
- Secondly, add application tags.
- Lastly, choose a platform, and then choose to create an application.
Elastic Beanstalk takes the following actions for running the example application on AWS resources.
- Firstly, creating an Elastic Beanstalk application named getting-started-app.
- Secondly, launching an environment named GettingStartedApp-env with these AWS resources:
- Firstly, an Amazon Elastic Compute Cloud (Amazon EC2) instance (virtual machine)
- Secondly, the Amazon EC2 security group
- Then, the Amazon Simple Storage Service bucket
- Next, Amazon CloudWatch alarms
- After that, the AWS CloudFormation stack
- Lastly, the domain name
- Next, it creates a new application version named Sample Application.
- Lastly, deploying the code for the example application to the GettingStartedApp-env environment.
Further, after launching all of the resources and the EC2 instances running the application pass health checks, the environment’s health changes to Ok. Now, you can use the web application’s website.
AWS resources created for the example application
While creating the example application, Elastic Beanstalk creates the following AWS resources:
- Firstly, EC2 instance. This is an Amazon EC2 virtual machine configured for running web apps on the platform you choose.
- Secondly, the Instance security group. This refers to an Amazon EC2 security group configured for allowing incoming traffic on port 80. This lets HTTP traffic from the load balancer gets to the EC2 instance running your web app.
- Thirdly, the Amazon S3 bucket. This is a storage location for your source code, logs, and other artifacts developed while using the Elastic Beanstalk.
- Next, Amazon CloudWatch alarms. There are two CloudWatch alarms for monitoring the load on the instances in your environment and they are triggered if the load is too high or too low. When an alarm is triggered, then the Auto Scaling group scales up or down in response.
- After that, AWS CloudFormation stack. Elastic Beanstalk uses this for launching the resources in your environment and for propagating configuration changes.
- Lastly, Domain name. This refers to a domain name that routes to your web app in the form subdomain.region.elasticbeanstalk.com.

2. Exploring your environment
For viewing the environment overview:
- Firstly, open the Elastic Beanstalk console, and select your AWS Region in the Regions list.
- Secondly, choose Environments in the navigation pane. Then, from the list choose the name of your environment.
Next, the environment overview pane displays information about your environment. This includes:
- Name
- URL
- Current health status
- The name of the currently deployed application version
- The platform version that the application is running on.
However, while Elastic Beanstalk creates your AWS resources and launches your application, the environment is in a Pending state. Further, the navigation pane on the left side of the console links to other pages containing detailed information about your environment and providing access to additional features like:
- Firstly, Configuration. This displays the resources provisioned for this environment like the Amazon Elastic Compute Cloud (Amazon EC2) instances that host your application.
- Secondly, Health. This displays the status and detailed health information about the Amazon EC2 instances running your application.
- Thirdly, Monitoring. This is for displaying statistics for the environment like average latency and CPU utilization.
- Then, Events. This displays the information or error messages from the Elastic Beanstalk service and from other services whose resources this environment uses.
- Lastly, Tags. This is for displaying environment tags and allows you for managing them.
3. Deploying a new version of your application
For updating your application version:
- Firstly, download the sample application matching your environment’s platform. Use one of the following applications.
- Firstly, Docker: docker.zip
- Multicontainer Docker: docker-multicontainer-v2.zip
- Then, Preconfigured Docker (Glassfish): docker-glassfish-v1.zip
- After that, .NET: dotnet-asp-v1.zip
- Next, Node.js: nodejs.zip
- PHP: php.zip
- Python: python.zip
- Lastly, Ruby: ruby.zip
- Secondly, open the Elastic Beanstalk console, and select your AWS Region in the Regions list.
- Thirdly, choose Environments in the navigation pane. And then, from the list choose the name of your environment.
- After that, choose Upload and deploy on the environment overview page.
- Then, select Choose File. Then, upload the downloaded sample application source bundle.
- However, the console automatically fills in the Version label with a new unique label.
- Lastly, choose Deploy.
Further, while Elastic Beanstalk deploys your file to your Amazon EC2 instances, you can check the deployment status on the environment’s overview. While updating the application version, the Environment Health status is gray. And, when the deployment is completed, then, the Elastic Beanstalk performs an application health check. And, when the application responds to the health check, it is viewed as healthy and the status returns to green.
4. Configuring your environment
You have the option to configure your environment for better suiting your application. However, some configuration changes are simple but some need deleting and recreating AWS resources.
Making a configuration change
In this, you will edit the environment’s capacity settings. Moreover, you will configure a load-balanced, scalable environment having two and four Amazon EC2 instances in its Auto Scaling group. After this, you confirm that the change has occurred. Then, Elastic Beanstalk generates an additional Amazon EC2 instance, adding to the single instance that is generated initially. Lastly, Elastic Beanstalk associates both instances with the environment’s load balancer. As a result, there is an increase in availability and improvement in the application’s responsiveness.
For changing your environment’s capacity:
- Firstly, open the Elastic Beanstalk console, and select your AWS Region. in the Regions list.
- Secondly, choose Environments in the navigation pane. And then, from the list choose the name of your environment.
- Thirdly, choose Configuration in the navigation pane.
- Then, choose Edit in the Capacity configuration category.
- After that, change the Environment type to Load balanced in the Auto Scaling group section.
- Next, change Max to 4, and then change Min to 2 in the Instances row.
- Then, choose Apply. Then, choose Confirm.
- Lastly, choose Events in the navigation pane.
Verifying the configuration change
After completing the environment update, verify your change.
For verifying the increased capacity:
- Firstly, choose Health in the navigation pane.
- Secondly, take a look at the Enhanced health overview page. There will be two Amazon EC2 instances listed following the Overall line. That means the environment capacity has increased to two instances.
5. Cleaning up
For deleting the application and all associated resources
- Deleting all application versions.
- Firstly, open the Elastic Beanstalk console. Then, select your AWS Region in the Regions list.
- Secondly, choose Applications in the navigation pane. And then choose getting-started-app.
- Thirdly, find your application’s name in the navigation pane. And then, choose Application versions.
- After that, select all application versions that you want to delete on the Application versions page.
- Then, choose Actions, and then click on Delete.
- Next, turn on Delete versions from Amazon S3.
- Lastly, choose Delete, and then click on Done.
- Terminating the environment.
- Firstly, choose getting-started-app in the navigation pane. And then, in the environment list, choose GettingStartedApp-env.
- Secondly, choose Environment actions. Then, select Terminate Environment.
- Thirdly, type the environment name for confirming that you want to terminate GettingStartedApp-env. Then, choose Terminate.
- Deleting the getting-started-app application.
- Firstly, choose the getting-started-app in the navigation pane.
- Secondly, choose Actions, and then click on Delete application.
- Lastly, type the application name for confirming that you want to delete getting-started-app. And then choose Delete.
AWS Elastic Beanstalk Pricing
For AWS Elastic Beanstalk pricing, there is no additional charge. That is to say, you pay for AWS resources created for storing and running your application. However, the costs of running a website using Elastic Beanstalk can change depending on several factors like
- Firstly, the number of Amazon EC2 instances required for handling your website traffic.
- Secondly, the bandwidth consumed by your application
- Thirdly, database or storage options your application uses.
- Lastly, the principal costs for a web application will be for the Amazon EC2 instance(s) and for the Elastic Load Balancing that spread traffic between the instances running your application.
Final Words
We have covered the overview, features, benefits, and how to get started with the AWS Elastic Beanstalk. This has given the simplest way to developers for deploying and managing applications in the AWS Cloud. This only requires you to upload your code and Elastic Beanstalk will automatically handle the deployment, from capacity provisioning, load balancing, and auto-scaling to application health monitoring. Further, this service has provided benefits to many top companies thus created the trust and acquired more customers. So, go through the blog to understand the overall working of AWS Elastic Beanstalk by taking help from useful AWS documentation and other resources.