Google Cloud Dataflow is a fully managed service for developing and executing data processing pipelines. It is a unified programming model and a managed service that enables you to develop and execute a wide range of data processing patterns, including ETL, batch computation, and continuous computation, without deploying or managing any infrastructure. It is built on Apache Beam, an open-source, unified programming model that allows you to develop pipelines in your preferred programming language, including Java, Python, and Go. With Dataflow, you can easily scale your data processing pipelines to handle any amount of data, while paying only for the resources you use.
Google Cloud Data Flow Glossary
Here are some important terms and concepts related to Google Cloud Dataflow:
- Apache Beam: A programming model for defining and executing data processing pipelines, which is supported by Google Cloud Dataflow.
- Dataflow job: A set of instructions that specify how to process data in a Dataflow pipeline.
- Pipeline: A series of steps or tasks that are executed in sequence to process and transform data in Google Cloud Dataflow.
- Transform: A unit of work in a Dataflow pipeline that processes and transforms data.
- ParDo: A type of transform that processes elements in a pipeline, potentially producing multiple output elements for each input element.
- Window: A time-based partition of data in a pipeline, used for grouping and aggregating data over specific time intervals.
- Side input: Additional data that can be used as input to a transform in a Dataflow pipeline, but that is not part of the main input data.
- Sink: The destination of the output data from a Dataflow pipeline, such as a file, a database, or another application.
- Source: The input data for a Dataflow pipeline, such as a file, a database, or a message queue.
- Watermark: A timestamp used to track the progress of data through a pipeline, and to determine when data can be considered complete.
- Shuffle: The process of redistributing data in a pipeline to balance the workload across processing nodes.
- Runner: The software that executes a Dataflow pipeline on a particular computing platform, such as Apache Flink or Google Cloud Dataflow.
Setting up a Google Cloud Dataflow environment
Setting up a Google Cloud Dataflow environment involves several steps that need to be followed to ensure a smooth setup. These steps include:
- Creating a Google Cloud account: To use Google Cloud Dataflow, you will need a Google Cloud account. You can sign up for a free trial account, which will give you $300 in credits to use for a period of 90 days.
- Creating a project: Once you have a Google Cloud account, you can create a new project by navigating to the Cloud Console and clicking on the “Create Project” button. You will be prompted to enter a name and ID for your project.
- Enabling APIs: After creating your project, you will need to enable the Google Cloud Dataflow API. This can be done by navigating to the API Library in the Cloud Console and searching for “Dataflow API”. Once you have located the API, click on the “Enable” button to activate it.
- Creating a service account: A service account is required to run Google Cloud Dataflow jobs. To create a service account, navigate to the “IAM & Admin” section of the Cloud Console and click on “Service Accounts”. From there, you can create a new service account and download the JSON key file associated with it.
- Installing the Google Cloud SDK: The Google Cloud SDK provides a set of command-line tools that can be used to interact with Google Cloud services, including Google Cloud Dataflow. You can download and install the SDK from the Google Cloud website.
- Writing and executing a Dataflow pipeline: With your environment set up, you can now write and execute a Dataflow pipeline. This involves defining your pipeline in code, specifying the input and output sources, and running the pipeline using the command-line tools provided by the Google Cloud SDK.
Overall, setting up a Google Cloud Dataflow environment involves a number of steps, but by following these steps carefully, you can ensure a smooth and successful setup.
Developing a Dataflow pipeline
Developing a Dataflow pipeline involves the following steps:
- Creating a Cloud Storage bucket: First, you need to create a Cloud Storage bucket to store your input and output files.
- Writing a Dataflow pipeline code: You need to write a Dataflow pipeline code in Java or Python that defines the processing logic of your data. The code should define the input source, processing steps, and output destination.
- Compiling the code: After writing the code, you need to compile it using the appropriate compiler for Java or Python.
- Creating a Dataflow job: Once the code is compiled, you can create a Dataflow job using the gcloud command-line tool or the Dataflow UI in the Google Cloud Console.
- Running the Dataflow job: After creating the Dataflow job, you can run it by submitting it to the Dataflow service. The Dataflow service will allocate the necessary resources and execute the pipeline code.
- Monitoring the Dataflow job: While the Dataflow job is running, you can monitor its progress using the Dataflow monitoring tools, such as the Dataflow monitoring UI or the Stackdriver Monitoring tool.
- Inspecting the output: Once the Dataflow job is complete, you can inspect the output files in the Cloud Storage bucket that you specified in the pipeline code.
Transforming and processing data with Dataflow
Google Cloud Dataflow is a powerful service that can be used to process, transform, and analyze large volumes of data. Here are some of the ways you can transform and process data using Dataflow:
- Data Source and Sink: Dataflow can read data from a variety of sources such as Google Cloud Storage, Google BigQuery, and Apache Kafka. Similarly, it can write the processed data to a variety of sinks such as Google Cloud Storage, Google BigQuery, and Apache Kafka.
- ParDo Transform: A ParDo transform can be use to apply custom user-defined functions to each element of the data set.
- GroupByKey and CoGroupByKey Transforms: These transforms are use to group data based on keys. GroupByKey is use to group data from a single source, while CoGroupByKey is used to group data from multiple sources.
- Windowing: Dataflow provides support for processing data in windows. Windows allow you to group data based on a time or size-based criteria. Windowing can be use to calculate rolling averages, detect trends, and more.
- Aggregation: Dataflow provides support for a variety of aggregation functions such as Sum, Min, Max, and Average. These functions can be use to calculate metrics and KPIs.
- Join: Dataflow provides support for joining data from multiple sources based on a common key. This can be use to combine data from different sources, enrich the data, and more.
- Side Inputs: Side inputs allow you to use data from another source as input to your transform. This can be useful for enriching data, filtering data, and more.
Integrating Dataflow with other Google Cloud services
Google Cloud Dataflow can be integrate with several other Google Cloud services to create powerful data processing pipelines. Some of the common integrations include:
- Google Cloud Storage: Dataflow can read and write data from Google Cloud Storage buckets. This integration allows you to store and process large amounts of data in a scalable and cost-effective way.
- BigQuery: Dataflow can read data from BigQuery tables and write data to BigQuery tables. This integration allows you to analyze large datasets in BigQuery and perform complex transformations on the data using Dataflow.
- Pub/Sub: Dataflow can read data from Pub/Sub topics and write data to Pub/Sub topics. This integration allows you to process data streams in real-time using Dataflow.
- Dataflow templates: Dataflow pipelines can be saved as templates, which can be used to create new pipelines. This feature allows you to reuse existing pipelines and customize them for different use cases.
- Google Cloud Machine Learning: Dataflow can be used to train machine learning models using data stored in Google Cloud Storage or BigQuery. This integration allows you to process and transform data before training machine learning models.
- Stackdriver Logging: Dataflow logs can be streamed to Stackdriver Logging, which provides a centralized location for monitoring and troubleshooting your Dataflow pipelines.
Integrating Dataflow with other Google Cloud services can help you build end-to-end data processing pipelines that are scalable, reliable, and easy to maintain.
Best practices for using Dataflow
Here are some best practices for using Google Cloud Dataflow:
- Design your pipeline for scalability: Dataflow is designed to handle large-scale data processing tasks, so it’s important to design your pipeline with scalability in mind. This includes partitioning data into smaller chunks and using parallel processing where possible.
- Use the right windowing strategy: Windowing allows you to group data into logical segments, which is important for aggregating data over time. Choosing the right windowing strategy is crucial for achieving accurate results and minimizing processing time.
- Optimize data serialization and deserialization: Data serialization and deserialization can be a bottleneck in Dataflow pipelines, so it’s important to choose an efficient data format and minimize the amount of data being transmitted between nodes.
- Use appropriate shuffle settings: Shuffling is a process in which data is moved between nodes in a distributed system. It’s important to use appropriate shuffle settings to optimize performance and avoid memory issues.
- Monitor and tune your pipeline: Dataflow provides tools for monitoring the performance of your pipeline, including monitoring data throughput, memory usage, and CPU utilization. Tuning your pipeline based on these metrics can help optimize performance and reduce processing time.
- Use the appropriate billing plan: Dataflow offers several billing plans, including pay-as-you-go and flat-rate plans. Choosing the appropriate plan depends on the nature of your workload and the level of predictability in your usage.
- Leverage Dataflow templates: Dataflow offers pre-built templates for common data processing tasks, such as streaming data analysis and ETL pipelines. These templates can be a useful starting point for building your own pipeline and can save time and effort in development.
- Secure your pipeline: Dataflow provides built-in security features, including encryption of data at rest and in transit, identity and access management, and auditing and monitoring. Ensuring the security of your pipeline is crucial for protecting sensitive data and preventing unauthorized access.
However, to understand the working and use of Data Flow services, in this blog, we will be covering the features and how to get started with this service. So, let’s begin with the features!
What are the Google Cloud Data Flow features?
Data Flow services have in-built features that make this effective and advanced. However, the features include:
1. Autoscaling of resources and dynamic work rebalancing
Data Flow services help in minimizing pipeline latency, maximizing resource utilization, and lowering processing cost per data record with data-aware resource autoscaling. Here, the data inputs are partitioned automatically and constantly rebalanced to even out worker resource utilization and lower the effect of “hotkeys” on pipeline performance.
2. Flexible scheduling and pricing for batch processing
Google Data Flow services come with flexible resource scheduling (FlexRS) that offers a lower price for batch processing to process with flexibility in job scheduling time. These flexible jobs are placed into a queue with ensuring to retrieve for execution within a six-hour window.
3. Real-time AI patterns
Dataflow’s real-time AI capabilities enable real-time reactions with near-human intelligence to large torrents of events. Using this, customers can create intelligent solutions varying from predictive analytics and anomaly detection to real-time personalization and other advanced analytics use cases.
4. Right fitting
Right fitting builds stage-defined pools of resources that are optimized for lowering resource wastage at every stage.
5. Streaming Engine
Streaming Engine is used for separating compute from state storage and travels parts of pipeline execution out of the worker VMs and into the Dataflow service back end, thus significantly improving autoscaling and data latency.
6. Horizontal autoscaling
For running a job, horizontal autoscaling enables the Dataflow service to automatically choose the suitable number of worker instances. However, during runtime to account for the characteristics of your job the Dataflow service dynamically reallocates more workers or fewer workers.
7. Vertical autoscaling
Vertical autoscaling works with horizontal autoscaling for scaling workers to best fit the needs of the pipeline.
8. Dataflow Shuffle
Service-based Dataflow Shuffle shifts the shuffle operation, used for grouping and joining data, out of the worker VMs and into the Dataflow service back end for batch pipelines. Further, the batch pipelines scale smoothly without any tuning needed into hundreds of terabytes.
9. Dataflow SQL
Dataflow SQL provides the use of SQL skills for building streaming Dataflow pipelines from the BigQuery web UI. Here, you have access to:
- Firstly, join streaming data from Pub/Sub with files in Cloud Storage or tables in BigQuery
- Secondly, write results into BigQuery
- Lastly, create real-time dashboards using Google Sheets or other BI tools.
10. Dataflow templates
Dataflow templates are used for sharing pipelines with team members and over the organization. They also take advantage of many Google-provided templates for implementing useful data processing tasks. Further, this includes Change Data Capture templates for streaming analytics use cases. And, Flex Templates, you can build a template out of any Dataflow pipeline.
11. Inline monitoring
For troubleshooting batch and streaming pipelines, dataflow inline monitoring enables you to directly access job metrics. In this, you can access monitoring charts at the step and worker level visibility. Further, you can also set alerts for conditions like stale data and high system latency.
12. Dataflow VPC Service Controls
Dataflow’s integration with VPC Service Controls offers additional security for the data processing environment by improving the ability for mitigating the risk of data exfiltration.
13. Private IPs
Turning off public IPs can help in securing your data processing infrastructure. However, you can lower the number of public IP addresses you consume against your Google Cloud project quota by not using public IP addresses for your Dataflow workers.
Now that we have covered the features of Google Cloud Data Flow services, it’s time to get started with it!
Getting Started with Data Flow
1. Using Java and Apache Maven
In this, we will learn how to set up your Google Cloud project, create a Maven project by using the Apache Beam SDK for Java, and run an example pipeline on the Dataflow service. However, before starting, get familiarity with installing and configuring both Java and Maven in your local production environment.
Getting the pipeline code
The Apache Beam SDK refers to an open-source programming model for data processing pipelines. We can define these pipelines with an Apache Beam program and can select a runner, such as Dataflow, for running the pipeline.
- Firstly, use the Maven Archetype Plugin in your shell or terminal for creating a Maven project on your computer that contains the Apache Beam SDK’s WordCount examples:

The command creates a new directory known as word-count-beam under your current directory. The word-count-beam directory consists of a simple pom.xml file and a series of example pipelines that count words in text files.
- Secondly, verify that your word-count-beam directory contains the pom.xml file:
Windows
cd word-count-beam/
dir
The output is the following:
pom.xml src
- Thirdly, verify that your Maven project contains the example pipelines:
Windows
dir src/main/java/org/apache/beam/examples/
The output is the following:
DebuggingWordCount.java WindowedWordCount.java common
MinimalWordCount.java WordCount.java
Running the pipeline locally
- Here, run the WordCount pipeline locally from your word-count-beam directory in your shell or terminal:
mvn compile exec:java \
-Dexec.mainClass=org.apache.beam.examples.WordCount \
-Dexec.args=”–output=counts”
The output files have the prefix counts and are written to the word-count-beam directory. They contain unique words from the input text and the number of occurrences of each word.
Running the pipeline on the Dataflow service
- Firstly, build and run the WordCount pipeline on the Dataflow service from your word-count-beam directory in your shell or terminal:
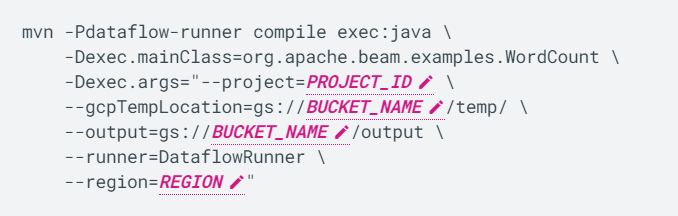
Further, replace the following:
- PROJECT_ID: your Cloud project ID
- BUCKET_NAME: the name of your Cloud Storage bucket
- REGION: a Dataflow regional endpoint, like us-central1
Viewing results
- Firstly, go to the Dataflow Jobs page in the Cloud Console for getting the details of all the available jobs, including the status.
- Secondly, go to the Cloud Storage Browser page in the Cloud Console for checking the list of all the storage buckets in your project.
- Lastly, click the storage bucket that you created for checking output files and staging files that your Dataflow job created.
2. Using Python
In this, we will learn how to use the Apache Beam SDK for Python for building a program that defines a pipeline. Then, you run the pipeline by using a direct local runner or a cloud-based runner such as Dataflow.
Getting the Apache Beam SDK
The Apache Beam SDK refers to an open-source programming model for data processing pipelines. We can define these pipelines with an Apache Beam program and can select a runner, such as Dataflow, for running the pipeline.
For downloading and installing the Apache Beam SDK:
- Firstly, verify that you are in the Python virtual environment that you built in the preceding section. Make sure that the prompt begins with <env_name>, where env_name is the name of the virtual environment.
- Secondly, install the Python wheel packaging standard:
pip install wheel
- Lastly, install the latest version of the Apache Beam SDK for Python:
pip install ‘apache-beam[gcp]’

Running the pipeline locally
Use a ready-made Python module for the wordcount example to see how a pipeline runs locally that is include with the apache_beam package.
However, the wordcount pipeline example does the following:
- Firstly, takes a text file as input.
- This file is located in a Cloud Storage bucket with the resource name gs://dataflow-samples/shakespeare/kinglear.txt.
- Secondly, parses each line into words.
- Thirdly, performs a frequency count on the tokenized words.
Then, for staging the wordcount pipeline locally:
- Firstly, run the wordcount example from your local terminal:
python -m apache_beam.examples.wordcount \
–output outputs
- Then, view the output of the pipeline:
more outputs*
- Lastly, press q to exit.
Running the pipeline on the Dataflow service
In this, we will run the wordcount example pipeline from the apache_beam package on the Dataflow service. This example defines DataflowRunner as the parameter for –runner.
- Run the pipeline:

Then, replace the following:
- DATAFLOW_REGION: this is the regional endpoint where you want to deploy the Dataflow job. For example, europe-west1
- STORAGE_BUCKET: the Cloud Storage name that you copied earlier
- PROJECT_ID: the Google Cloud project ID that you copied earlier
Viewing your results
While running a pipeline using Dataflow, your results are stored in a Cloud Storage bucket. In this, we will verify that the pipeline is running by using either the Cloud Console or the local terminal.
Cloud Console:
For viewing results in Cloud Console:
- Firstly, go to the Dataflow Jobs page in the Cloud Console for getting the details of your wordcount job, including a status of Running at first, and then Succeeded.
- Secondly, go to the Cloud Storage Browser page.
- Lastly, click the storage bucket that you created earlier from the list of buckets in your project.
Modifying the pipeline code
For modifying the pipeline so that the wordcount pipeline is not case-sensitive:
- Firstly, download the latest copy of the wordcount code from the Apache Beam GitHub repository on your local machine.
- Secondly, run the pipeline from the local terminal:
python wordcount.py –output outputs
- Thirdly, view the results:
more outputs*
- Fourthly, press q to exit.
- Now, open the wordcount.py file in an editor of your choice.
- Then, examine the pipeline steps inside the run function:

- After that, modify the line after the split to lowercase the strings:

- Next, save the file and run the modified wordcount job:
python wordcount.py –output outputs
- Then, view the results of the modified pipeline:
more outputs*
- Lastly, press q to exit.
3. Using SQL
In this, we will learn how to write SQL syntax to query a publicly available Pub/Sub topic. However, the SQL query runs a Dataflow pipeline, and the results of the pipeline are written to a BigQuery table.
Creating a BigQuery dataset
In this, the Dataflow SQL pipeline publishes a BigQuery dataset to a BigQuery table.
- Build a BigQuery dataset that is named taxirides:
bq mk taxirides
Running the pipeline
- Firstly, run a Dataflow SQL pipeline that evaluates the number of passengers per minute by using data from a publicly available Pub/Sub topic about taxi rides.
- This command also builds a BigQuery table that’s named passengers_per_minute for storing the data output.
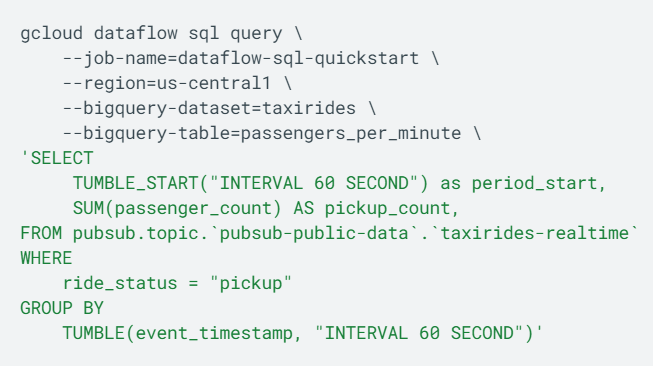
However, the following explains the values used in the Dataflow SQL pipeline:
- dataflow-sql-quickstart: the name of the Dataflow job
- us-central1: the region where the job runs
- taxirides: the name of the BigQuery dataset used as the sink
- passengers_per_minute: the name of the BigQuery table
- taxirides-realtime: the name of the Pub/Sub topic used as the source
Viewing the results
Console:
- Firstly, go to the Dataflow Jobs page in the Cloud Console.
- Secondly, click dataflow-sql-quickstart in the list of jobs.
- Thirdly, confirm that the Job status field is set to Running in the Job info panel.
- Then, confirm that every step is running in the Job graph tab.
- Next, go to the BigQuery page in the Cloud Console.
- Lastly, paste the following SQL query in the Editor and click Run:
‘SELECT *
FROM taxirides.passengers_per_minute
ORDER BY pickup_count DESC
LIMIT 5′
gcloud:
- Firstly, get the list of Dataflow jobs running in your project:
gcloud dataflow jobs list
- Then, gather more information about the dataflow-sql-quickstart job:
gcloud dataflow jobs describe JOB_ID
Here, replace JOB_ID with the job ID of the dataflow-sql-quickstart job from your project.
- Lastly, return the busiest intervals from the passengers_per_minute table:
bq query \
‘SELECT *
FROM taxirides.passengers_per_minute
ORDER BY pickup_count DESC
LIMIT 5′
4. Using templates
In this, we will learn how to create a streaming pipeline using a Google-provided Dataflow template.
Creating a BigQuery dataset and table
In this example, the name of the dataset is taxirides and the name of the table is in real-time. However, for creating this dataset and table:
- Firstly, go to the BigQuery page in the Cloud Console.
- Secondly, click more_vert View actions next to the project where you want to create the dataset, and then click Open.
- Thirdly, click create_new_folder Create dataset in the details panel.
- Then, on the Create dataset panel, follow the given steps:
- For Dataset ID, enter taxirides.
- For Data location, select United States (US). However, public datasets are stored in the US multi-region location.
- Next, leave the other default settings in place and click Create dataset.
- Now, expand your project in the Explorer panel.
- After that, click more_vert View actions available next to your taxirides dataset, and then click Open.
- Then, click add_box Create table in the details panel.
- Next, on the Create table panel, follow the given steps:
- Firstly, in the Source section, select the Empty table for creating table from.
- Secondly, in the Destination section, enter real-time for the Table name.
- Then, in the Schema section, click the Edit as text toggle and paste the following schema definition into the box:
- Ride_id:string,point_idx:integer,latitude:float,longitude:float,timestamp:timestamp, meter_reading:float,meter_increment:float,ride_status:string,passenger_count:integer
- Next, in the Partitioning and cluster settings section, select the timestamp field for Partitioning.
- Lastly, leave the other default settings in place and click Create table.
Running the pipeline
In this, we will run a streaming pipeline using the Google-provided Pub/Sub Topic to BigQuery template.
- Firstly, go to the Dataflow Jobs page in the Cloud Console.
- Secondly, click Create job from the template.
- Thirdly, enter a Job name for your Dataflow job.
- Fourthly, select the Pub/Sub Topic to BigQuery template for the Dataflow template.
- Next, for Input Pub/Sub topic, enter the following:
projects/pubsub-public-data/topics/taxirides-realtime
- Then, enter the following for the BigQuery output table:
PROJECT_ID:taxirides.realtime
Here, replace PROJECT_ID with the project ID of the project where you created your BigQuery dataset.
- After that, enter the following for Temporary location:
gs://BUCKET_NAME/temp/
Here, replace BUCKET_NAME with the name of your Cloud Storage bucket. The temp folder stores temporary files, like the staged pipeline job.
- Lastly, click Run job.
Viewing your results
For viewing the data written to your realtime table:
- Firstly, go to the BigQuery page in the Cloud Console.
- Secondly, run the following query in the query editor:
SELECT * FROM `PROJECT_ID.taxirides.realtime`
WHERE `timestamp` > TIMESTAMP_SUB(CURRENT_TIMESTAMP(), INTERVAL 1 DAY)
LIMIT 1000
Here, replace PROJECT_ID with the project ID of the project where you created your BigQuery dataset. It can take up to a minute for data to start appearing in your table.
Concluding
Above we have covered the overview, features, and steps to start using Google Cloud Data Flow. With providing support to many companies and organizations, Google Data Flow services offer serverless, fast, and cost-effective solutions. So, if you have an interest in starting using this service, go through the above information and explore more using Google documentation.
