Microsoft introduced load balancing for distributing the load across a group of backend resources or servers. Talking about Azure Load Balancer, this operates at layer 4 of the Open Systems Interconnection (OSI) model. As it is the single point of contact for clients. Moreover, the load balancer has the ability to allocate inbound flows arriving at the load balancer’s front end to backend pool instances.
Types of Load Balancers:
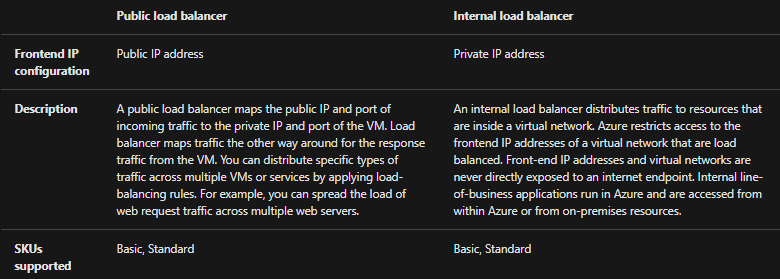
Public load balancer
- For providing outbound connections for virtual machines (VMs) inside your virtual network a public load balancer is used. These connections are achieved by translating their private IP addresses to public IP addresses. Further, Public Load Balancers are used for load balancing internet traffic to your VMs.

Internal load balancer
- An internal (or private) load balancer is used where private IPs are required at the frontend only. Internal load balancers are for load balancing traffic inside a virtual network. However, a load balancer frontend can be accessed from an on-premises network in a hybrid Structure.
Why use Azure Load Balancer?
You can scale your applications and create highly available services using Azure Load Balancer. Moreover, it supports both inbound and outbound scenarios. And, provides low latency and high throughput. Further, for all TCP and UDP applications, it can scale up to millions of flows.
Major key tasks:
- Firstly, internal and external traffic load balancing to Azure virtual machines. Increasing availability by allocating resources within and across zones.
- Secondly, configuring outbound connectivity for Azure virtual machines.
- Thirdly, using health probes to monitor load-balanced resources.
- Fourthly, enabling support for load-balancing of IPv6.
- Fifthly, a standard load balancer provides multi-dimensional metrics through Azure Monitor. Further, metrics can be filtered, grouped, and broken out for a given dimension. Moreover, they provide current and historic insights into the performance and health of your service.
- Then, using load balance services on multiple ports, multiple IP addresses, or both. And, moving internal and external load balancer resources over Azure regions.
- Lastly, load-balance TCP and UDP flow on all ports simultaneously using HA ports.
However, before moving forward you must know if Azure Load Balancer is secure or not!
Is Azure Load Balancer Secure?
It is secure by default:
- The standard load balancer is developed on the zero-trust network security model. However, it is secure by default and part of your virtual network. Where the virtual network is a private and isolated network.
- Standard load balancers and standard public IP addresses are closed for inbound connections unless opened by Network Security Groups. NSGs are used for directly permitting allowed traffic. However, if you don’t have an NSG on a subnet or NIC of your virtual machine resource, traffic isn’t allowed to reach this resource.
- Lastly, by default, the basic load balancer is open to the internet. And, the load balancer doesn’t store customer data.
What are the features of Azure Load Balancer?
- Firstly, you can create highly available and scalable applications using built-in application load balancing for cloud services and virtual machines. Azure Load Balancer supports TCP/UDP-based protocols.
- Secondly, a load balancer provides high availability and robust performance for your applications. It automatically scales with increasing application traffic.
- Thirdly, you can use the internal load balancer for traffic between virtual machines inside your private virtual networks. Further, you can also create multi-tiered hybrid applications.
- Fourthly, it helps in building highly reliable applications using the global anycast frontend. It examines the health of your application instances. Then, automatically takes unhealthy instances out of rotation and reinstates them when they become healthy again.
- Then, in this, you can use network address translation (NAT) for controlling your inbound and outbound network traffic and protect private networks.
- Lastly, load-balanced IPv6 Internet connectivity all the way to native IPv6 endpoints on your Azure virtual machines. However, Native dual-stack endpoints are for meeting regulatory requirements and addressing the fast-growing number of devices in mobile and IoT markets that are looking for connecting to Azure-based services.
Moving on to the components sections, that will help you understand the functionality of Azure Load Balancer.
Azure Load Balancer components
Components of Azure Load Balancer may be set via the Azure interface, Azure CLI, Azure PowerShell, and Resource Manager Templates.
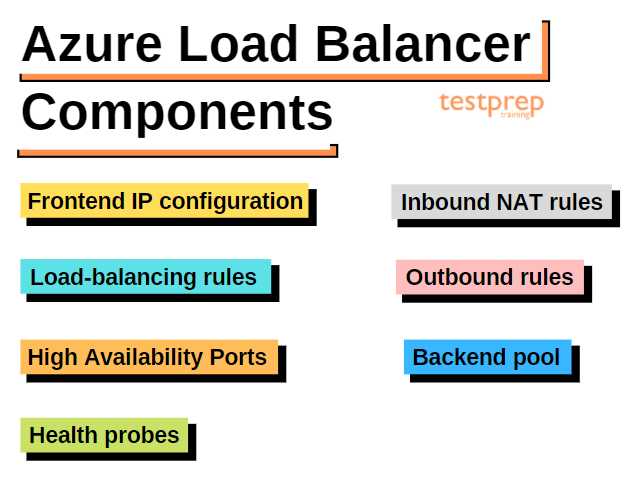
1. Frontend IP configuration
The IP address of your Azure Load Balancer is the point of contact for clients. These IP addresses can be either:
- Public IP Address
- Private IP Address
However, the nature of the IP address explains the type of load balancer created. Private IP address selection is for creating an internal load balancer. On the other hand, Public IP address selection is for creating a public load balancer.
2. Backend pool
- This defines the group of virtual machines or instances in a virtual machine scale set that is serving the incoming request. However, to scale cost-effectively for meeting high volumes of incoming traffic, computing guidelines it is recommended to add more instances to the backend pool.
- Secondly, the Load balancer instantly reconfigures itself via automatic reconfiguration when you scale instances up or down. Adding or removing VMs from the backend pool will result in the load balancer reconfiguration without additional operations. However, when considering designing your backend pool, design for the least number of individual backend pool resources for optimizing the length of management operations.
3. Health probes
A health probe is for determining the health status of the instances in the backend pool. Configure a health probe for the load balancer to use during load balancer creation. This health probe will explain if an instance is healthy and can receive traffic.
However, you can define the unhealthy threshold for your health probes. Further, the load balancer stops sending new connections to unhealthy instances when a probe fails to respond. A probe failure doesn’t affect existing connections. The connection continues until the application:
- Firstly, Ends the flow
- Secondly, Idle timeout occurs
- Lastly, The VM shuts down
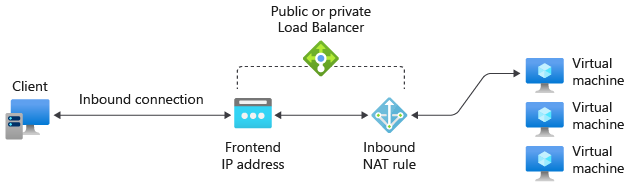
4. Load-balancing rules
A load balancer rule is for defining how incoming traffic is distributed to all the instances within the backend pool. Moreover, a load-balancing rule plans a given frontend IP configuration and port to multiple backend IP addresses and ports.
For example, using a load-balancing rule for port 80 for routing traffic from your frontend IP to port 80 of your backend instances.

5. High Availability Ports
A load balancer rule configured with ‘protocol – all and port – 0’. However, the rule enables a single rule for load-balancing all TCP and UDP flows arriving on all internal Standard Load Balancer ports.
The load-balancing decision is made per flow. However, the action depends on the following five-tuple connection:
- Firstly, the source IP address
- Secondly, the source port
- Thirdly, destination IP address
- Then, the destination port
- Lastly, protocol
However, the HA ports load-balancing rules help you with critical scenarios like high availability and scaling for network virtual appliances (NVAs) inside virtual networks.

6. Inbound NAT rules
An inbound NAT rule has the ability to forward incoming traffic sent to the frontend IP address and port combination. In this, the traffic is sent to a specific virtual machine or instance in the backend pool. Furthermore, the same hash-based distribution that is used for load balancing is used for port forwarding.
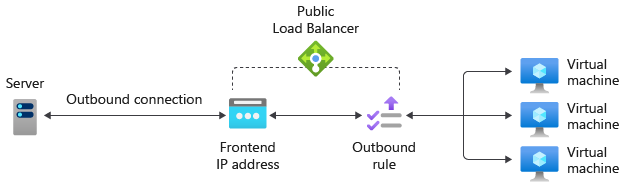
7. Outbound rules
An outbound rule is for configuring outbound Network Address Translation (NAT) for all virtual machines or instances identified by the backend pool. This rule, on the other hand, allows backend instances to communicate (outbound) with the internet or other endpoints.
Now that we have covered the features and components of the Azure load balancer, it’s time to get some familiarity with it. And, the best way to start creating a load balancer.
Creating a public load balancer for loading balance VMs using the Azure portal
Sign in to Azure
- Use the Azure portal at https://portal.azure.com for signing in.
Standard SKU
Creating a load balancer for loading balances virtual machines. However, while creating a public load balancer, you create a new public IP address with a configuration the same as the frontend for the load balancer.
- Firstly, select Create a resource.
- Secondly, in the search box, enter Load balancer. Then, select Load balancer in the search results.
- Thirdly, Select create in the load balancer page.
- Then, enter the following information on the create load balancer page
| Setting | Value |
|---|---|
| Subscription | Select your subscription. |
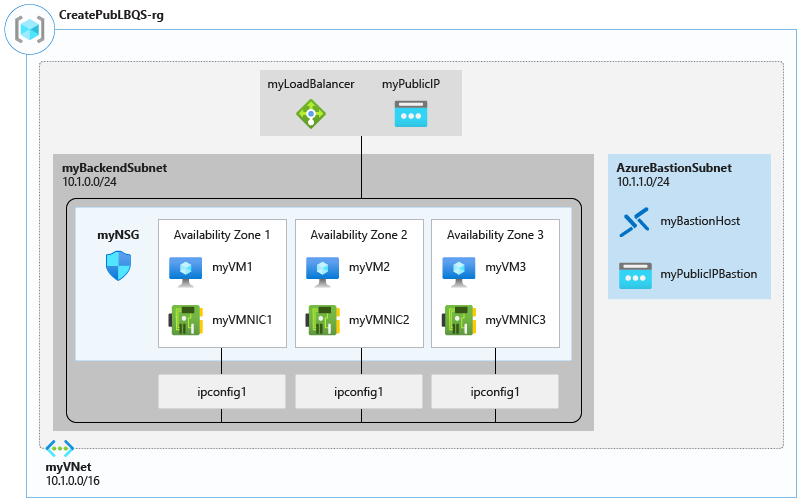
| Resource group | Select Create new and enter CreatePubLBQS-rg in the text box. |
| Name | Enter myLoadBalancer |
| Region | Select (Europe) West Europe. |
| Type | Select Public. |
| SKU | Leave the default Standard. |
| Tier | Leave the default Regional. |
| Public IP address | Select Create new. If you have an existing Public IP you would like to use, select Use existing. |
| Public IP address name | Type myPublicIP in the text box. |
| Availability zone | Select Zone-redundant to create a resilient load balancer. To create a zonal load balancer, select a specific zone from 1, 2, or 3 |
| Add a public IPv6 address | Select No. |
| Routing preference | Leave the default of Microsoft network. |
- Now, accept the defaults for the remaining settings. And then, select Review + create.
- Lastly, select create in the Review + create tab.
Create load balancer resources
1. Create a backend pool
A backend address pool contains the virtual (NICs) IP addresses connected to the load balancer. However, creating the backend address pool myBackendPool for including virtual machines for load-balancing internet traffic.
- Firstly, select All services in the left-hand menu. Then, select All resources. After that, select myLoadBalancer from the resources list.
- Secondly, select Backend pools under Settings, and then, select Add.
- Lastly, for name, type myBackendPool as the name of backend pool on the Add a backend pool page. Then, select Add.
2. Create a health probe
A health probe is used by the load balancer to examine the condition of your app. The health probe, on the other hand, can add or remove VMs from the load balancer based on how they respond to health checks. In addition, a health probe named myHealthProbe was created to monitor the health of the VMs.
- Firstly, select All services in the left-hand menu. From there, select All resources. Then, select myLoadBalancer from the resources list.
- Secondly, under Settings, select Health probes, then select Add.
| Setting | Value |
|---|---|
| Name | Enter myHealthProbe. |
| Protocol | Select HTTP. |
| Port | Enter 80. |
| Interval | Enter 15 for number of Interval in seconds between probe attempts. |
| Unhealthy threshold | Select 2 for number of Unhealthy threshold or consecutive probe failures that must occur before a VM is considered unhealthy. |
- Lastly, leave the rest of the defaults and select OK.
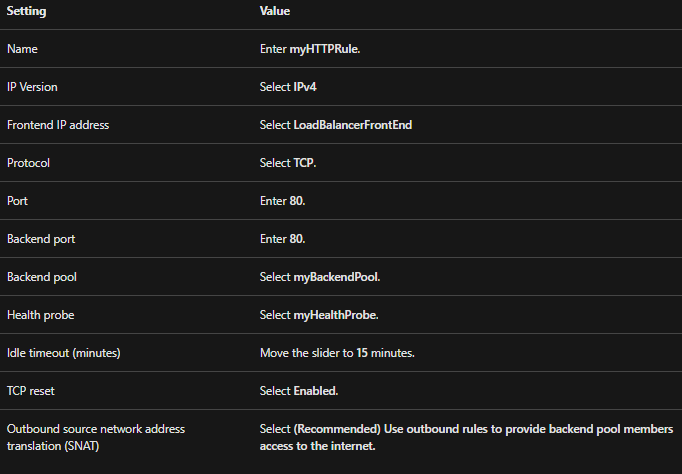
3. Create a load balancer rule
A load balancer rule specifies how traffic is allocated to virtual machines. In this, you explain the frontend IP configuration for the incoming traffic and the backend IP pool for receiving the traffic. However, the source and destination ports are defined in the rule.
- Named myHTTPRule.
- In the frontend named LoadBalancerFrontEnd.
- Listening on Port 80.
- Directs load-balanced traffic to the backend named myBackendPool on Port 80.
Creating a load balancer rule:
- Firstly, select All services in the left-hand menu. From there, select All resources. Then, from the resources list, select myLoadBalancer.
- Secondly, under Settings, select Load-balancing rules, then select Add.
- Then, use these values to configure the load-balancing rule:
- Lastly, leave the rest of the defaults. Then, select OK.
Create backend servers
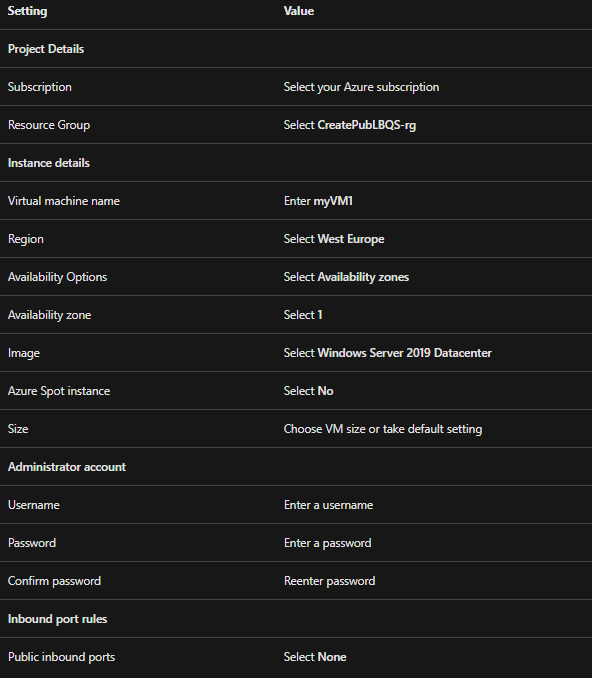
1. Create the virtual network
- Firstly, select Create a resource from the upper-left side of the screen. Then, click on Networking and select Virtual network.
- Secondly, in creating virtual networks, enter information in the Basics tab:
| Setting | Value |
|---|---|
| Project Details | |
| Subscription | Select your Azure subscription |
| Resource Group | Select CreatePubLBQS-rg |
| Instance details | |
| Name | Enter myVNet |
| Region | Select West Europe |
- Thirdly, at the bottom of the page., select the IP Addresses tab or select the Next: IP Addresses button.
- Fourthly, in the IP Addresses tab, enter this information:
- Setting
- IPv4 address space
- Value
- Enter 10.1.0.0/16
- Setting
- After that, under the Subnet name, select the word default.
- Then, in the Edit subnet, enter this information:
| Setting | Value |
|---|---|
| Subnet name | Enter myBackendSubnet |
| Subnet address range | Enter 10.1.0.0/24 |
- After that, select Save.
- Now, select the Security tab.
- Then, under BastionHost, select Enable. Enter this information:
| Setting | Value |
|---|---|
| Bastion name | Enter myBastionHost |
| AzureBastionSubnet address space | Enter 10.1.1.0/24 |
| Public IP Address | Select Create new. For Name, enter myBastionIP. Select OK. |
- Now, select the Review + create a tab or select the Review + create button.
- Lastly, select Create.
2. Create virtual machines
In this, we will be creating three VMs in three different zones. However, these VMs are added to the backend pool of the load balancer created earlier.
- Firstly, on the upper-left side of the portal, select Create a resource. Then, choose to Compute and select Virtual machine.
- Secondly, in Create a virtual machine, type or select the values in the Basics tab:
- Thirdly, select the Networking tab, or select Next: Disks, then Next: Networking.
- After that, in the Networking tab, select or enter:
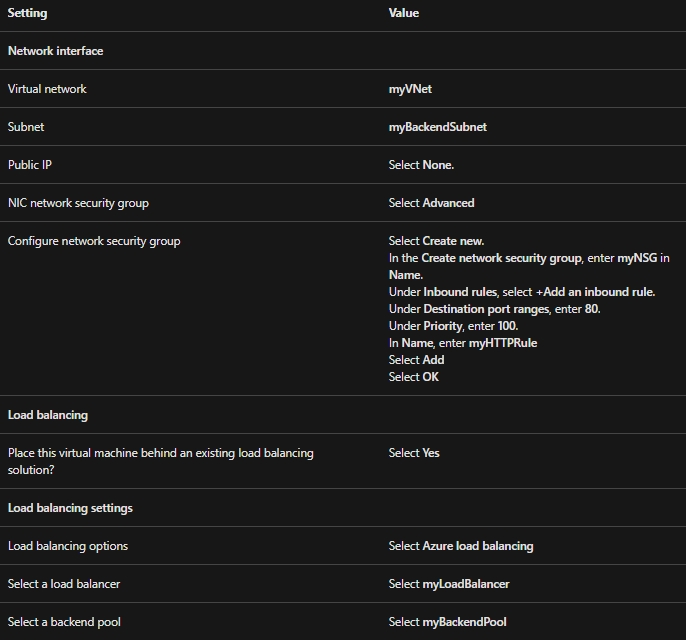
- Then, select the Management tab, or select Next > Management.
- Now, in the Management tab, select or enter:
| Setting | Value |
|---|---|
| Monitoring | |
| Boot diagnostics | Select Off |
- After that, select Review + create.
- Next, review the settings, and then select Create.
- Lastly, follow steps 1 to 8 for creating two additional VMs with the following values. However, all the other settings the same as myVM1:
| Setting | VM 2 | VM 3 |
|---|---|---|
| Name | myVM2 | myVM3 |
| Availability zone | 2 | 3 |
| Network security group | Select the existing myNSG | Select the existing myNSG |
Create outbound rule configuration
Load balancer outbound rules are for configuring outbound SNAT for VMs in the backend pool.
1. Create outbound rule
- Firstly, select All services in the left-hand menu. From there, select All resources. Then, from the resources list, select myLoadBalancer.
- Secondly, under Settings, select Outbound rules, then select Add.
- Thirdly, use these values for configuring the outbound rules:
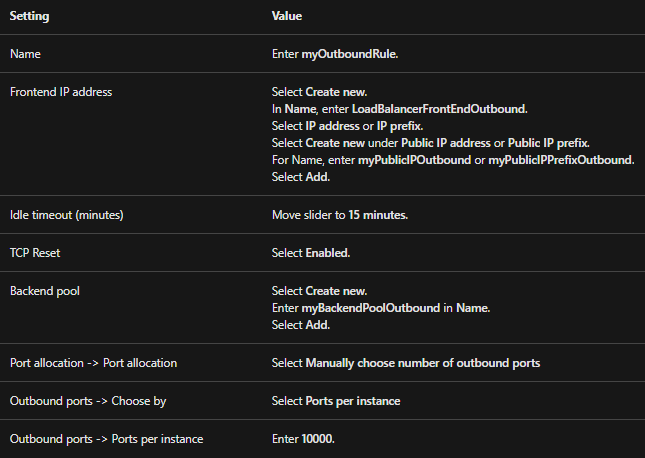
- Lastly, select Add.
2. Adding virtual machines to outbound pool
- Firstly, select All services in the left-hand menu. From there, select All resources. Then, from the resources list, select myLoadBalancer.
- Secondly, under Settings, select Backend pools.
- Thirdly, select myBackendPoolOutbound.
- Then, in the Virtual network, select myVNet.
- After that, in Virtual machines, select + Add.
- Now, tick the boxes next to myVM1, myVM2, and myVM3.
- Then, select Add.
- Lastly, select Save.
Install IIS
- Firstly, select All services in the left-hand menu. From there, select All resources. Then, select myVM1 from the resources list that is located in the CreatePubLBQS-rg resource group.
- Secondly, on the Overview page, select Connect, then Bastion.
- Thirdly, enter the username and password that were entered while creating VM.
- Fourthly, select Connect.
- Now, on the server desktop, navigate to Windows Administrative Tools > Windows PowerShell.
- Then, in the PowerShell Window, run the following commands to:
- Firstly, installing the IIS server
- Secondly, removing the default iisstart.htm file
- Lastly, adding a new iisstart.htm file that displays the name of the VM:
PowerShell:
# install IIS server role
Install-WindowsFeature -name Web-Server -IncludeManagementTools
# remove default htm file
remove-item C:\inetpub\wwwroot\iisstart.htm
# Add a new htm file that displays the server name
Add-Content -Path “C:\inetpub\wwwroot\iisstart.htm” -Value $(“Hello World from ” + $env:computername)
- After that, close the Bastion session with myVM1.
- Lastly, repeat steps 1 to 6 to install IIS and the updated iisstart.htm file on myVM2 and myVM3.

Testing the load balancer
- Firstly, find the public IP address for the load balancer on the Overview screen. After that, select All services in the left-hand menu, and from there, select All resources. Then, select myPublicIP.
- Now, copy and paste the public IP address in the address bar of your browser. Then, the default page of the IIS Web server is displayed on the browser.
- Further, for seeing the load balancer distributed traffic over all three VMs, you can customize the default page of each VM’s IIS Web server. And then, refresh your web browser from the client machine.
For cleaning up resources:
- However, if you want to delete the resource group, load Balancer, and all related resources. Just, select the resource group CreatePubLBQS-rg containing the resources and then select Delete.
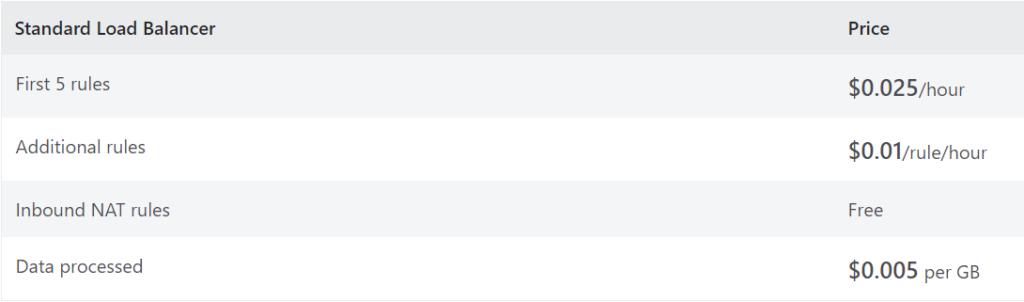
Check out the Azure load balancing pricing and get started with it.
What is Load Balancing pricing?
Azure Load Balancer is a network load balancer that gives access to build highly scalable and highly available applications. You only pay for what you use with Azure Standard Load Balancer.
Want to quick start with Azure Load Balancer? Here it is!
 Firstly, by signing up for a free Azure account get started with 750 hours free of Load Balancer Standard tier, plus a ₹14,500 credit.
 Secondly, learn and understand the process of using Load Balancer using the documentation.
 Lastly, enhance Load Balancer with additional features and products such as security and backup services.
Final Words
Above we learned about the Azure load balancer and how it is delivering high availability and network performance for your applications. Additionally, the Azure load balancer offers the potential to immediately expand your applications and improve application dependability through health checks. As a result, top companies globally have chosen Azure load balancer with getting better security in addition. Lastly, go through the blog and get familiar with the load balancer using Microsoft documentation. I hope you get to benefit from all the above information to begin your journey with Azure.