Microsoft Azure has made it easy for getting cloud-hosted pipelines for Linux, macOS, and Windows as well as for creating web, desktop, and mobile applications. That is to say, with providing Azure Pipelines service, it is now simple to deploy to any cloud or on‑premises. This can continuously create, test, and deploy to any platform and cloud. Azure Pipelines is now used by many top organizations for providing solutions.
However, to learn why this service is in demand, let’s check out the overview, uses, features, and other areas to get started with Azure Pipeline.
What are Azure Pipelines?
Azure Pipelines have the ability for creating and testing code projects automatically for making them available to others. This is compatible with any language or project type. Moreover, Azure Pipelines integrates continuous integration (CI) and continuous delivery (CD) for testing, building code, and then delivering it to any target.
Continuous Integration (CI):
This can be considered as the practice used by development teams for automating merging and testing code. However, implementing CI helps in catching bugs early in the development cycle in order to make them less expensive to fix. Further, automated tests execute as part of the CI process for ensuring quality. And, artifacts are created from CI systems and fed for releasing processes to drive frequent deployments.
Continuous Delivery (CD):
This can be referred to as a process by which code is created, tested, and deployed to one or more test and production environments. However, deploying and testing in multiple environments expands the quality. And, CI systems create deployable artifacts, including infrastructure and apps. Further, automated release processes use these artifacts for releasing new versions and fixes to existing systems.
Uses of Azure Pipeline
- Firstly, using Azure Pipelines, you can create, test and deploy Node.js, PHP, Ruby, C/C++, .NET, Python, Java, Android, and iOS apps. Moreover, you can run in parallel on Linux, macOS, and Windows.
- Secondly, this service makes it easy to create and push images to container registries like Docker Hub and Azure Container Registry. Thirdly, using this you can explore and implement a large range of community-built build, test, and deployment tasks with having the support of hundreds of extensions from Slack to SonarCloud.
- Fourthly, this can implement continuous delivery (CD) of your software to any cloud. This can be Azure, AWS, and GCP. So, you can easily visualize deployment to any number of interdependent stages.
- Azure Pipeline provides quick continuous integration/continuous delivery (CI/CD) pipelines for open source projects.
- Lastly, this helps in easily build chaining and multi-phased builds with have the support for YAML, test integration, release gates, reporting, and more.
What are the features of the Azure Pipeline?
Some of the top-rated features of Azure Pipelines are:
1. Linux, macOS, and Windows agent
In Azure Pipelines, you can easily simplify the management of hardware and VMs using Microsoft cloud-hosted agents. Moreover, it provides complete CI/CD pipeline support for every major platform and tool.
2. Powerful workflows with native container support
In this, you will get lightning-fast builds with parallel jobs and test execution. Moreover, you can make use of container jobs for creating consistent builds with the required tools. Further, you can also build new containers with ease and push them to any registry.
3. Flexible deployments to Kubernetes, serverless or VMs
In Azure Pipelines, you can easily deploy to Kubernetes, VMs, Azure Functions, Azure Web Apps, or any cloud. Moreover, you can create a deployment strategy that is right for you and ensures quality at every step using stages, gates, and approvals. And, you can also deploy from other CI systems such as Jenkins.
Getting started with Azure Pipelines
1. Defining pipelines using YAML syntax
We can specify the pipeline in a YAML file called azure-pipelines.yml using the rest of your app.

- Firstly, the pipeline is versioned with your code and follows the same branching structure. However, you get validation of your modifications through code reviews in pull requests and branch build policies.
- Secondly, each branch you use can modify the building policy by changing the azure-pipelines.yml file.
- Lastly, modification to the build process might cause a break or result in an unexpected outcome. However, you can more easily identify the issue because the change is in version control with the rest of your codebase.
Follow the below steps:
- Firstly, configure Azure Pipelines for using your Git repo.
- Secondly, edit your azure-pipelines.yml file for defining your build.
- Lastly, push your code to your version control repository. This will check out the default trigger for building, deploying, and then monitoring the results.
2. Defining pipelines using the Classic interface
In this, we will build and configure pipelines in the Azure DevOps web portal with the Classic user interface editor. However, specify a build pipeline for building, testing code, and then publish artifacts. And, also define a release pipeline for consuming and deploying those artifacts to deployment targets.

Follow the below steps:
- Firstly, configure Azure Pipelines for using your Git repo.
- Secondly, use the Azure Pipelines classic editor for creating and configuring your build and release pipelines.
- Lastly, push your code to your version control repository. This triggers your pipeline and runs tasks like creating or testing code.

3. Create your first pipeline
In this, we will use Azure Pipelines for building a GitHub repository. As an example, we will be creating a pipeline using Java.
Java
- Firstly, sign in to your Azure DevOps organization. Then, navigate to your project.
- Secondly, navigate to the Pipelines page in your project. Then, select the action for creating a new pipeline.
- Thirdly, go through the steps of the wizard by first choosing GitHub as the location of your source code.
- Now, you may be redirected to GitHub for signing in. Here, enter your GitHub credentials.
- Then, select your desired sample app repository when the list of repositories appears.
- After that, Azure Pipelines will examine your repository and recommend a Maven pipeline template. Just, select Save and run. And, then, choose to Commit directly to the main branch, and select Save and run again.
- Lastly, a new run is started.
4. Adding a status badge to your repository
Developers often display their code quality high by showing a status badge in their repo.
For copying the status badge to your clipboard:
- Firstly, go to the Pipelines page to view the list of pipelines in Azure Pipelines. Then, choose the pipeline you created in the previous section.
- Secondly, select the Status badge in the context menu for the pipeline.
- Lastly, from the status badge panel copy the sample Markdown.
Now with the badge Markdown in your clipboard, follow the below steps in GitHub:
- Firstly, go to the list of files and select Readme.md. Then, for editing, choose the pencil icon.
- Secondly, at the beginning of the file paste the status badge Markdown.
- After that, commit the modifications to the master branch.
- Lastly, observe that the status badge appears in the description of your repository.
For configuring anonymous access to badges for private projects:
- Firstly, navigate to Project Settings
- Then, open the Settings tab under Pipelines
- Lastly, under General toggle the Disable anonymous access to badges slider.
5. Managing your pipeline with Azure CLI
Using the pipelines commands provided below, you can manage the pipelines in your organization:
- Firstly, az pipelines run: Running an existing pipeline
- Then, az pipelines update: Updating an existing pipeline
- Lastly, az pipelines show: Displaying the details of an existing pipeline
However, these commands need either the name or ID of the pipeline you want to manage. And, use the az pipelines list command for getting the ID of a pipeline.
1. Running a pipeline
Use the az pipelines run command for queuing (run) an existing pipeline.
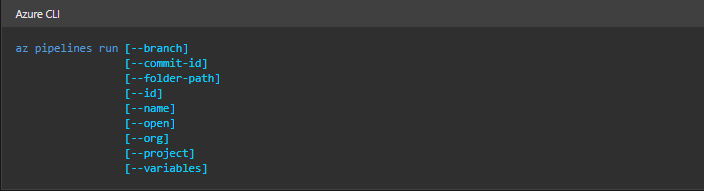
For example:
The command runs the pipeline named myGithubname.pipelines-java in the branch pipeline.
Azure CLI
az pipelines run --name myGithubname.pipelines-java --branch pipeline --output table

Run ID    Number      Status      Result    Pipeline ID    Pipeline Name                Source Branch    Queued Time               Reason
--------  ----------  ----------  --------  -------------  --------------------------- ---------------  --------------------------  --------
123       20200123.2  notStarted            12             myGithubname.pipelines-java  pipeline           2020-01-23 11:55:56.633450  manual
2. Updating a pipeline
Use the az pipelines update command for updating an existing pipeline.
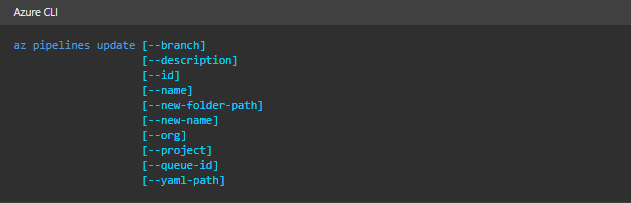
For example:
The command updates the pipeline with the ID of 12 with a new name.
Azure CLI
az pipelines update --id 12 --description "rename pipeline" --new-name updatedname.pipelines-java --output table

ID    Name                        Status    Default Queue
----  --------------------------  --------  ------------------
12    updatedname.pipelines-java  enabled   Hosted Ubuntu 1604
3. Displaying pipeline
Use the az pipelines show command for viewing the details of an existing pipeline.
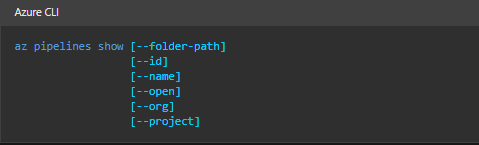
For example:
The command displays the details of the pipeline with the ID of 12.
Azure CLI
az pipelines show --id 12 --output table

ID    Name                        Status    Default Queue
----  --------------------------  --------  ------------------
12    updatedname.pipelines-java  enabled   Hosted Ubuntu 1604
Azure Pipelines Pricing
The pricing for Azure Pipelines provides one free Microsoft-hosted CI/CD and one free Self-Hosted CI/CD. In which for 1 Microsoft-hosted job, you will get 1,800 minutes per month for CI/CD and one self-hosted job with unlimited minutes per month. And, you have to pay ₹2,881.82 per extra Microsoft-hosted CI/CD parallel job and ₹1,080.68 per extra self-hosted CI/CD parallel job with unlimited minutes. Click here for more pricing details.
Summarizing:
To have a quick revision, let’s summarize the major qualities of Azure Pipelines that makes it worth are:
- Firstly, this can operate with any language or platform
- Secondly, you can deploy to different types of targets at the same time.
- Thirdly, you will get the option to combine with Azure deployments. And, it builds on Windows, Linux, or Mac machines
- Lastly, you can easily integrate with GitHub and also works with open-source projects.
Final Words
Above we have understood the concepts, features, and steps to get started with Azure Pipelines. This service comes with CI and CD to ensure consistent and quality code. Moreover, it offers a fast, easy, and safe way for automating building your projects and making them available to users. So, if you have interest and want to get started with this, just go through the above provide details and starting learning by taking help from Microsoft documentation as a reference.
