AWS CloudShell refers to a browser-based shell that can be accessed from the AWS Management Console. This helps in securely managing and interacting with your AWS resources. But, there is so much more to know about this service.
So, in this blog, we will take a look at the overview of AWS CloudShell service, features, and how to get started with this service.
What is AWS CloudShell?
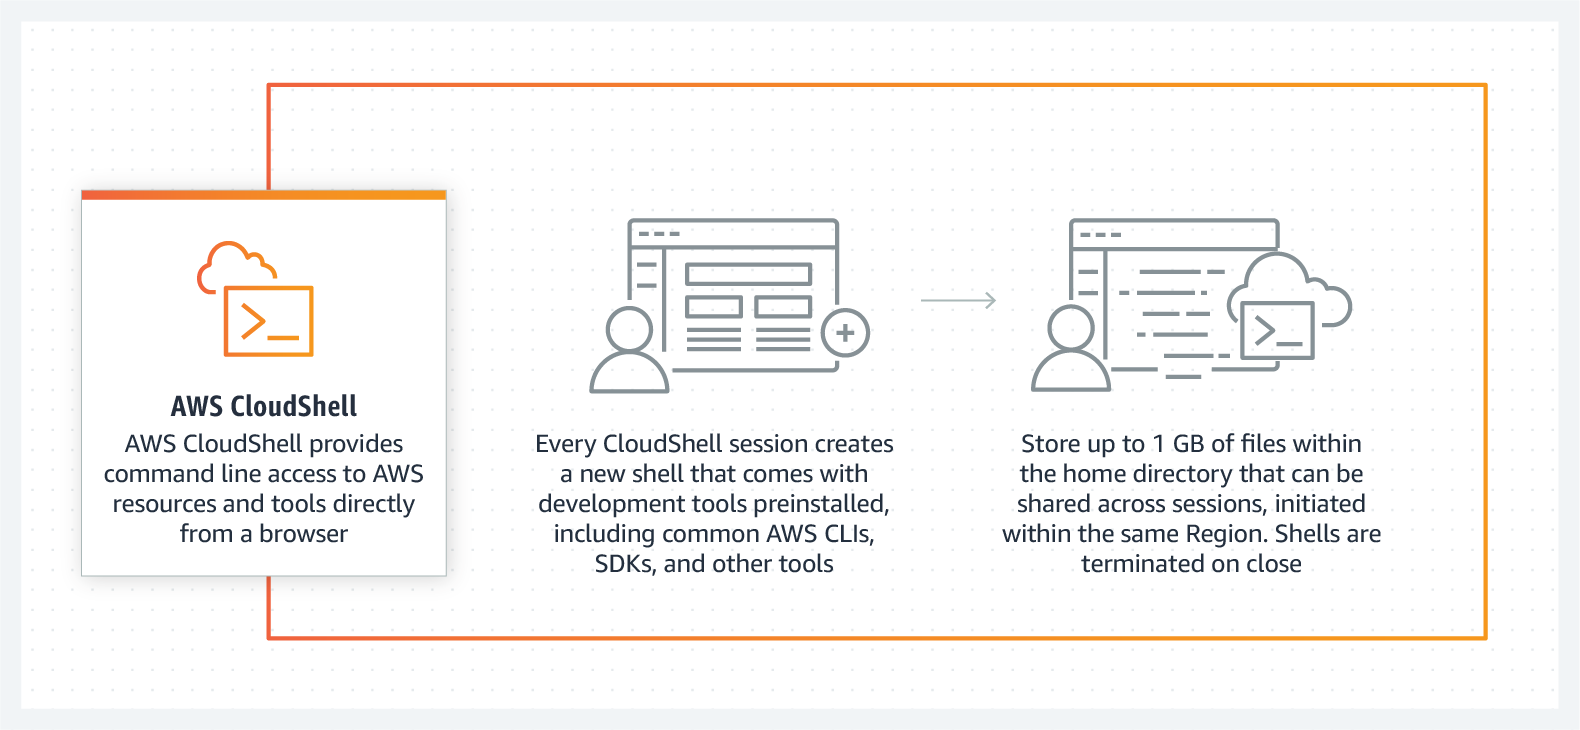
AWS CloudShell help in managing, securing, exploring, and interacting with your AWS resources. This is pre-authenticated with console credentials in which the Common Development and operations tools are pre-installed. That is to say, there is no need for local installation or configuration. Moreover, using CloudShell, you can instantly:
- Firstly, run scripts with the AWS Command Line Interface (AWS CLI)
- Secondly, validate and experiment with AWS service APIs using the AWS SDKs
- Lastly, use a range of other tools to be productive.
Further, this browser-based shell service is available from the AWS Management Console. After logging into the Management Console, you can start a CloudShell session that gives immediate access to customers to experience an Amazon Linux 2 environment with the AWS Command Line Interface (CLI) which is pre-installed and pre-authenticated.
You must know that the AWS CloudShell can be started from any supported AWS Region with just one click. Moreover, you can perform files uploading and downloading up to 1GB to your CloudShell home directory ($HOME) and files, scripts, and tools saved in $HOME will persist between sessions.
Benefits of AWS CloudShell:
- Firstly, there are no extra charges needed for managing credentials. CloudShell takes over the credentials of the user signed in to the AWS Management Console.
- Secondly, this service provides users a fully managed Amazon Linux 2 environment with upgraded versions of popular tools. These tools are already installed. Moreover, you don’t require for patching the environment or updating the pre-installed tools.
- Thirdly, it provides a browser-based shell for running scripts and commands. Moreover, it includes 1 GB of persistent storage per Region with no extra cost. And, you only pay for the AWS resources you use with CloudShell for creating and running your applications.
- Lastly, with 1 GB of persistent storage per Region, you can store:
- scripts
- files
- configuration preferences
- additional tools in your home directory.
Working of CloudShell:
AWS CloudShell features:
There are various features of AWS CloudShell that make this service usable globally. Let’s learn about them.
1. AWS Command Line Interface
While launching AWS CloudShell from the AWS Management Console, the AWS credentials automatically get available in a new shell session which used to sign in to the console. However, this pre-authentication of AWS CloudShell users allows for skipping the configuration of credentials when interacting with AWS services using AWS CLI version 2.
2. Shells and development tools
The shell created for AWS CloudShell sessions can be switched smoothly between your preferred command-line shells. Moreover, you can also switch between Bash, PowerShell, and Z shell with having access to pre-installed tools and utilities like
- git
- make
- pip
- sudo
- tar
- tmux
- vim
- wget
- zip.
Further, the shell environment is pre-configured with support for leading software languages. Thus, enabling you for running Node.js and Python projects.
3. Persistent storage
AWS CloudShell will provide persistent storage of 1 GB for each AWS Region at no additional cost. The persistent storage private and is located in your home directory ($HOME).
4. Security
Specific security mechanisms protect the AWS CloudShell environment and its users, including:
1. Permissions management with IAM
Administrators have access to grant and deny permissions to AWS CloudShell users using IAM policies. They may also set policies that specify the specific activities that those users can execute with the shell environment on a granular level.
2. Shell session management
Inactive and long-running sessions automatically stop and then, recycle.
3. Safe Paste for text input
Safe Paste is a security feature that prompts you to confirm that the multiline text you’re copying into the shell doesn’t include harmful scripts by default.
5. Customization options
You may customise the AWS CloudShell by modifying screen layouts (many tabs), font sizes, and interface styles (light/dark).
6. Familiar tools
CloudShell runs on Amazon Linux 2 and consists of common AWS command-line interfaces. This also includes:
- AWS CLI
- Amazon Elastic Container Service (Amazon ECS) CLI
- AWS Serverless Application Model (AWS SAM) CLI
- Runtimes and AWS SDKs for Python and Node.js.
- Command-line utilities for shells
7. Automatically manages your credentials
CloudShell takes over the credentials of the user who is signed in to the AWS Management Console. This makes authentication easier and reduces the operational load by removing the need for configuring and managing credentials locally.
8. Fully managed and up-to-date
CloudShell is fully managed that consists of the latest security patches and updated versions of the operating system and the installed tools. This lets you can focus on building and managing your AWS resources.
After covering the overview and features of AWS CloudShell, let’s understand the process of getting started with CloudShell.
Getting started with AWS CloudShell
In this section, we will learn the process of launching AWS CloudShell and performing key tasks using the shell command-line interface.
Prerequisites
IAM permissions
The simples way for obtaining permissions for AWS CloudShell is to attach the following AWS managed policy to your IAM identity (user, role, or group):
AWSCloudShellFullAccess:
This provides users with full access to AWS CloudShell and its features.
Here, you will also get interacted with AWS services. So your IAM identity needs a policy that grants, at a minimum, the s3:CreateBucket, and s3:PutObject permissions.
Exercise file:
This exercise also involves uploading and editing a file that will run as a program from the command line interface. However, open a text editor on your local machine and add the following code snippet:
import sys
x=int(sys.argv[1])
y=int(sys.argv[2])
sum=x+y
print(“The sum is”,sum)
Then, save the file with the name add_prog.py.
Step 1: Signing in to AWS Management Console
You can have access to the AWS Management Console by using an IAM user’s sign-in URL or going to the main sign-in page.
IAM user sign-in URL
- Firstly, open a browser and enter the following sign-in URL. There replace account_alias_or_id with the account alias or account ID provided by your administrator:
- ‘https://account_alias_or_id.signin.aws.amazon.com/console/’
- Then, enter the IAM user name and password and choose Sign in.

Step 2: Launching AWS CloudShell, selecting a Region, and choosing a shell.
- Firstly, from the AWS Management Console, you can launch AWS CloudShell by selecting the following options available on the navigation bar:
- Select the AWS CloudShell icon.
- Then, in the Search box start typing “cloudshell”. Then, choose the CloudShell option.
- However, when AWS CloudShell launches in a new browser window for the first time. Then, a welcome panel shows and lists key features. After closing this panel, status updates are provided while the shell configures and forwards your console credentials. And, when the command prompt shows, the shell is ready for interaction.
- Secondly, for choosing an AWS Region to work in, open the Select a Region menu and then, select a supported AWS Region to work in.
- Lastly, for choosing a pre-installed shell to work with, just enter its program name at the command line prompt:
Bash
bash
Here, if you switch to Bash, then, the symbol at the command prompt updates to $.
PowerShell
pwsh
Here, if you switch to PowerShell, then, the symbol at the command prompt updates to PS>.
Z shell
zsh
Here, if you switch to Z shell, then, the symbol at the command prompt updates to %.
Step 3: Uploading a file to AWS CloudShell
This step explains the process of uploading a file and then moving it to a new directory in your home directory.
- Firstly, for checking the current working directory, at the prompt enter the following command:
- pwd
- After pressing Enter, the shell returns your current working directory. For example, /home/cloudshell-user.
- pwd
- Secondly, for uploading a file to this directory, go to Actions. Then, from the menu select the Upload file.
- Upload file dialog box shows.
- Thirdly, select Browse.
- Fourthly, select the text file you created (add_prog.py) in your system’s File Upload dialog box. Then, choose Open.
- After that, choose Upload in the Upload file dialog box.
- Here, a progress bar tracks the upload. However, if the upload is successful, then, a confirmation message displays that add_prog.py was added to the root of your home directory.
- Now, enter the make directories command: mkdir mysub_dir for creating a directory for the file.
- Then, for moving the uploaded file from the root of your home directory to the new directory, use the mv command:
- mv add_prog.py mysub_dir.
- Next, enter cd mysub_dir for changing your working directory to the new directory.
- Here, the command prompts updates for indicating that you’ve changed your working directory.
- Lastly, enter the ls command for viewing the contents of the current directory, mysub_dir.
Step 4: Editing file’s code and running it from the command line
In this step, we will learn how to use the pre-installed Vim editor for working with a file.
- Firstly, enter the following command for editing the file you uploaded in the previous step:
- vim add_prog.py
- Secondly, for editing the file in Vim, press the I key. Now edit the contents for the program to add up three numbers instead of two:
import sys
x=int(sys.argv[1])
y=int(sys.argv[2])
z=int(sys.argv[3])
sum=x+y+z
print(“The sum is”,sum)
- After editing the program, press Esc for entering the Vim command mode. Then, for saving the file and exiting the editor enter the following command:
- :wq
- Lastly, back in the main command-line interface, run the program and define three numbers for input:
- python3 add_prog.py 4 5 6
- Then, the command line shows the program output: The sum is 15.
- python3 add_prog.py 4 5 6
Step 5: Using AWS CLI for adding the file as an object in an Amazon S3 bucket.
In this step, you create an Amazon S3 bucket and then use the PutObject method for adding a code file as an object in that bucket.
- Firstly, enter the following command for creating a bucket in a specified AWS Region:
- aws s3api create-bucket –bucket insert-unique-bucket-name-here –region us-east-1
- However, if the call is successful. Then, the command line shows a response from the service similar to the following output:
{
“Location”: “/insert-unique-bucket-name-here”
}
- Secondly, call the PutObject method for uploading a file and adding it as an object to the bucket that was just created:
- aws s3api put-object –bucket insert-unique-bucket-name-here –key add_prog –body add_prog.py
- However, if the object is uploaded successfully to the Amazon S3 bucket, then, the command line shows a response from the service similar to the following output:
{
“ETag”: “\”ab123c1:w:wad4a567d8bfd9a1234ebeea56\””
}
The ETag refers to the hash of the object that’s been stored. It can be used for checking the integrity of the object uploaded to Amazon S3
AWS CloudShell pricing
For AWS CloudShell there are no additional charges. In this, you will only for other AWS resources you use with CloudShell for creating and running your applications. In addition, there are no minimum fees and no need for upfront commitments. Further, the Data transfer is billed at standard AWS data transfer rates.
Final Words
Above we have covered the overview, features, benefits, and how to get started with the AWS CloudShell. This browser-based shell service makes it simple to manage, interact, and explore the AWS resources using the pre-installed common tools and AWS CLIs. Moreover, it includes 1 GB of persistent storage per Region with no extra cost. And, you only pay for the AWS resources you use with CloudShell for creating and running your applications. So, go through the blog to understand the overall working of AWS CloudShell by taking help from AWS documentation and other resources.