Using Data Operations with Power Automate
Compose, join, select, filter arrays, construct tables, and parse JSON are just a few of the typical data operations covered in Power Automate.
Power Automate (formerly known as Microsoft Flow) is a cloud-based service that allows you to create automated workflows between different applications and services. Power Automate provides a wide range of connectors and triggers that enable you to connect to various data sources and perform data operations, such as creating, updating, and deleting records.
To use data operations with Power Automate, you first need to create a new flow and select the appropriate trigger, which could be a new record created in a Dynamics 365 entity, a new email received in Outlook, or a new file added to OneDrive for Business. You can then add one or more actions to the flow, such as creating a new record in a SharePoint list, sending an email, or updating a record in a SQL Server database.
When you design flows, you may use these operations to alter data. The following are some of the requirements for using these operations:
- Access to Power Automate.
- A tool such as PostMan to send HTTP POST requests with a JSON array to your flow.
Data Operations
Power Automate provides several data operations that you can use to manipulate data within a flow, including:
- Create a record: This action allows you to create a new record in a data source, such as a SharePoint list, Dynamics 365 entity, or Salesforce object. You can specify the values for each field in the record, and Power Automate will automatically create the record in the data source.
- Get a record: This action allows you to retrieve a record from a data source based on a specific criteria, such as the record ID or a field value. You can then use the record data in subsequent actions.
- Update a record: This action allows you to update an existing record in a data source. You can specify the field values to update, and Power Automate will automatically update the record in the data source.
- Delete a record: This action allows you to delete an existing record from a data source. You can specify the record ID or other criteria to identify the record to delete.
Compose Action
We use the data operation Compose action to save you from having to enter the same data multiple times as you’re designing a cloud flow. While designing your flow, you’ll need to enter an array of digits—[0,1,2,3,4,5,6,7,8,9]—several times. To save the array, use the compose operation, as shown in the following procedure:
- Search for Compose, and then select the Data Operation – Compose action.
- In the Inputs box, enter the array that you want to reference later.
- Then in order to access the contents of the compose action use the following steps –
- Add an action, such as Data Operation – Join.
- Select the control to which you’d like to add the contents you saved in the compose action.
- The Add dynamic content from the apps and connectors used in this flow screen opens.
- On the Dynamic content tab, in the Compose section, select Outputs.
Join Action
To delimit an array with the separator of your choice, use the Data Operation – Join operation. Your flow, for example, gets a web request with the following email addresses: [“[email protected]”, “[email protected]”, “[email protected]”]. Your email application, on the other hand, expects addresses to be structured as a single string separated by semicolons. Follow these steps to transform the comma delimiter (,) to a semicolon (;) using the Data Operation – Join Action:
- Add a new action, search for Join, and then select Data Operation – Join.
- In the From box, enter the array, and in the Join with box, enter a semicolon (;).
- Save your flow, and then run it
- After your flow runs, the output of the Data Operation – Join action will be a string with the addresses joined by semicolons
Select Action
To change the shape of objects in an array, use the Data Operation – Select action. Each item in an array, for example, can have elements added, removed, or renamed.
Data enters your flow in this example via a web request with the following format:
JSON
[ { "first": "Eugenia", "last": "Lopez" }, { "first": "Elizabeth", "last": "Moore" } ]You want to reshape the incoming data by changing the first and last members to FirstName and FamilyName, respectively, and adding a new member entitled FullName that combines the first and last names (separated with a space).
JSON
[ { "FirstName": "Eugenia", "FamilyName": "Lopez", "FullName": "Eugenia Lopez" }, { "FirstName": "Elizabeth", "FamilyName": "Moore", "FullName": "Elizabeth Moore" } ]To do:
- Add the When an HTTP request is received trigger to your flow.
- Select Use sample payload to generate schema.
- In the box that appears, paste a sample of your source data array, and then select Done.
- Add the Data Operation – Select action, and then configure it as shown in the following image.
Filter Array Action
To decrease the number of items in an array to a subset that satisfies the criteria you supply, we utilise the Data Operation – Filter array action.
You use the filter array action on this array in this example:
JSON
[ { "first": "Eugenia", "last": "Lopez" }, { "first": "Elizabeth", "last": "Moore" } ]to make a new array with just objects in it, with Eugenia as the first.
- Find, and then add, the Filter array action to your flow.
- Configure the filter array action
- Save, and then run your flow.
We can use PostMan to generate a web request that sends a JSON array to your flow.
Create CSV Table Action
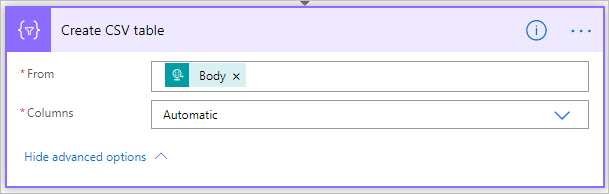
To convert a JSON array into a comma-separated value (CSV) table, use the Data Operation – Create CSV table action. The headers can be kept visible in the CSV output. In this example, you’ll create a CSV table using the following array:
JSON
[ { "first": "Eugenia", "last": "Lopez" }, { "first": "Elizabeth", "last": "Moore" } ]- Find the Data Operation – Create CSV table action, add it, and then configure it to look like this. The Body token in this example comes from the When an HTTP request is received action
- however, you may retrieve the input for the Create CSV table action from the output of any previous action in your flow, or you can type it into the From box directly.
- Save, and then run, your flow.
Create HTML Table Action
We use the Data Operation, Create HTML table action to change a JSON array input into an HTML table. Moreover, we can keep the headers visible in the HTML output.

PL-900 Exam Practice Questions
Question: You have a list of customer names and email addresses in an Excel file, and you need to send an email to each customer with a personalized message. Which data operation action would you use in Power Automate to accomplish this?
A) Get file content
B) Parse JSON
C) Parse CSV
D) Apply to each
Answer: d) Apply to each
Explanation: The Apply to each action in Power Automate allows you to perform a set of actions for each item in a list. In this case, you can use the Apply to each action to iterate through the list of customer names and email addresses and send a personalized email to each customer.
Question: You have a SharePoint list that contains a column with a date and time value, and you want to send a reminder email to a user 24 hours before the date and time value in the column. Which data operation action would you use in Power Automate to accomplish this?
A) Filter array
B) Select
C) Add days to time
D) Condition
Answer: d) Condition
Explanation: The Condition action in Power Automate allows you to check if a certain condition is true or false. In this case, you can use the Condition action to check if the current time is 24 hours before the date and time value in the SharePoint list column. If the condition is true, you can then send the reminder email.
Question: You have a CSV file that contains a list of product IDs and their corresponding prices, and you need to calculate the total price of an order based on the list of product IDs and quantities provided by the user. Which data operation action would you use in Power Automate to accomplish this?
A) Filter array
B) Parse CSV
C) Select
D) Join
Answer: c) Select
Explanation: The Select action in Power Automate allows you to select a subset of properties from an object or array. In this case, you can use the Select action to extract the price of each product ID from the CSV file and then calculate the total price of the order based on the list of product IDs and quantities provided by the user.
Question: You have a SharePoint list that contains a column with a person or group value, and you want to send an email to the user in the person or group column. Which data operation action would you use in Power Automate to accomplish this?
A) Get user profile
B) Send an email
C) Get item
D) Initialize variable
Answer: a) Get user profile
Explanation: The Get user profile action in Power Automate allows you to retrieve information about a user, such as their email address, from their user profile in SharePoint. In this case, you can use the Get user profile action to retrieve the email address of the user in the person or group column and then send an email to that address using the Send an email action.