Setting up staging environments in Azure App Service
AZ-303 is retired. AZ-305 replacement is available.
This tutorial will help you in Setting up staging environments in Azure App Service. When you deploy your web app, web app on Linux, mobile back end, or API app to Azure App Service, you can use a separate deployment slot instead of the default production slot when you’re running in the Standard, Premium, or Isolated App Service plan tier.
Add a slot
The app must be running in the Standard, Premium, or Isolated tier in order for you to enable multiple deployment slots.
- Visit Azure portal, search for and choose App Services and choose your app.
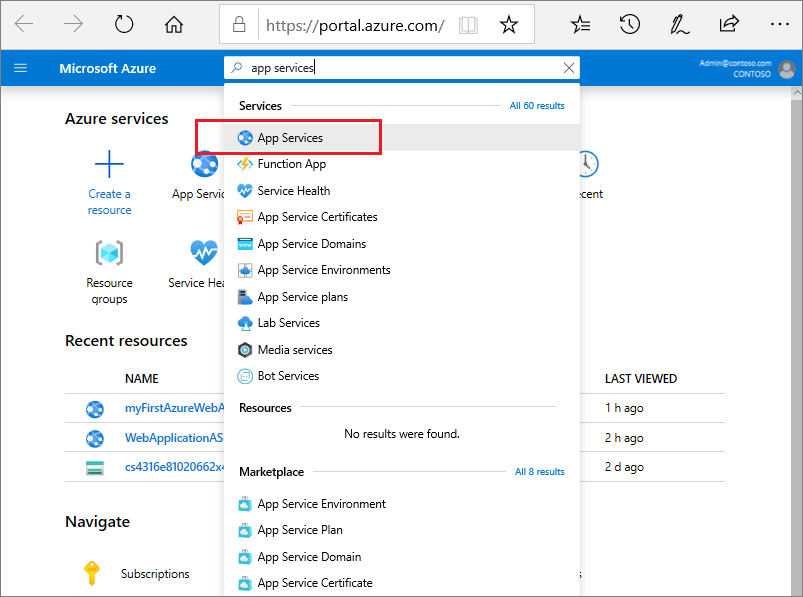
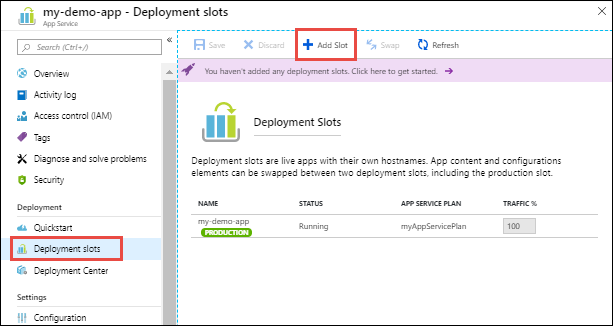
In the left pane, choose Deployment slots > Add Slot.
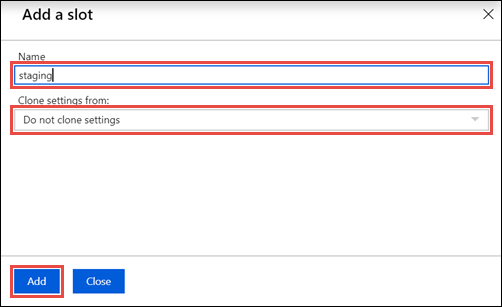
In the Add a slot dialog box, give the slot a name, and select whether to clone an app configuration from another deployment slot. Select Add to continue.You can clone a configuration from any existing slot. Settings that can be cloned include app settings, connection strings, language framework versions, web sockets, HTTP version, and platform bitness.
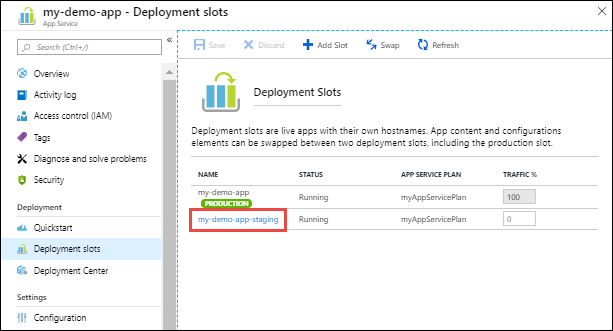
After the slot is added, select Close to close the dialog box. The new slot is now shown on the Deployment slots page. By default, Traffic % is set to 0 for the new slot, with all customer traffic routed to the production slot.
Select the new deployment slot to open that slot’s resource page.
The staging slot has a management page just like any other App Service app. You can change the slot’s configuration. To remind you that you’re viewing the deployment slot, the app name is shown as <app-name>/<slot-name>, and the app type is App Service (Slot). You can also see the slot as a separate app in your resource group, with the same designations.
Select the app URL on the slot’s resource page. The deployment slot has its own host name and is also a live app. To limit public access to the deployment slot, see Azure App Service IP restrictions.
What happens during a swap
Swap operation steps
When you swap two slots (usually from a staging slot into the production slot), App Service does the following to ensure that the target slot doesn’t experience downtime:
- Apply the following settings from the target slot (for example, the production slot) to all instances of the source slot:
- Slot-specific app settings and connection strings, if applicable.
- Continuous deployment settings, if enabled.
- App Service authentication settings, if enabled.Any of these cases trigger all instances in the source slot to restart. During swap with preview, this marks the end of the first phase. The swap operation is paused, and you can validate that the source slot works correctly with the target slot’s settings.
- Wait for every instance in the source slot to complete its restart. If any instance fails to restart, the swap operation reverts all changes to the source slot and stops the operation.
- If local cache is enabled, trigger local cache initialization by making an HTTP request to the application root (“/”) on each instance of the source slot. Wait until each instance returns any HTTP response. Local cache initialization causes another restart on each instance.
Further steps
- If auto swap is enabled with custom warm-up, trigger Application Initiation by making an HTTP request to the application root (“/”) on each instance of the source slot.If
applicationInitializationisn’t specified, trigger an HTTP request to the application root of the source slot on each instance.If an instance returns any HTTP response, it’s considered to be warmed up. - If all instances on the source slot are warmed up successfully, swap the two slots by switching the routing rules for the two slots. After this step, the target slot (for example, the production slot) has the app that’s previously warmed up in the source slot.
- Now that the source slot has the pre-swap app previously in the target slot, perform the same operation by applying all settings and restarting the instances.
At any point of the swap operation, all work of initializing the swapped apps happens on the source slot. The target slot remains online while the source slot is being prepared and warmed up, regardless of where the swap succeeds or fails. To swap a staging slot with the production slot, make sure that the production slot is always the target slot. This way, the swap operation doesn’t affect your production app.
Swapping Settings
Settings that are swapped:
- General settings, such as framework version, 32/64-bit, web sockets
- App settings (can be configured to stick to a slot)
- Connection strings (can be configured to stick to a slot)
- Handler mappings
- Public certificates
- WebJobs content
- Hybrid connections *
- Virtual network integration *
- Service endpoints *
- Azure Content Delivery Network *
Settings that aren’t swapped:
- Publishing endpoints
- Custom domain names
- Non-public certificates and TLS/SSL settings
- Scale settings
- WebJobs schedulers
- IP restrictions
- Always On
- Diagnostic settings
- Cross-origin resource sharing (CORS)
Swap two slots
You can swap deployment slots on your app’s Deployment slots page and the Overview page. For technical details on the slot swap, see What happens during swap.
To swap deployment slots:
- Go to your app’s Deployment slots page and select Swap.
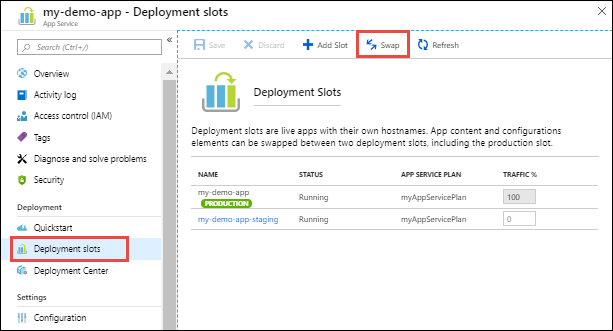
- The Swap dialog box shows settings in the selected source and target slots that will be changed.
- Select the desired Source and Target slots. Usually, the target is the production slot. Also, select the Source Changes and Target Changes tabs and verify that the configuration changes are expected. When you’re finished, you can swap the slots immediately by selecting Swap.
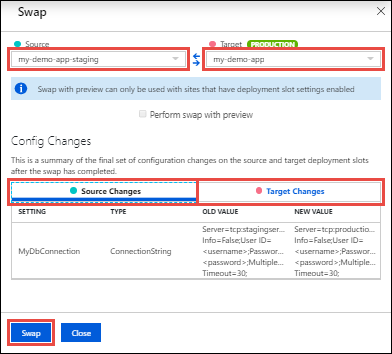
- To see how your target slot would run with the new settings before the swap actually happens, don’t select Swap, but follow the instructions in Swap with preview.
- When you’re finished, close the dialog box by selecting Close.
Monitor a swap
If the swap operation takes a long time to complete, you can get information on the swap operation in the activity log.
On your app’s resource page in the portal, in the left pane, select Activity log.
Route production traffic automatically
To route production traffic automatically:
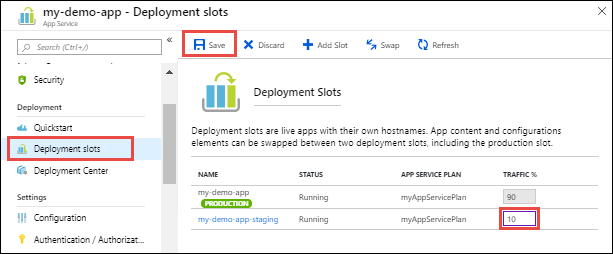
- Go to your app’s resource page and select Deployment slots.
- In the Traffic % column of the slot you want to route to, specify a percentage (between 0 and 100) to represent the amount of total traffic you want to route. Select Save.
Delete a slot
Search for and select your app. Select Deployment slots > <slot to delete> > Overview. The app type is shown as App Service (Slot) to remind you that you’re viewing a deployment slot. Select Delete on the command bar.

Reference documentation – Set up staging environments in Azure App Service

