Learn to Add custom domain name using the Azure Active Directory portal
This article will show you how to use the Azure Active Directory interface to add your own domain name. The domain name .onmicrosoft.com comes standard with every new Azure AD tenant. The original domain name cannot be changed or deleted, however, you may add the names of your organization. Using custom domain names, such as [email protected], allows you to build user identities that are known to your users. Create your domain name with a domain registrar before you may add a custom domain name.
Create your directory in Azure AD
You can build your first Azure AD directory once you have your domain name. Log in to the Azure portal for your directory with an account that has the subscription’s Owner role.
Add your custom domain name to Azure AD
After you create your directory, you can add your custom domain name.
- Sign in to the Azure portal using a Global administrator account for the directory.
- Search for and select Azure Active Directory from any page. Then select Custom domain names > Add custom domain.
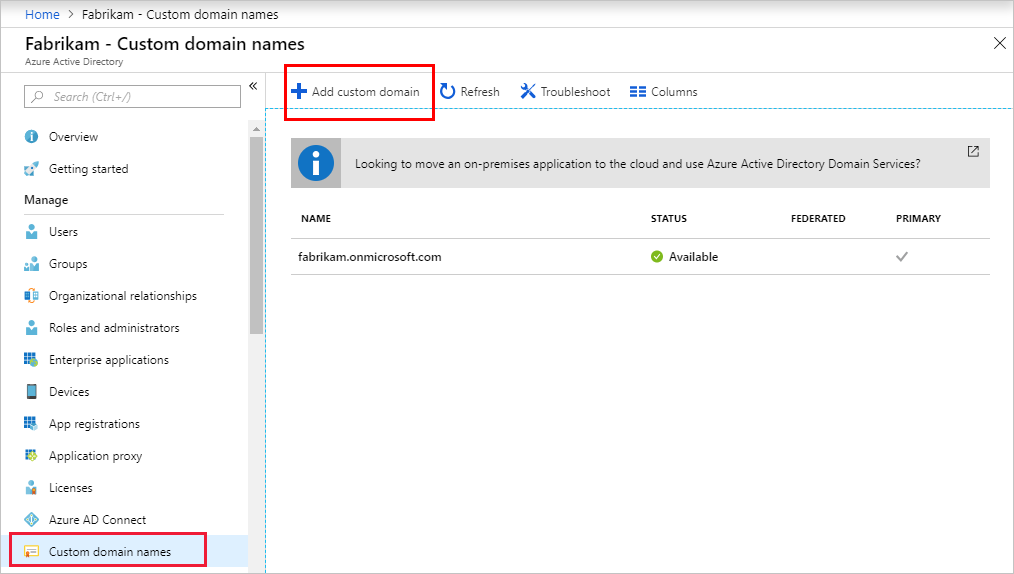
- In Custom domain name, enter your organization’s new name, in this example, contoso.com. Select Add domain.

- The unverified domain is added. The contoso.com page appears showing your DNS information. Save this information. You need it later to create a TXT record to configure DNS.
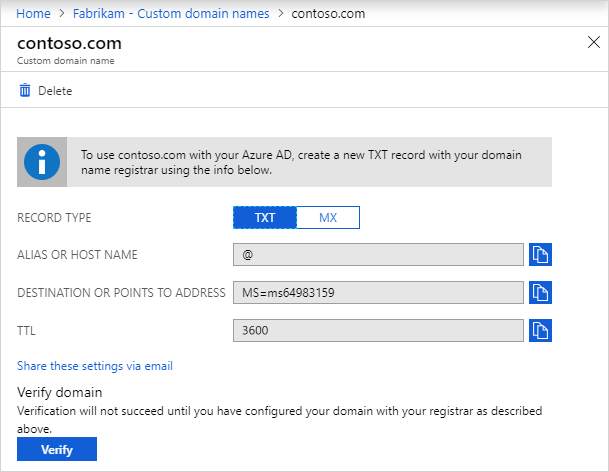
Add your DNS information to the domain registrar
You must go back to your domain registrar and upload the Azure AD DNS information from your copied TXT file once you’ve added your custom domain name to Azure AD. Adding this TXT record to your domain proves that you are the owner of the domain.
Return to your domain registrar and, using the DNS information you copied, create a new TXT record for your domain. Save the record after setting the time to live (TTL) to 3600 seconds (60 minutes).
Verify your custom domain name
Make sure your custom domain name is valid in Azure AD once you’ve registered it. Depending on your domain registrar, propagation from your domain registrar to Azure AD might be instantaneous or take a few days.
To verify your custom domain name, follow these steps:
- Sign in to the Azure portal using a Global administrator account for the directory.
- Search for and select Azure Active Directory from any page, then select Custom domain names.
- In Custom domain names, select the custom domain name. In this example, select contoso.com.

- On the contoso.com page, select Verify to make sure your custom domain is properly registered and is valid for Azure AD.
- After you’ve verified your custom domain name, you can delete your verification TXT or MX file.
Common verification issues
If Azure AD can’t verify a custom domain name, try the following suggestions:
- Wait at least an hour and try again
- Make sure the DNS record is correctMake sure the DNS record is correct
- Also, Make sure the domain name isn’t already in use in another directory
- Make sure you don’t have any unmanaged Power BI tenants

Reference documentation – Add your custom domain name using the Azure Active Directory portal