How to Deploy VMs to dedicated hosts in portal?
This tutorial explains how to create an Azure dedicated host to host your virtual machines (VMs). However, it has some limitations –
- Firstly, Virtual machine scale sets are not currently supported on dedicated hosts.
- Also, The sizes and hardware types available for dedicated hosts vary by region.
Create a host group in Portal
A host group is a new resource that represents a group of dedicated hosts. In a region and an availability zone, you construct a host group and add hosts to it. There are extra possibilities when preparing for high availability. With your dedicated hosts, you can employ one or all of the following options:
- Firstly, Span across multiple availability zones
- Secondly, Span across multiple fault domains which are mapped to physical racks
In this example, we will create a host group using 1 availability zone and 2 fault domains.
- Open the Azure portal.
- Select Create a resource in the upper left corner.
- Search for Host group and then select Host Groups from the results.
- In the Host Groups page, select Create.
- Select the subscription you would like to use, and then select Create new to create a new resource group.
- Type myDedicatedHostsRG as the Name and then select OK.
- For Host group name, type myHostGroup.
- Subsequently, For Location, select East US.
- For Availability Zone, select 1.
- Also, For Fault domain count, select 2.
- Select Review + create and then wait for validation.
- Once you see the Validation passed message, select Create to create the host group.
Creating the host group should just take a few seconds.
Create a dedicated host
In the host group, now make a dedicated host. It is necessary to provide the SKU for the host in addition to a name. Host SKU records the available VM series as well as the hardware generation for your dedicated host.
If you establish a fault domain count for your host group, you will be prompted to specify the fault domain for your host.
- Select Create a resource in the upper left corner.
- Search for Dedicated host and then select Dedicated hosts from the results.
- In the Dedicated Hosts page, select Create.
- Select the subscription you would like to use.
- Select myDedicatedHostsRG as the Resource group.
- In Instance details, type myHost for the Name and select East US for the location.
- In Hardware profile, select Standard Es3 family – Type 1 for the Size family, select myHostGroup for the Host group and then select 1 for the Fault domain. Leave the defaults for the rest of the fields.
- When it is done, select Review + create and wait for validation.
- Once you see the Validation passed message, select Create to create the host.
Create a VM in Portal
- Choose Create a resource in the upper left-hand corner of the Azure portal.
- In the New page, under Popular, select Windows Server 2016 Datacenter.
- In the Basics tab, under Project details, make sure the correct subscription is selected and then select myDedicatedHostsRG as the Resource group.
- Under Instance details, type myVM for the Virtual machine name and choose East US for your Location.
- In Availability options select Availability zone, select 1 from the drop-down.
- For the size, select Change size. In the list of available sizes, choose one from the Esv3 series, like Standard E2s v3. You may need to clear the filter in order to see all of the available sizes.
- Under Administrator account, provide a username, such as azureuser and a password. The password must be at least 12 characters long and meet the defined complexity requirements.
- Under Inbound port rules, choose Allow selected ports and then select RDP (3389) from the drop-down.
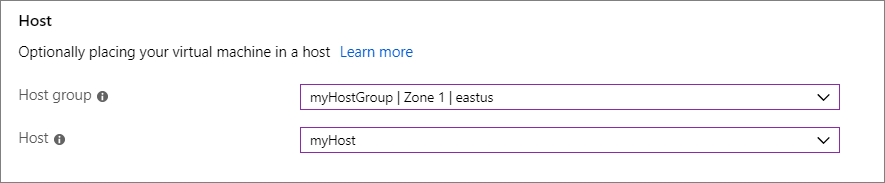
- At the top of the page, select the Advanced tab and in the Host section, select myHostGroup for Host group and myHost for the Host.
- Leave the remaining defaults and then select the Review + create button at the bottom of the page.
- When you see the message that validation has passed, select Create.
Add an existing VM
Follow these procedures to add an existing virtual machine:
- Open the page for the VM.
- Select Stop to stop\deallocate the VM.
- Then, Select Configuration from the left menu.
- Select a host group and a host from the drop-down menus.
- When this is done, select Save at the top of the page.
- After the VM is added to the host, select Overview from the left menu.
- At the top of the page, select Start to restart the VM.
Check the status of the host
If you need to know how much capacity is still available, you may check the status.
Portal:
- Search for and choose the host.
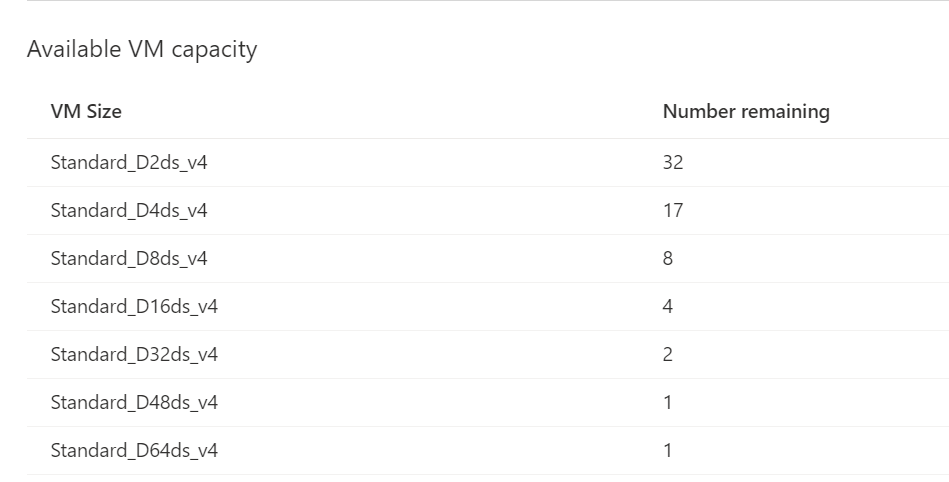
- Scroll down the host’s Overview page to see the list of sizes that are still available. It should resemble the following:
Deleting hosts
Even if no virtual machines are installed, you will be paid for your dedicated hosts. To save money, you should eliminate any hosts you aren’t utilizing right now. However, you can only remove a host if no virtual machines are currently utilizing it.
Portal:
- Search for and select the host.
- In the left menu, select Instances.
- Select and delete each virtual machine.
- When all of the VMs have been deleted, go back to the Overview page for the host and select Delete from the top menu.
- Once the host has been deleted, open the page for the host group and select Delete host group.

Reference documentation – Deploy VMs to dedicated hosts using the portal