How to Create an Azure File Share?
This tutorial will help you to To Create an Azure File Share. create an Azure file share, you need to answer three questions about how you will use it:
- Firstly, What are the performance requirements for your Azure file share?
- Secondly, What size file share do you need?
- Thirdly, What are your redundancy requirements for your Azure file share?
Prerequisites
- Firstly, get an Azure subscription or create a free account.
- Also, If you intend to use Azure PowerShell, install the latest version.
- Lastly, If you intend to use the Azure CLI, install the latest version.
Creating a storage account
Storage accounts, which are top-level objects that represent a shared pool of storage, are used to install Azure file shares. Multiple file shares can be deployed using this storage pool.
For diverse storage scenarios that customers may have, Azure provides numerous types of storage accounts, however, there are two major types of storage accounts for Azure Files.
- General purpose version 2 (GPv2) storage accounts
- FileStorage storage accounts
To create a storage account using the Azure portal, go to the dashboard and click + Create a resource. Search for storage account in the resultant Azure Marketplace search box and choose the first search result. This will take you to a storage account overview page; choose to Create to begin the storage account creation procedure.
Know about The Basics section
Basics are the first thing you complete while creating a storage account. This comprises all of the fields that must be filled out in order to create a storage account. To establish a GPv2 storage account, set the Performance radio button to Standard and choose StorageV2 from the Account type drop-down list (general purpose v2).

Then, to establish a FileStorage storage account, make sure the Performance radio option is set to Premium and FileStorage is chosen from the Account type drop-down list.

Furthermore, The other basics fields are independent of the choice of storage account:
- Subscription
- Resource group
- Storage account name
- Location
- Replication
- Access tier
Learn about The Networking blade
The networking section allows you to configure networking options. Subsequently, These settings are optional for the creation of the storage account and can be configured later if desired.
The Advanced blade
The advanced section contains several important settings for Azure file shares:
- Secure transfer required
- Large file shares
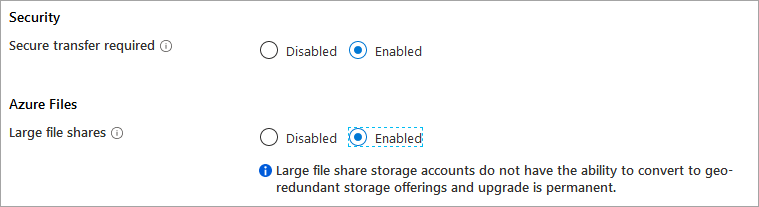
The other settings that are available in the advanced tab (blob soft-delete, hierarchical namespace for Azure Data Lake storage gen 2, and NFSv3 for blob storage) do not apply to Azure Files.
Tags
By applying the same tag to many resources and resource groups, you may classify resources and examine aggregated billing. These are optional and can be applied once you’ve created your storage account.
Review + create
Select the Create button on the Review + create a tab to complete the storage account creation process. If you don’t fill out all of the essential details for a storage account, you won’t be able to use this button.
Create file share
If you’ve just created your storage account, choose Go to resource from the deployment screen to go there. If you’ve already established the storage account, you may access it through the resource group that contains it. Select the File shares tile from the storage account’s table of contents (you can also go to File shares from the storage account’s table of contents).
Any file shares you’ve previously made in this storage account should appear in the file share listing; if no file shares have been created yet, the table should be empty. To create a new file share, choose Add File share.
The new file share blade should appear on the screen. Complete the fields in the new file share blade to create a file share:
- Name: the name of the file share to be created.
- Quota: The quota of the file share for standard file shares; the provisioned size of the file share for premium file shares.
To complete creating the new share, choose Create. It’s worth noting that if your storage account is part of a virtual network, you won’t be able to build an Azure file share unless your client is as well. You may also use the Azure PowerShell New-AzRmStorageShare cmdlet to get around this point-in-time constraint.

Reference documentation – Create an Azure file share