Describe Polling Triggers and their Usage
We may define a polling trigger as an event that periodically makes a call to your service to look for new data. Further, the Polling triggers vary from webhooks in follwoing way –
- At first, a polling trigger begins an event to find if new data is available
- Next, a webhooks respond to a push of new data from the service. Once the flow determines that new data is available, you can then perform an action with that data.
Pre-requirements
- First, a Power Automate subscription.
- Second, basic experience building flows and custom connectors.
- Lastly, a free Postman app
Working of a Polling Triggers
To begin with, a polling trigger starts by setting a state, then periodically checks for updates over an interval. Thereafter, the trigger then requests all the new data since the last state update. Additionally, the trigger also maintains the state context between requests.
- At first, the flow runtime requests an initial call on the trigger to the API in the connector.
- In the second step, the connector will then call the backend service.
- Then, the backend service returns all of the current data back to the connector.
- In the next step, the connector, in turn, returns a 202 Accepted message, a retry interval, and a location header that includes the current state.
- Once the retry interval times out, the flow runtime makes another call to the connector using the location header and current state.
- Further, the connector now knows, since this state is now equal to 1, to call the proper API that will do the appropriate filtering to ensure the correct set of data returned.
- Next, there is no new data since the create date, so an empty set of values is sent back to the connector.
- Then, the connector then returns a 202 Accepted message, a retry interval, and a location header in which the state hasn’t changed.
- After the retry interval times out again, the flow runtime makes another call to the connector using the same location header and state.
- Again, the connector does the appropriate filtering using the create date.
- Now, new data has become available since the create date, so the backend returns the values of all the new data back to the connector.
- Thereafter, the connector then returns a 200 OK message, a retry interval, the location with a new state value, and an array of values containing all of the new data is available after the create date.
- Lastly, at this point, the flow will start.
Use the Polling Trigger

After everything is configured, we can use the polling trigger in a flow. We will learn to create a flow that will poll the backend service for changes whenever a new trip is recorded for a particular person.
- First Step –
- In flow.microsoft.com, on the left side of the page, choose Create.
- Second Step –
- Under Start from blank, choose Instant flow.
- Third Step –
- In the Build an instant flow dialog, select the Skip button.
- Fourth Step –
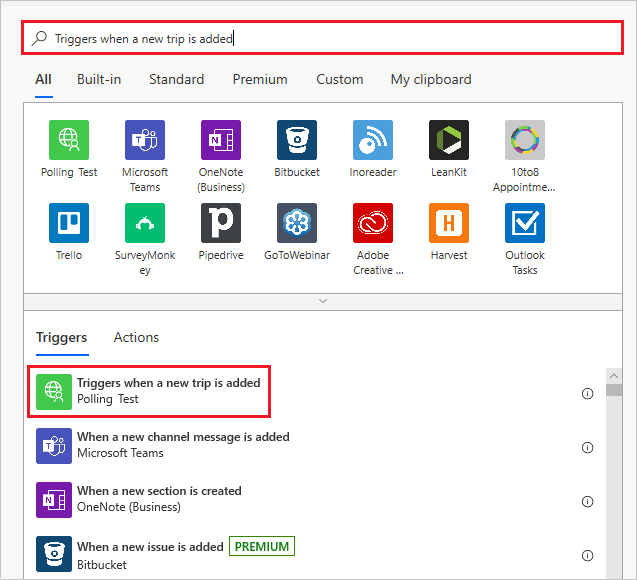
- In the search box, enter Triggers when a new trip is added.
- Fifth Step –
- In the Person flow box, enter russellwhyte for the person whose trips you’ll examine, and then select + New step.
- Sixth Step –
- In the Choose an action dialog, select the Built-in tab, and then select Date Time.
- Seventh Step –
- From Date Time, select Current time.
- Eighth Step –
- Select Save to save the new flow.
Verification and Troubleshooting
Use the following steps to conduct the verification and troubleshooting –

- In order to verify everything has been set up correctly, firstly choose My flows
- Then select the Triggers when a new trip is added -> Current time flow to view the run history.
- To test the flow, you’ll need to open the Postman application to add new data to TripPin.
- In Postman, select the + icon next to the Launchpad tab.
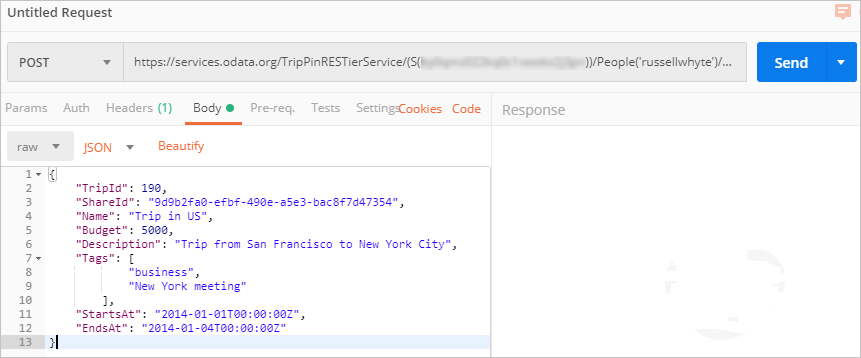
- In the untitled request, select POST from the drop-down box on the left, and then enter the following address in Enter request URL box
- Under the POST request, select the Body tab, and then choose raw. In the dropdown to the right of raw, choose JSON.
- Enter the following text in the text box:
Learn more about Triggers and their Requirements

