Create an application gateway
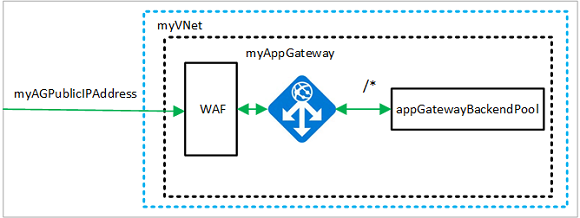
This tutorial shows you how to use the Azure portal to create an Application Gateway with a Web Application Firewall (WAF). The WAF uses OWASP rules to protect your application. These rules include protection against attacks such as SQL injection, cross-site scripting attacks, and session hijacks. After creating the application gateway, you test it to make sure it’s working correctly.
Create an application gateway
For Azure to communicate between resources, it needs a virtual network. You can either create a new virtual network or use an existing one. You can create a virtual network at the same time that you create the application gateway. Application Gateway instances are created in separate subnets. You create two subnets in this example: one for the application gateway, and another for the backend servers.
Select Create a resource on the left menu of the Azure portal. The New window appears.
Select Networking and then select Application Gateway in the Featured list.
Add backend targets
In this example, you’ll use virtual machines as the target backend. You can either use existing virtual machines or create new ones. You’ll create two virtual machines that Azure uses as backend servers for the application gateway.
To do this, you’ll:
- Create two new VMs, myVM and myVM2, to be used as backend servers.
- Install IIS on the virtual machines to verify that the application gateway was created successfully.
- Add the backend servers to the backend pool.
Create a storage account and configure diagnostics
Create a storage account
For this article, the application gateway uses a storage account to store data for detection and prevention purposes. You could also use Azure Monitor logs or Event Hub to record data.
- Select Create a resource on the upper left-hand corner of the Azure portal.
- Select Storage, and then select Storage account.
- For Resource group, select myResourceGroupAG for the resource group.
- Type myagstore1 for the name of the storage account.
- Accept the default values for the other settings and then select Review + Create.
- Review the settings, and then select Create.
Configure diagnostics
Configure diagnostics to record data into the ApplicationGatewayAccessLog, ApplicationGatewayPerformanceLog, and ApplicationGatewayFirewallLog logs.
- In the left-hand menu, select All resources, and then select myAppGateway.
- Under Monitoring, select Diagnostics settings.
- select Add diagnostics setting.
- Enter myDiagnosticsSettings as the name for the diagnostics settings.
- Select Archive to a storage account, and then select Configure to select the myagstore1 storage account that you previously created, and then select OK.
- Subsequently, Select the application gateway logs to collect and keep.
- Select Save.
Create and link a Web Application Firewall policy
All of the WAF customizations and settings are in a separate object, called a WAF Policy. The policy must be associated with your Application Gateway. To create a WAF Policy. Once it’s been created, you can then associate the policy to your WAF (or an individual listener) from the WAF Policy in the Associated Application Gateways tab.
Test the application gateway
Although IIS isn’t required to create the application gateway, you installed it to verify whether Azure successfully created the application gateway.
- Find the public IP address for the application gateway on its Overview page.Or, you can select All resources, enter myAGPublicIPAddress in the search box, and then select it in the search results. Azure displays the public IP address on the Overview page.
- Copy the public IP address, and then paste it into the address bar of your browser.
- Check the response. A valid response verifies that the application gateway was successfully created and it can successfully connect with the backend.
Clean up resources
When you no longer need the resources that you created with the application gateway, remove the resource group. By removing the resource group, you also remove the application gateway and all its related resources.
To remove the resource group:
- On the left menu of the Azure portal, select Resource groups.
- Then, On the Resource groups page, search for myResourceGroupAG in the list, then select it.
- On the Resource group page, select Delete resource group.
- Enter myResourceGroupAG for TYPE THE RESOURCE GROUP NAME and then select Delete

Reference documentation – Tutorial: Create an application gateway with a Web Application Firewall using the Azure portal