Add or remove a role assignment
This tutorial will teach you chiefly to Add or remove a role assignment. Azure role-based access control (Azure RBAC) is the authorization system that can be used by anyone to manage access to Azure resources. To grant permissions, you have to assign roles to users, groups, service principals, or managed identities at a particular scope.
Add a role assignment
In Azure RBAC, to grant access to an Azure resource, you add a role assignment. Follow these steps to assign a role.
- Visit the Azure portal, then choose All services and then select the scope that you want to grant access to. For example, you can choose Management groups, Subscriptions, Resource groups, or a resource.
- Also, choose the specific resource for that scope.
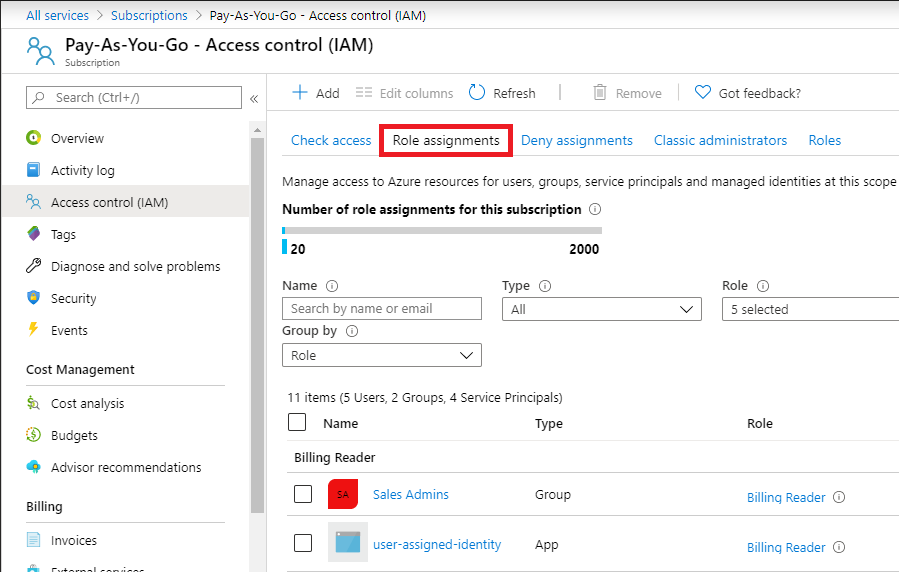
- Furthermore, Click Access control (IAM).
- choose the Role assignments tab to view the role assignments at this scope.
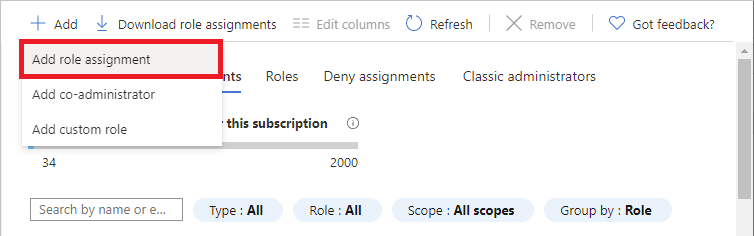
- Now, choose Add then Add role assignment.
- However, If you don’t have permissions to assign roles, the Add role assignment option will not be enabled.
The Add role assignment pane will open.
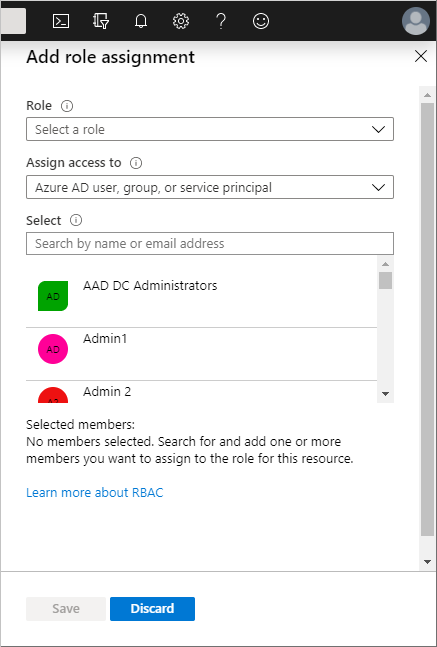
- Then, In the Role drop-down list, choose a role as Virtual Machine Contributor.
- Now, In the Select list, choose a user, group, service principal, or managed identity. If the security principal does not appear in the list, you can type in the Select box to search the directory for display names, email addresses, and object identifiers.
- Now, select Save to assign the role.
Assign a user as an administrator of a subscription
To make a user an administrator of an Azure subscription, you can assign them the Owner role at the subscription scope. However, The Owner role gives the user full access to all resources in the subscription, including the permission to grant access to others of your team. These steps as follows are the same as any other role assignment.
- Firstly, visit Azure portal, click All services and then Subscriptions.
- choose the subscription where you want to grant access.
- choose Access control (IAM).
- Select the Role assignments tab to view the role assignments for this subscription.
- choose Add > Add role assignment.
- If you don’t have permissions to assign roles, the Add role assignment option will not be enabled.
- In the Role drop-down list, choose the Owner role.
- In the Select list, choose a user. If the user option does not appear in the list, you can type in the Select box to search the directory for display names and email addresses.
- Select Save to assign the role. After some time, the user is assigned the Owner role at the subscription scope.
System-assigned managed identity
Follow the below mentioned steps to assign a role to a system-assigned managed identity by starting with the managed identity.
- Visit Azure portal, open a system-assigned managed identity.
- In the left menu, choose Identity.
- Under Permissions, choose Azure role assignments.
- If roles are already assigned to the selected system-assigned managed identity, you will see the list of role assignments. This list includes all role assignments you have permission to read.
- To change the subscription, choose the Subscription list.
- choose Add role assignment (Preview).
- Use the drop-down lists to choose the set of resources that the role assignment applies to such as Subscription, Resource group, or resource.If you don’t have role assignment write permissions for the selected scope, an inline message will be displayed.
- In the Role drop-down list, choose a role such as Virtual Machine Contributor.
- choose Save to assign the role.
After sometime, the managed identity is assigned the role at the selected scope.
User-assigned managed identity
Follow these below mentioned steps to assign a role to a user-assigned managed identity by starting with the managed identity.
- Visit Azure portal, open a user-assigned managed identity.
- In the left menu, choose Azure role assignments.If roles are already assigned to the selected user-assigned managed identity, you will see the list of role assignments. This list includes all role assignments you have permission to read.
- To change the subscription, choose the Subscription list.
- choose Add role assignment (Preview).
- Use the drop-down lists to select the set of resources that the role assignment applies to such as Subscription, Resource group, or resource.If you don’t have role assignment write permissions for the selected scope, an inline message will be displayed.
- In the Role drop-down list, choose a role such as Virtual Machine Contributor.
- choose Save to assign the role. After some time, the managed identity is assigned the role at the selected scope.
Remove a role assignment
In Azure RBAC, to remove access from an Azure resource, you have to remove a role assignment. Follow the below mentioned steps to remove a role assignment.
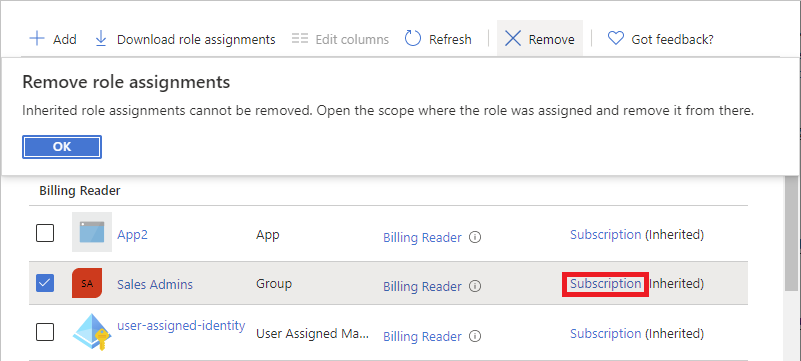
- choose and Open Access control (IAM) at a scope, such as management group, subscription, resource group, or resource, where you want to remove access.
- choose the Role assignments tab to view all the role assignments for this subscription.
- In the list of role assignments, add a checkmark next to the security principal with the role assignment that you wanted to remove.
- choose Remove.
- In the remove role assignment message that appears, choose Yes.

Reference documentation – Add or remove Azure role assignments using the Azure portal