Azure – Cost Prediction and Optimizing Spending
When planning a solution in the cloud, there’s always the challenge of balancing cost against performance. It can feel like a guessing game whether your selected options will stay within budget or if you’ll have a surprise on your next bill.
You need to be able to confidently answer several questions:
- What will this solution cost this fiscal year?
- Is there an alternate configuration you could use to save money?
- Can you estimate how a change would impact your cost and performance without putting it into a production system?
Purchasing Azure products and services
Let’s start by examining the purchasing options you have with Azure. There are three main customer types on which the available purchasing options for Azure products and services are contingent, including:
- Enterprise – Enterprise customers sign an Enterprise Agreement with Azure that commits them to spend a negotiated amount on Azure services, which they typically pay annually. Enterprise customers also have access to customized Azure pricing.
- Web direct – Direct Web customers pay general public prices for Azure resources, and their monthly billing and payments occur through the Azure website.
- Cloud Solution Provider – Cloud Solution Provider (CSP) typically are Microsoft partner companies that a customer hires to build solutions on top of Azure. Payment and billing for Azure usage occur through the customer’s CSP.
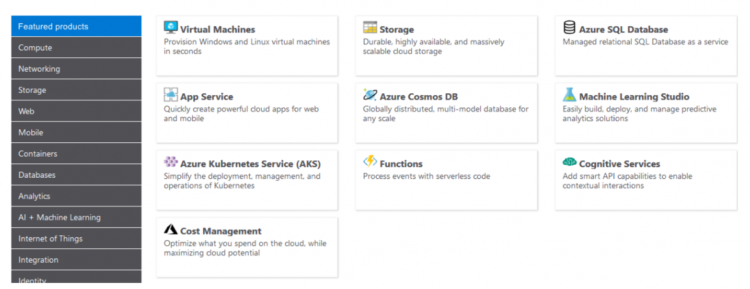
Products and services in Azure are arranged by category, which has various resources that you can provision. You select the Azure products and services that fit your requirements, and your account is billed according to Azure’s pay-for-what-you-use model.
Usage meters
When you provision an Azure resource, Azure creates one or more meter instances for that resource. The meters track the resources’ usage, and generate a usage record that is used to calculate your bill.
For example, a single virtual machine that you provision in Azure might have the following meters tracking its usage:
- Compute Hours
- IP Address Hours
- Data Transfer In
- Data Transfer Out
- Standard Managed Disk
- Standard Managed Disk Operations
- Standard IO-Disk
- Standard IO-Block Blob Read
- Standard IO-Block Blob Write
- Standard IO-Block Blob Delete
The meters and pricing vary per product and often have different pricing tiers based on the size or capacity of the resource. Check the documentation for specific details on what each service area costs.
At the end of each monthly billing cycle, the usage values will be charged to your payment method and the meters are reset. You can check the billing page in the Azure portal at any time to get a quick summary of your current usage and see any invoices from past billing cycles.
The key takeaway is that resources are always charged based on usage. For example, if you de-allocate a VM then you will not be billed for compute hours, I/O reads or writes or the private IP address since the VM is not running and has no allocated compute resources. However you will incur storage costs for the disks.
Note – De-allocating a VM is not the same as deleting a VM. De-allocation means the VM is not assigned to a CPU or network in a datacenter. However, your persistent disks remain, and the resource is present in your subscription. It’s similar to turning off your physical computer.
Factors Affecting Costs
Just like your on-premises equipment costs, there are several elements that will affect your monthly costs when using Azure services. Let’s look at a few of the primary factors including resource type, services, the user’s location, and the billing zone.
Resource type
Costs are resource-specific, so the usage that a meter tracks and the number of meters associated with a resource depend on the resource type.
Note – Each meter tracks a particular kind of usage. For example, a meter might track bandwidth usage (ingress or egress network traffic in bits-per-second), the number of operations, size (storage capacity in bytes), or similar items.
The usage that a meter tracks correlates to a number of billable units. Those are charged to your account for each billing period, and the rate per billable unit depends on the resource type you are using.
Services
Azure usage rates and billing periods can differ between Enterprise, Web Direct, and Cloud Solution Provider (CSP) customers. Some subscription types also include usage allowances, which affect costs.
The Azure team develops and offers first-party products and services, while products and services from third-party vendors are available in the Azure Marketplace . Different billing structures apply to each of these categories.
Image depicting a billing period, with a calendar, computer, and meter linked to illustrate the correlation between the three
Location
Azure has datacenters all over the world. Usage costs vary between locations that offer particular Azure products, services, and resources based on popularity, demand, and local infrastructure costs.
For example, you might want to build your Azure solution by provisioning resources in locations that offer the lowest prices, but this would require transferring data between locations if dependent resources and their users are located in different parts of the world. If there are meters tracking the volume of data that moves between the resources you provision, any potential savings you make from choosing the cheapest location could be offset by the additional cost of transferring data between those resources.
Azure billing zones
Bandwidth refers to data moving in and out of Azure datacenters. Most of the time inbound data transfers (data going into Azure datacenters) are free. For outbound data transfers (data going out of Azure datacenters), the data transfer pricing is based on Billing Zones.
A Zone is a geographical grouping of Azure Regions for billing purposes. The following zones exist and include the listed countries (regions) listed.
Table Diagram
| Zone | Areas |
|---|---|
| Zone 1 | United States, Europe, Canada, UK, France |
| Zone 2 | Asia Pacific, Japan, Australia, India, Korea |
| Zone 3 | Brazil |
| DE Zone 1 | Germany |
In most zones, the first outbound 5 GB per month is free. After that, you are billed a fixed price per GB.
Note – Billing zones aren’t the same as an Availability Zone. In Azure, the term zone is for billing purposes only, and the full term Availability Zone refers to the failure protection that Azure provides for datacenters.
Estimate costs with the Azure pricing calculator
Imagine that you’ve been asked to build a system on Azure, and you’ve been asked for an estimate of what it might cost to run over the next 12 months. You already know that Azure pricing is fully transparent and that you’re billed monthly for only the services that you use. How would you get that estimate without deploying and running those services or without manually pricing out each service from the Azure service pricing pages?
Introducing the Azure pricing calculator
To make estimates easy for customers to create, Microsoft developed the Azure pricing calculator. The Azure pricing calculator is a free web-based tool that allows you to input Azure services and modify properties and options of the services. It outputs the costs per service and total cost for the full estimate.
The options that you can configure in the pricing calculator vary between products, but basic configuration options include:
| Option | Description |
|---|---|
| Region | Lists the regions from which you can provision a product. Southeast Asia, central Canada, the western United States, and Northern Europe are among the possible regions available for some resources. |
| Tier | Sets the type of tier you wish to allocate to a selected resource, such as Free Tier, Basic Tier, etc. |
| Billing Options | Highlights the billing options available to different types of customer and subscriptions for a chosen product. |
| Support Options | Allows you to pick from included or paid support pricing options for a selected product. |
| Programs and Offers | Allows you to choose from available price offerings according to your customer or subscription type. |
| Azure Dev/Test Pricing | Lists the available development and test prices for a product. Dev/Test pricing applies only when you run resources within an Azure subscription that is based on a Dev/Test offer. |
Azure Pricing Calculator
In another browser window or tab, open the Azure pricing calculator. On the pricing calculator page, you’ll see three tabs:
- Products. This tab is where you’ll do most of your activity. This tab has all the Azure services listed and is where you’ll add or remove services to put together your estimate.
- Estimates. This tab has all of your previously saved estimates. We’ll go through this process in a moment.
- FAQ. Just as it says, this tab has answers to some frequently asked questions.
Let’s start with the Products tab. You’ll see the full listing of service categories down the left-hand side. Clicking on any of the categories will display the services in that category. There’s also a search box where you can search through all services for the service you’re looking for. Clicking on the service will add that service to your estimate. You can add just one service, or you can add as many as you need, including multiples of the same service (for example, multiple virtual machines).
After you’ve added the services, you’ll want to price them. Scrolling down on the page will show you customizable details for that service that apply to pricing. For example, on virtual machines, you can select details such as the region, operating system, and instance size, all of which will impact the pricing for the VM. You’ll see a subtotal for the service. And scrolling further down, you’ll see a full total for all services included in the estimate. Along with the total, you’ll see buttons where you can export, save, and share the estimate.
Estimate a Solution
From our original scenario, let’s imagine that this system will run on two Azure VMs and will connect to an Azure SQL Database instance. We also want to have a layer 7 firewall in place to ensure we have enhanced load-balancing capabilities. The following illustration shows an application gateway connected to two virtual machines that are connected to a single Azure SQL Database instance.
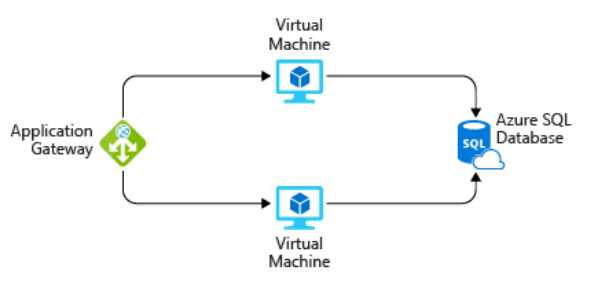
We can use the Azure pricing calculator to figure out what the solution will cost and export our estimate to share with the team.
Make sure you have a clean calculator with nothing listed in the estimate. If you have anything present in your estimate, click the trash can icon on each item to reset the estimate.
In the Azure pricing calculator, on the Products tab, add the following services to the estimate by clicking on them:
- Virtual Machines in the Compute category
- Azure SQL Database in the Databases category
- Application Gateway in the Networking category
We can configure the details of each, on the Estimates tab, to get a solid estimate of our costs. Use the West US region for all resources.
- Virtual Machines. This is an ASP.NET application, so we’ll need to use a Windows OS VM. This application doesn’t require a massive amount of computing power, so select the D2 v3 instance size. We’ll need two virtual machines, and they will run all the time (730 hours/month). We’re going to use standard SSD storage for these VMs and will require just one disk per VM of size E10, for a total of two disks.
- SQL Database. For the database, we’re going to provision a single database type using the vCore model. We want a General Purpose, Gen 5 database with 8 vCores. We’ll need 32 GB of storage.
- Application Gateway. For Application Gateway, we’re going to use the Web Application Firewall tier, so we have some protection for our environment. And we’re going to go with just two instances and medium size, as our load isn’t going to be high. We expect to process 1 TB of data per month. We don’t expect to process any data in Europe (Zone 1).
Looking through your estimate, you should see a summary cost for each service you’ve added and a full total for the entire estimate. You can try playing with some of the options – particularly the location you place these resources in – to see the estimate go up and down.
Tip – If you have resources that are not location-sensitive, you can save a lot of money by locating them in less expensive regions. Checking the pricing calculator can help you determine the most cost-effective place to put these services.
Share and Save Your Estimate
We now have an estimate for our solution. We can save this estimate, so we can come back to it later and adjust it if necessary. We can also export it to Excel for further analysis or share the estimate via a URL.
To export the estimate, click Export at the bottom of the estimate. This will download your estimate in Excel (.xlsx) format and will include all the services you added to your estimate.
We can either share the Excel spreadsheet, or we can click on the Share button in the calculator. This gives you a URL that you can use to share this estimate. Anyone with this link will be able to access it, making it easy to share with your team.
If you are logged in with your Azure account, you can save the estimate, so you can come back to it later. Go ahead and click the Save button. If you are signed in, you should see a notification that your estimate was saved. If you aren’t signed in, you’ll see a message to sign in to save your estimate. After you’ve saved the estimate, scroll back up to the top of the page and select the Estimates tab. You will see your estimate there. You can then select it to pull it back up or delete it if you no longer need it.
We have arrived at a cost estimate for a set of Azure services without spending any money. We didn’t create anything, and we have a fully sharable estimate that we can do further analysis or modifications on in the future. You can use this not only to create estimates for systems where you know the specific services you plan to use but also to compare how different services might impact your overall costs. An example is Microsoft SQL Server on a VM vs. Azure SQL Database.
Predict and optimize with Cost Management and Azure Advisor
We learned how to estimate your costs before you deploy services on Azure, but what if you already have resources deployed? How do you get visibility into the costs you’re already accruing? If we had deployed our previous solution to Azure and now want to make sure that we’ve sized the virtual machines properly and predict how much our bill will be, how can we do this? Let’s look at a few tools on Azure that you can use to help you solve this problem.
What is Azure Advisor?
Azure Advisor is a free service built into Azure that provides recommendations on high availability, security, performance, and cost. Advisor analyzes your deployed services and looks for ways to improve your environment across those four areas. We’ll focus on the cost recommendations, but you’ll want to take some time to review the other recommendations as well.
Advisor makes cost recommendations in the following areas:
- Reduce costs by eliminating unprovisioned Azure ExpressRoute circuits. This identifies ExpressRoute circuits that have been in the provider status of Not Provisioned for more than one month and recommends deleting the circuit if you aren’t planning to provision the circuit with your connectivity provider.
- Buy reserved instances to save money over pay-as-you-go. This will review your virtual machine usage over the last 30 days and determine if you could save money in the future by purchasing reserved instances. Advisor will show you the regions and sizes where you potentially have the most savings and will show you the estimated savings you might achieve from purchasing reserved instances.
- Right-size or shutdown underutilized virtual machines. This monitors your virtual machine usage for 14 days and then identifies underutilized virtual machines. Virtual machines whose average CPU utilization is 5 percent or less and network usage is 7 MB or less for four or more days are considered underutilized virtual machines. The average CPU utilization threshold is adjustable up to 20 percent. By identifying these virtual machines, you can decide to resize them to a smaller instance type, reducing your costs.
Note – If you don’t have an Azure subscription, create a free account before you begin.
Let’s take a look at where you can find Azure Advisor in the portal.
- Sign into the Azure portal using your Microsoft account.
- Click on All Services, and in the Management Tools category, you will see Advisor. You can also type Advisor in the filter box to filter on just that service.
- Click on Advisor, and you’ll be taken to the Advisor recommendations dashboard where you can see all the recommendations for your subscription. You’ll see a box for each category of recommendations.
Note – You might not have any recommendations on cost in Advisor. This could be because assessments have not yet completed or simply because Advisor has no recommendations.
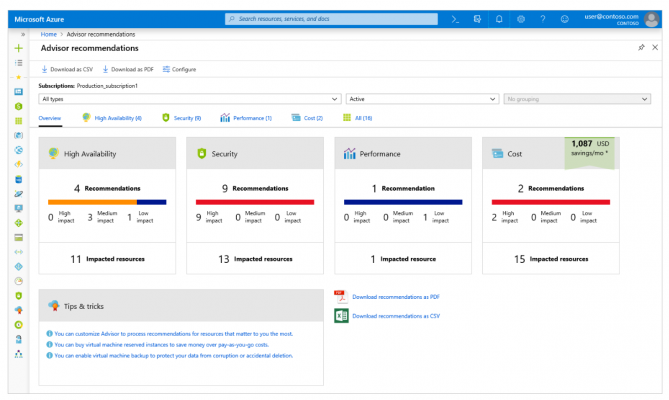
Clicking on the Cost box will take you to detailed recommendations where you can see the recommendations that Advisor has.
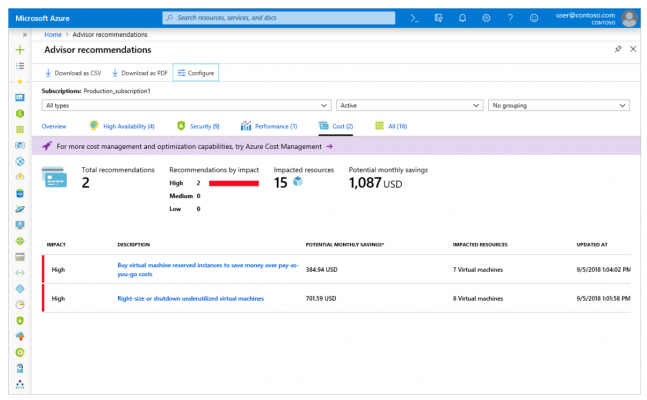
Clicking on any recommendation will take you to the details for that specific recommendation. Then you’ll be able to take a specific action, such as resizing virtual machines to reduce spending.
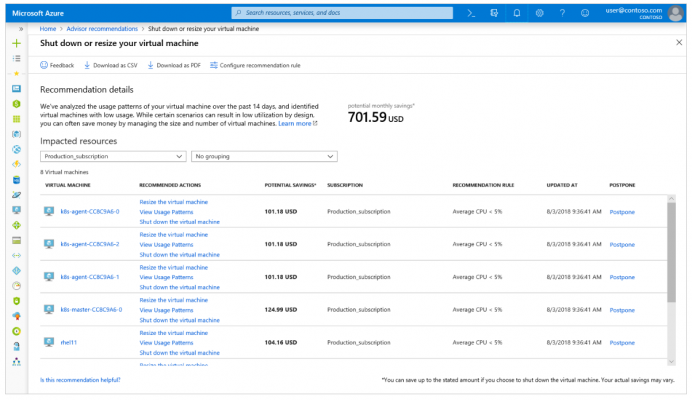
These recommendations are all places where you might be inefficiently spending money. They’re a great place to start and continue to revisit when looking for places to reduce costs. In our example, there’s an opportunity for us to save around $700 per month if we take these recommendations. This savings adds up, so be sure to review this periodically for recommendations across all four areas.
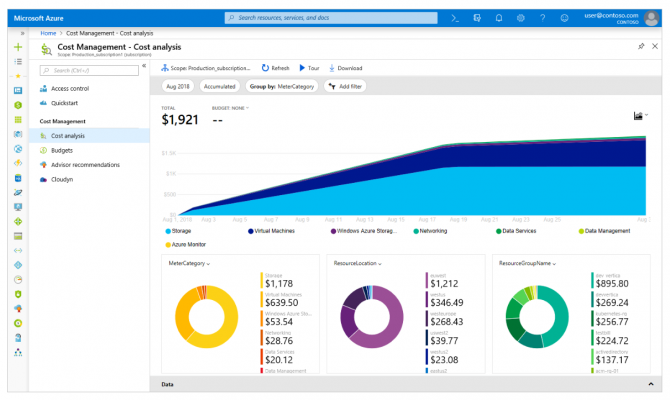
Azure Cost Management
Azure Cost Management is another free, built-in Azure tool that can be used to gain greater insights into where your cloud money is going. You can see historical breakdowns of what services you are spending your money on and how it is tracking against budgets that you have set. You can set budgets, schedule reports, and analyze your cost areas.
Cloudyn
Cloudyn, a Microsoft subsidiary, allows you to track cloud usage and expenditures for your Azure resources and other cloud providers including Amazon Web Services and Google. Easy-to-understand dashboard reports help with cost allocation and chargebacks. Cost Management helps optimize your cloud spending by identifying underutilized resources that you can then manage and adjust. Usage for Azure is free, and there are paid options for premium support and to view data from other clouds.

As you can see, there are several tools available for no cost on Azure that you can use to track and predict your cloud spend and identify where your environment may be inefficient from a cost perspective. You’ll want to make sure you make it a regular practice to review the reports and recommendations that these tools make available, so you can unlock savings across your cloud footprint.
Estimate the Total Cost of Ownership with the Azure TCO calculator
The pricing calculator and cost management advisor can help you predict and analyze your spend for new or existing services. If you are starting to migrate to the cloud, a useful tool you can use to predict your cost savings is the Total Cost of Ownership (TCO) calculator. To use the TCO calculator, you need to complete four steps.
Step 1: Open the TCO calculator
Start by opening the Total Cost of Ownership calculator website.
Step 2: Define your workloads
Start by entering details about your on-premises infrastructure into the TCO calculator according to four groups:
| Group | Description |
|---|---|
| Servers | Enter details of your current on-premises server infrastructure. |
| Databases | Enter details of your on-premises database infrastructure in the Source section. In the Destination section, select the corresponding Azure service you would like to use. |
| Storage | Enter the details of your on-premises storage infrastructure. |
| Networking | Enter the amount of network bandwidth you currently consume in your on-premises environment. |
Step 3: Adjust assumptions
Adjust the values of assumptions that the TCO calculator makes, which might vary between customers. To improve the accuracy of the TCO calculator, you should adjust the values, so they match the costs of your current on-premises infrastructure. The assumptions you can customize include:
- Storage costs
- IT labor costs
- Hardware costs
- Software costs
- Electricity costs
- Virtualization costs
- Datacenter costs
- Networking costs
- Database costs
Step 4: View the report
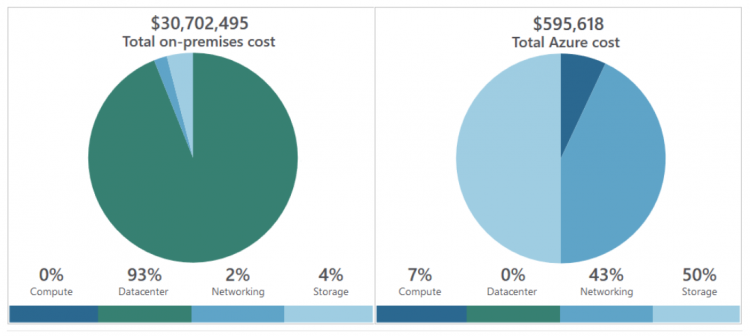
The TCO calculator generates a detailed report based on the details you enter and the adjustments you make. The report allows you to compare the costs of your on-premises infrastructure with the costs of using Azure products and services to host your infrastructure in the cloud.
Save on infrastructure costs
We have seen how to create cost estimates for environments you’d like to build, walked through some tools to get details on where we’re spending money, and projected future expenses. Our next challenge is to look at how to reduce those infrastructure costs.
Use Azure credits
Visual Studio subscribers can activate a monthly credit benefit that allows you to experiment with, develop, and test new solutions on Azure. Use Azure credits to try out new services such as App Service, Windows 10 VMs, Azure SQL Server databases, Containers, Cognitive Services, Functions, Data Lake, and more without incurring any monetary costs.
When you activate this benefit, you will own a separate Azure subscription under your account with a monthly credit balance that renews each month while you remain an active Visual Studio subscriber.
The credit amount varies based on the program level, and you should check the documentation for more details on how much credit you receive for your specific subscription level. For example:
- $50 per month for VS Professional
- $150 per month for Enterprise
Important – The monthly Azure credit for Visual Studio subscribers is for development and testing only and does not carry a financially-backed SLA. Azure will suspend any instance (VM or cloud service) that runs continuously for more than 120 hours or if it’s determined that the instance is being used for production. This benefit is made available to Visual Studio subscribers on a best efforts basis; there is no guarantee of capacity availability.
Use spending limits
By default, Azure subscriptions that have associated monthly credits (which includes trial accounts) have a spending limit to ensure you aren’t charged once you have used up your credits. This feature is useful for development teams exploring new solution architectures as it ensures you won’t have an unexpectedly large bill at the end of the month.
Note – Azure spending limits are not the same as Subscription, Service, or Resource Group limits and quotas.
Azure provides the Spending Limits feature to help prevent you from exhausting the credit on your account within each billing period. When your Azure usage results in charges that use all the included monthly credit, the services that you deployed are disabled and turned off for the rest of that billing period. Once a new billing period starts, assuming there are credits available, the resources are reactivated and deployed.
You are notified by email when you hit the spending limit for your subscription. In addition, the Azure portal includes notifications about your credit spend. You can adjust the spending limit as desired or even turn it off.
Important – The spending limit feature is specific to subscriptions that include a monthly Azure credit allotment. It is not available on pay-only subscriptions.
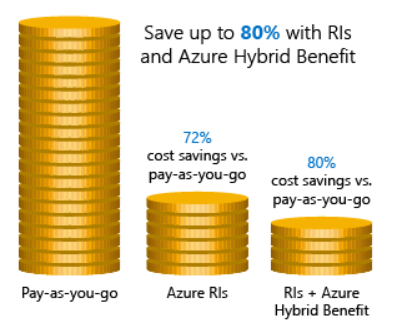
Use reserved instances
If you have VM workloads that are static and predictable, particularly ones that run 24x7x365, using reserved instances is a fantastic way to potentially save up to 70-80%, depending on the VM size. The following illustration shows that using Azure reserved instances saves you up to 72% and using reserved instance plus Azure Hybrid Benefit saves up to 80% in costs.
Reserved instances are purchased in one-year or three-year terms, with payment required for the full term up front. After it’s purchased, Microsoft matches up the reservation to running instances and decrements the hours from your reservation. Reservations can be purchased through the Azure portal. And because reserved instances are a compute discount, they are available for both Windows and Linux VMs.
Choose low-cost locations and regions
The cost of Azure products, services, and resources can vary across locations and regions, and if possible, you should use them in those locations and regions where they cost less.
Note – Some resources are metered and billed according to how much outgoing network bandwidth they consume (egress). You should provision connected resources that are bandwidth metered in the same region to reduce egress traffic between them.
Research available cost-saving offers
Keep up-to-date with the latest Azure customer and subscription offers, and switch to offers that provide the most significant cost-saving benefit.
You can check the Azure Updates page for information about the latest updates to Azure products, services, and features, as well as product roadmaps and announcements.
Right-size underutilized virtual machines
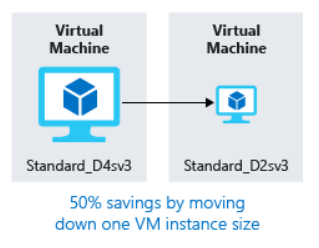
Recall from our previous discussion that Azure Cost Management and Azure Advisor might recommend right-sizing or shutting down VMs. Right-sizing a virtual machine is the process of resizing it to a proper size. Let’s imagine you have a server running as a domain controller that is sized as a Standard_D4sv3, but your VM is sitting at 90% idle the vast majority of the time. By resizing this VM to a Standard_D2sv3, you reduce your compute cost by 50%. Costs are linear and double for each size larger in the same series. In this case, you might even benefit from changing the instance series to go to a less expensive VM series. The following illustration shows a 50% savings achieved by moving one size down within the same series.
Over-sized virtual machines are a common unnecessary expense on Azure and one that can be easily fixed. You can change the size of a VM through the Azure portal, Azure PowerShell, or the Azure CLI.
Tip – Resizing a VM requires it to be stopped, resized, and then restarted. This may take a few minutes depending on how significant the size change is. Plan for an outage, or shift your traffic to another instance while you perform this task.
Deallocate virtual machines in off hours
If you have virtual machine workloads that are only used during certain periods, but you’re running them every hour of every day, you’re wasting money. These VMs are great candidates to shut down when not in use and start back up on a schedule, saving you compute costs while the VM is deallocated.
This approach is an excellent strategy for development environments. It’s often the case that development may happen only during business hours, giving you the flexibility to deallocate these systems in the off hours and stopping your compute costs from accruing. Azure now has an automation solution fully available for you to leverage in your environment.
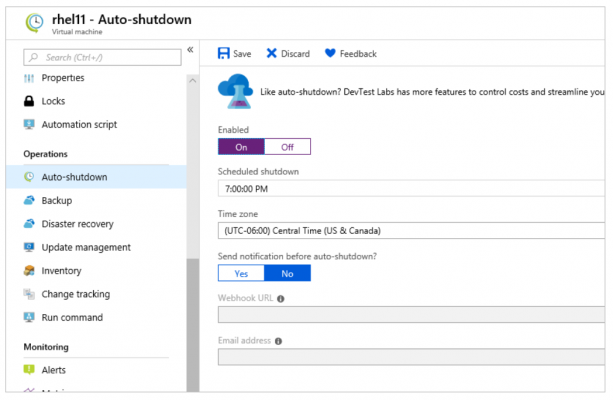
You can also use the auto-shutdown feature on a virtual machine to schedule automated shutdowns.
Delete unused virtual machines
This advice may sound obvious, but if you aren’t using a service, you should shut it down. It’s not uncommon to find non-production or proof-of-concept systems left around following a project that is no longer needed. Regularly review your environment and work to identify these systems. Shutting down these systems can have a multifaceted benefit by saving you not only on infrastructure costs but also potential savings on licensing and operations.
Migrate to PaaS or SaaS services
Lastly, as you move workloads to the cloud, a natural evolution is to start with infrastructure-as-a-service (IaaS) services and then move them to platform-as-a-service (PaaS) as appropriate, in an iterative process.
PaaS services typically provide substantial savings in both resource and operational costs. The challenge is that depending on the type of service, varying levels of effort will be required to move to these services from both a time and resource perspective. You might be able to move a SQL Server database to Azure SQL Database easily, but it might take substantially more effort to transfer your multi-tier application to a container or serverless-based architecture. It’s a good practice to continuously evaluate the architecture of your applications to determine if there are efficiencies to be gained through PaaS services.
Azure makes it easy to test these services with little risk, giving you the ability to try out new architecture patterns relatively easily. That said, it’s typically a longer journey and might not be of immediate help if you’re looking for quick wins from a cost-savings perspective. The Azure Architecture Center is a great place to get ideas for transforming your application, as well as best practices across a wide array of architectures and Azure services.
Save on licensing costs
Licensing is another area that can dramatically impact your cloud spending. Let’s look at some ways you can reduce your licensing costs.
Linux vs. Windows
Many of the Azure services you deploy have the choice of running on Windows or Linux. In some cases, the cost of the product can be different based on the OS you choose. Where you have a choice, and your application doesn’t depend on the underlying OS, it’s useful to compare pricing to determine whether you can save money.
Azure Hybrid Benefit for Windows Server
Many customers have invested in Windows Server licenses and would like to repurpose this investment on Azure. The Azure Hybrid Benefit gives customers the right to use these licenses for virtual machines on Azure. That means you won’t be charged for the Windows Server license and will instead be billed at the Linux rate.
To be eligible for this benefit, your Windows licenses must be covered by Software Assurance. The following guidelines will also apply:
Each two-processor license or each set of 16-core licenses is entitled to two instances of up to 8 cores or one instance of up to 16 cores.
Standard Edition licenses can only be used once either on-premises or in Azure. That means you can’t use the same license for an Azure VM and a local computer.
Datacenter Edition benefits allow for simultaneous usage both on-premises and in Azure so that the license will cover two running Windows machines.
Note
Most customers are typically licensed by core, so you’ll use that model for your calculation. If you have questions about what licenses you have, reach out to your license reseller or your Microsoft account team.
Applying the benefit is easy. It can be turned on and off at any time with existing VMs or applied at deployment time for new VMs. The Hybrid Benefit (especially when combined with reserved instances) can provide substantial license savings.
Azure Hybrid Benefit for SQL Server
The Azure Hybrid Benefit for SQL Server helps you maximize the value from your current licensing investments and accelerate your migration to the cloud. Azure Hybrid Benefit for SQL Server is an Azure-based benefit that enables you to use your SQL Server licenses with active Software Assurance to pay a reduced rate.
You can use this benefit even if the Azure resource is active, but the reduced rate will only be applied from the time you select it in the portal. No credit will be issued retroactively.
Azure SQL Database vCore-based options
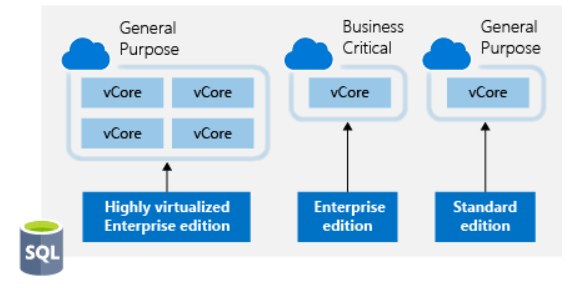
For Azure SQL Database, the Azure Hybrid Benefit works as follows:
- If you have Standard Edition per core licenses with active Software Assurance, you can get one vCore in the General Purpose service tier for every one license core you own on-premises.
- If you have Enterprise Edition per core licenses with active Software Assurance, you can get one vCore in the Business Critical service tier for every one license core you own on-premises. Note that the Azure Hybrid Benefit for SQL Server for the Business Critical service tier is available only to customers who have Enterprise Edition licenses.
- If you have highly virtualized Enterprise Edition per core licenses with active Software Assurance, you can get four vCores in the General Purpose service tier for every one license core you own on-premises. This is a unique virtualization benefit available only on Azure SQL Database.
- The following illustration shows the vCore-based options available in each service tier with Azure Hybrid Benefit for SQL Server licenses.
For SQL Server in Azure Virtual Machines, the Azure Hybrid Benefit works as follows:
- If you have Enterprise Edition per core licenses with active Software Assurance, you can get one core of SQL Server Enterprise Edition in Azure Virtual Machines for every one license core you own on-premises.
- If you have Standard Edition per core licenses with active Software Assurance, you can get one core of SQL Server Standard Edition in Azure Virtual Machines for every one license core you own on-premises.
- This can make a dramatic impact on your Azure spending with SQL Server workloads.
Use Dev/Test subscription offers
The Enterprise Dev/Test and Pay-As-You-Go Dev/Test offers are a benefit you can take advantage of to save costs on your non-production environments. This benefit gives you several discounts, most notably for Windows workloads, eliminating license charges and only billing you at the Linux rate for virtual machines. This also applies to SQL Server and any other Microsoft software that is covered under a Visual Studio subscription (formerly known as MSDN).
There are a few requirements for this benefit, one being that it’s only for non-production workloads, and another being that any users of these environments (excluding testers) must be covered under a Visual Studio subscription. In short, for non-production workloads, this allows you to save money on your Windows, SQL Server, and other Microsoft virtual machine workloads.
Below are the full details of each offer. If you are a customer on an Enterprise Agreement, you’d want to leverage the Enterprise Dev/Test offer, and if you are a customer without an Enterprise Agreement and are instead using PAYG accounts, you’d leverage the Pay-As-You-Go Dev/Test offer.
Bring your own SQL Server license
If you are a customer on an Enterprise Agreement and already have an investment in SQL Server licenses, and they have freed up as part of moving resources to Azure, you can provision bring your own license (BYOL) images off the Azure Marketplace, giving you the ability to take advantage of these unused licenses and reduce your Azure VM cost. You’ve always been able to do this by provisioning a Windows VM and manually installing SQL Server, but this simplifies the creation process by leveraging Microsoft certified images. Search for BYOL in the Marketplace to find these images.
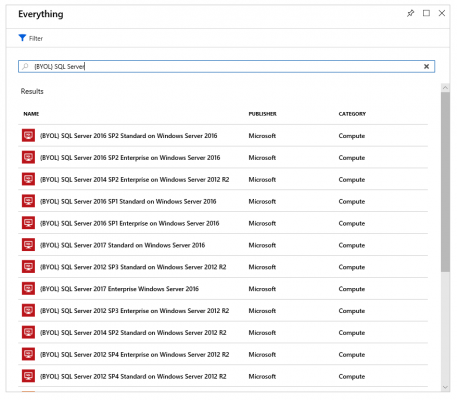
Important – An Enterprise Agreement subscription is required to use these certified BYOL images.
Use SQL Server Developer Edition
A lot of people are unaware that SQL Server Developer Edition is a free product for nonproduction use. Developer Edition has all the same features that Enterprise Edition has, but for nonproduction workloads, you can save dramatically on your licensing costs.
Look for SQL Server images for Developer Edition on the Azure Marketplace and use them for development or testing purposes to eliminate the additional cost for SQL Server in these cases.
Tip – For full licensing information, take a look at the documented pricing guidance.
Use constrained instance sizes for database workloads
Many customers have high requirements for memory, storage, or I/O bandwidth but low CPU core counts. Based on this popular request, Microsoft has made available the most popular VM sizes (DS, ES, GS, and MS) in new sizes that constrain the vCPU count to one half or one-quarter of the original VM size, while maintaining the same memory, storage, and I/O bandwidth.
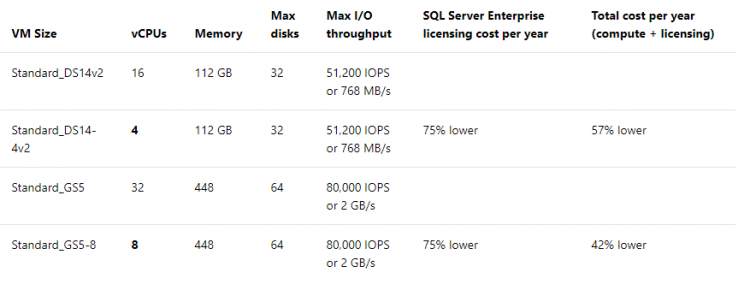
Because database products like SQL Server and Oracle are licensed per CPU, this allows customers to reduce licensing cost by up to 75 percent but still maintain the high performance their database requires.
For more on Tutorial visit – Microsoft Azure Fundamental (AZ-900)