Investigating Security Incidents
In this tutorial, we will understand and learn about responding and investigating security incidents with triaging security alerts. However, the Security Center is responsible for continuously analyzing hybrid cloud workloads using advanced analytics and threat intelligence to alert you to malicious activity. In addition, you can integrate alerts from other security products and services into the Security Center. And for creating custom alerts based on your own indicators or intelligence sources.
Prerequisites
For stepping through the features covered in this tutorial, you must be on Security Center’s standard pricing tier. However, you can try the Security Center Standard at no cost.
Scenario
Contoso recently did migration for some of their on-premises resources to Azure. This also includes some virtual machine-based line-of-business workloads and SQL databases. But, currently, Contoso’s Core Computer Security Incident Response Team (CSIRT) is facing problems in investigating security issues. This is due to security intelligence not being integrated with their current incident response tools. However, this lack of integration introduces a problem during the Detect stage. And further, during the Assess and Diagnose stages. So, as part of this migration, they decided to opt-in for the Security Center to help them address this problem.
The first phase of this migration finished after they onboarded all resources and addressed all of the security recommendations from the Security Center. However, Contoso CSIRT is the focal point for dealing with computer security incidents. And, the team consists of a group of people with responsibilities for dealing with any security incident.

Triage security alerts
Security Center offers a unified view of all security alerts. Security alerts are ranked on the basis of the severity and when possible related alerts are combined into a security incident. When triaging alerts and incidents, you should:
- Firstly, dismiss alerts for which no additional action is required, for example if the alert is a false positive
- Secondly, act to remediate known attacks, for example blocking network traffic from a malicious IP address
- Lastly, determine alerts that require further investigation
For triaging security alerts:
- Firstly, on the Security Center main menu under DETECTION, select Security alerts.
- Secondly, in the list of alerts, click on a security incident, which is a collection of alerts, to learn more about this incident. Security incident detected opens.
- Thirdly, on this screen you have the security incident description on top, and the list of alerts that are part of this incident.
- Lastly, if the root cause and scope of the malicious activity is unknown, proceed to the next step to investigate further.
Investigating an alert or incident
- Firstly, on the Security alert page, click the Start investigation button (if you already started, the name changes to Continue investigation).
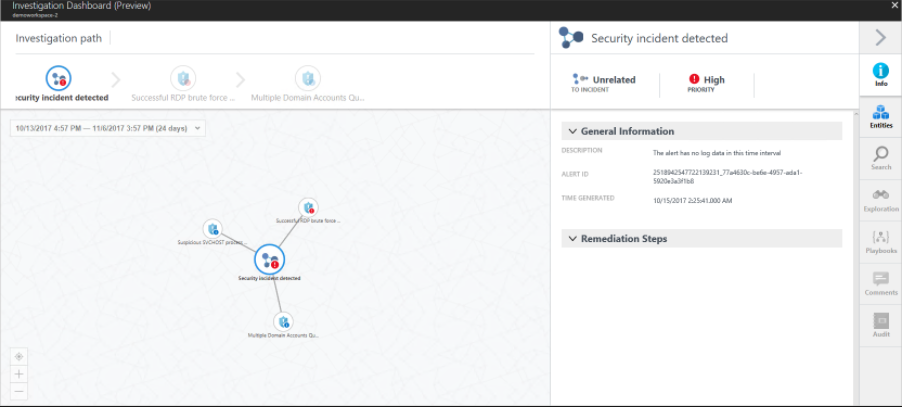
However, the investigation map refers to a graphical representation of the entities that are connected to this security alert or incident. By clicking on an entity in the map, the information about that entity will display new entities, and the map expands. The entity selected in the map has its properties highlighted in the pane on the right side of the page. And, the information available on each tab will change according to the selected entity. During the process of investigation, check all relevant information to better understand the attacker’s movement.
- Secondly, if you need more evidence, or must further investigate entities that were found during the investigation, proceed to the next step.
Searching data for investigation
For searching data you can use search capabilities in the Security Center and to have more details about the entities that are part of the investigation.
However, for performing a search, open the Security Center dashboard, click Search in the left navigation pane, select the workspace that contains the entities that you want to search, type the search query, and click the search button.
Cleaning up resources
If you plan to continue on to work with subsequent quickstarts and tutorials, then continue running the standard tier and keep automatic provisioning enabled. However, if you do not plan to continue or wish to return to the Free tier:
- Firstly, return to the Security Center main menu and select Security Policy.
- Secondly, select the subscription or policy that you want to return to Free. Security policy opens.
- Then, under POLICY COMPONENTS, select Pricing tier.
- After that, select Free to change subscription from standard tier to Free tier.
- Lastly, select Save.
If you wish to disable automatic provisioning:
- Firstly, return to the Security Center main menu and select Security policy.
- Secondly, select the subscription that you wish to disable automatic provisioning.
- Then, under Security policy – Data Collection, select Off under Onboarding to disable automatic provisioning.
- Lastly, select Save.

Reference: Microsoft Documentation