Implementing a solution using Data Lake Storage Gen2
In this tutorial, we will learn and understand about loading data into Azure Data Lake Storage Gen2 with Azure Data Factory.
Azure Data Lake Storage Gen2 refers to a set of capabilities dedicated to big data analytics, built into Azure Blob storage. It provides access to interface with your data using both file systems and objects storage paradigms.
On the other hand, Azure Data Factory (ADF) refers to a fully managed cloud-based data integration service. Moreover, this service can populate the lake with data from a rich set of on-premises and cloud-based data stores and save time when building your analytics solutions.
Lastly, Azure Data Factory provides a scale-out, managed data movement solution. Because of the scale-out architecture of ADF, it can ingest data at a high throughput.
Prerequisites
- Firstly, you must have an Azure subscription.
- Secondly, an Azure Storage account with Data Lake Storage Gen2 enabled.
- Thirdly, an AWS account with an S3 bucket that contains data.
Creating a data factory
- Firstly, on the left menu, select Create a resource > Data + Analytics > Data Factory.
- Secondly, in the New data factory page, provide values for following fields:
- Firstly, name in which enter a globally unique name for your Azure data factory. However, if you receive the error “Data factory name YourDataFactoryName is not available”, then enter a different name for the data factory.
- Secondly, subscription, where you select your Azure subscription in which to create the data factory.
- Thirdly, resource Group, where you select an existing resource group from the drop-down list, or select the Create new option and enter the name of a resource group. Then, Select version V2.
- Lastly, location, in which select the location for the data factory.
- Thirdly, select Create.
- After completing the creation, go to your data factory. There you see the Data Factory home page as shown in the following image:
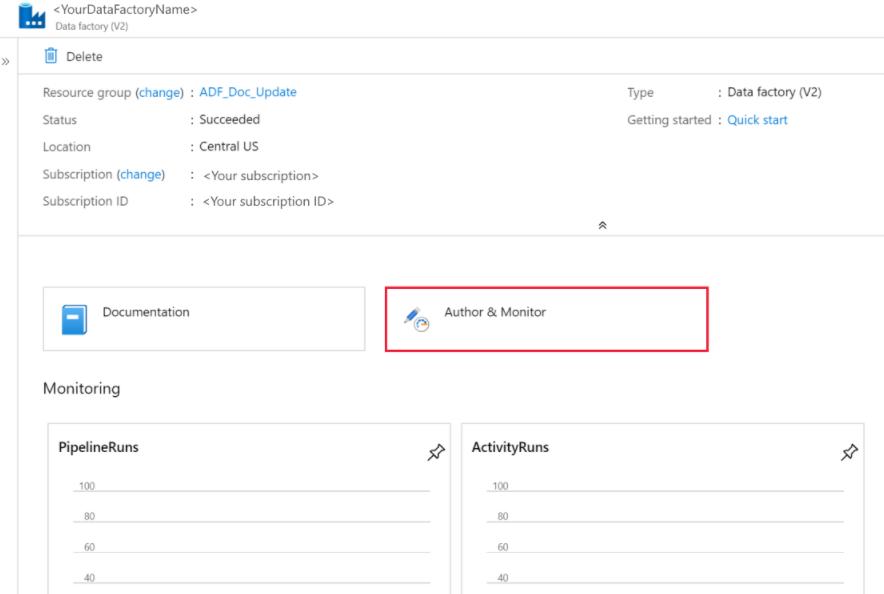
- Lastly, select the Author & Monitor tile to launch the Data Integration Application in a separate tab.

Loading data into Azure Data Lake Storage Gen2
- Firstly, in the Get started page, select the Copy Data tile to launch the Copy Data tool.
- Secondly, in the Properties page, specify CopyFromAmazonS3ToADLS for the Task name field, and select Next.
- Thirdly, in the Source data store page, click + Create new connection. Then, select Amazon S3 from the connector gallery, and select Continue.
- Fourthly, in the New linked service (Amazon S3) page, do the following steps:
- Firstly, specify the Access Key ID value.
- Then, specify the Secret Access Key value.
- Lastly, click Test connection to validate the settings, then select Create. And, you will see a new AmazonS3 connection get created. Select Next.
- Fifthly, in the Choose the input file or folder page, browse to the folder and file that you want to copy over. Select the folder/file, and then select Choose.
- After that, specify the copy behavior by checking the Recursively and Binary copy options. Select Next.
- Then, in the Destination data store page, click + Create new connection. And, select Azure Data Lake Storage Gen2, and select Continue.
- Next, in the New linked service (Azure Data Lake Storage Gen2) page,
Do the following steps:
- Firstly, select your Data Lake Storage Gen2 capable account from the “Storage account name” drop-down list.
- Then, select Create to create the connection. Then select Next.
- After that, in the Choose the output file or folder page, enter copyfroms3 as the output folder name, and select Next. However, ADF will create the corresponding ADLS Gen2 file system and subfolders during copy if it doesn’t exist.
- Then, in the Settings page, select Next to use the default settings.
- Now, in the Summary page, review the settings, and select Next.
- Next, on the Deployment page, select Monitor for monitoring the pipeline (task).
- However when the pipeline run completes successfully, you see a pipeline run that is triggered by a manual trigger. There you can use links under the PIPELINE NAME column to view activity details and to rerun the pipeline.
- For seeing activity runs associated with the pipeline run, just select the CopyFromAmazonS3ToADLS link under the PIPELINE NAME column. Further, for details about the copy operation, select the Details link (eyeglasses icon) under the ACTIVITY NAME column. Moreover, you can monitor details like the volume of data copied from the source to the sink, data throughput, execution steps with corresponding duration, and used configuration.
- For refreshing the view, select Refresh. And, then, select All pipeline runs at the top to go back to the Pipeline Runs view.
- Lastly, verify that the data is copied into your Data Lake Storage Gen2 account.

Reference: Microsoft Documentation