Implement PolyBase
In this we will talk about PolyBase to load the WideWorldImportersDW data warehouse from Azure Blob storage to your data warehouse in Azure Synapse Analytics SQL pool.
Create a blank data warehouse in SQL pool
A SQL pool is created with a defined set of compute resources. The SQL pool is created within an Azure resource group and in a logical SQL server.
Follow these steps to create a blank SQL pool.
- Firstly, select Create a resource in the the Azure portal.
- Secondly, select Databases from the New page, and select Azure Synapse Analytics under Featured on the New page.
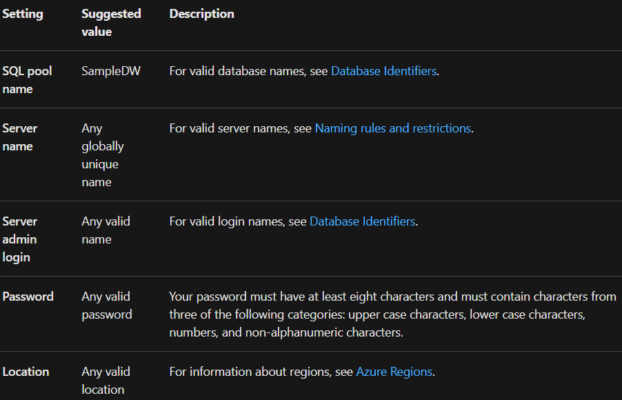
- Thirdly, fill out the Project Details section with the following information:

- Next, under SQL pool details, provide a name for your SQL pool. Next, either select an existing server from the drop down, or select Create new under the Server settings to create a new server. Fill out the form with the following information:
- After that, select performance level. The slider by default is set to DW1000c. Move the slider up and down to choose the desired performance scale.
- Then, on the Additional Settings page, set the Use existing data to None, and leave the Collation at the default of SQL_Latin1_General_CP1_CI_AS.
- Lastly, select Review + create to review your settings, and then select Create to create your data warehouse. You can monitor your progress by opening the deployment in progress page from the Notifications menu.

Create a server-level firewall rule
The Azure Synapse Analytics service creates a firewall at the server-level that prevents external applications and tools from connecting to the server or any databases on the server. To enable connectivity, you can add firewall rules that enable connectivity for specific IP addresses.
- Firstly, after the deployment completes, search for your pool name in the search box in the navigation menu, and select the SQL pool resource. Select the server name.
- Secondly, select the server name.
- Thirdly, select Show firewall settings. The Firewall settings page for the server opens.
- Then, on the Firewalls and virtual networks page, select Add client IP to add your current IP address to a new firewall rule. A firewall rule can open port 1433 for a single IP address or a range of IP addresses.
- Lastly, select Save. A server-level firewall rule is created for your current IP address opening port 1433 on the server.
Connect to the server as server admin
This section uses SQL Server Management Studio (SSMS) to establish a connection to your server.
- Firstly, open SQL Server Management Studio.
- Secondly, in the Connect to Server dialog box, enter the following information:
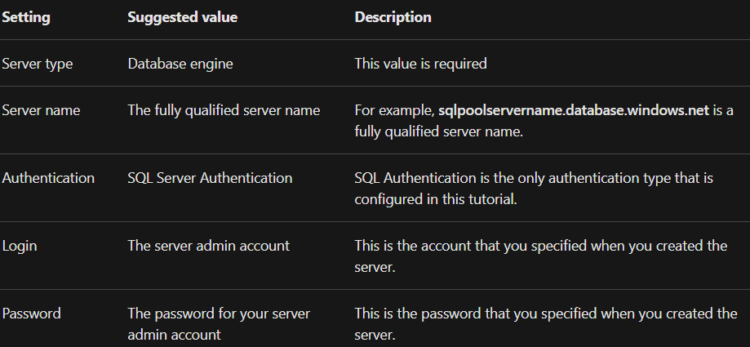
- Then, click Connect. The Object Explorer window opens in SSMS.
- Next, in Object Explorer, expand Databases. Then expand System databases and master to view the objects in the master database. Expand SampleDW to view the objects in your new database.
Create a user for loading data
The server admin account is meant to perform management operations, and is not suited for running queries on user data. Loading data is a memory-intensive operation. Memory maximums are defined according to the Generation of SQL pool you’re using, data warehouse units, and resource class.
Since you are currently connected as the server admin, you can create logins and users. Use these steps to create a login and user called LoaderRC60. Then assign the user to the staticrc60 resource class.
- Firstly, in SSMS, right-click master to show a drop-down menu, and choose New Query. A new query window opens.
- Secondly, In the query window, enter these T-SQL commands to create a login and user named LoaderRC60, substituting your own password for ‘a123STRONGpassword!’.
SQL
CREATE LOGIN LoaderRC60 WITH PASSWORD = ‘a123STRONGpassword!’;
CREATE USER LoaderRC60 FOR LOGIN LoaderRC60;
- Then, click Execute.
- After that, right-click SampleDW, and choose New Query. A new query Window opens.
- Next, enter the following T-SQL commands to create a database user named LoaderRC60 for the LoaderRC60 login. The second line grants the new user CONTROL permissions on the new data warehouse. The third line adds the new user as a member of the staticrc60 resource class.
SQL
CREATE USER LoaderRC60 FOR LOGIN LoaderRC60;
GRANT CONTROL ON DATABASE::[SampleDW] to LoaderRC60;
EXEC sp_addrolemember ‘staticrc60’, ‘LoaderRC60’;
- Lastly, click Execute.

Reference: Microsoft Documentation