Implement for high availability, disaster recovery, and global distribution
Microsoft DP-200 exam is getting retired on June 30, 2021. A new replacement exam Data Engineering on Microsoft Azure Beta (DP-203) is available.
In this we will learn about show how to use the Azure portal to set up Azure Cosmos DB global distribution and then connect using the SQL API. And how to Online backup and on-demand data restore in Azure Cosmos DB.
Add global database regions using the Azure portal
Azure Cosmos DB is available in all Azure regions worldwide. After selecting the default consistency level for your database account, you can associate one or more regions.
- Firstly, in the Azure portal, in the left bar, click Azure Cosmos DB.
- Secondly, in the Azure Cosmos DB page, select the database account to modify.
- Then, in the account page, click Replicate data globally from the menu.
- Lastly, in the Replicate data globally page, select the regions to add or remove by clicking regions in the map. And then click Save.
However, once you add a second region, the Manual Failover option is enabled on the Replicate data globally page in the portal. You can use this option to test the failover process or change the primary write region. And, once you add a third region, the Failover Priorities option is enabled on the same page so that you can change the failover order for reads.
Selecting global database regions
There are two common scenarios for configuring two or more regions:
- Firstly, delivering low-latency access to data to end users no matter where they are located around the globe
- Secondly, adding regional resiliency for business continuity and disaster recovery (BCDR)
Connecting to a preferred region using the SQL API
- In order to take advantage of global distribution, client applications can specify the ordered preference list of regions. This is to be used to perform document operations. Based on the Azure Cosmos DB account configuration, current regional availability and the preference list specified. Here, the most optimal endpoint will be chosen by the SQL SDK to perform write and read operations.
- However, this preference list is specified when initializing a connection using the SQL SDKs. The SDKs accept an optional parameter PreferredLocations that is an ordered list of Azure regions.
- Secondly, the SDK will automatically send all writes to the current write region. All reads will be sent to the first available region in the preferred locations list. If the request fails, the client will fail down the list to the next region.
- Next, the SDK will only attempt to read from the regions specified in preferred locations. For example, if the Azure Cosmos account is available in four regions, but the client only specifies two read(non-write) regions within the PreferredLocations. Then no reads will be served out of the read region that is not specified in PreferredLocations.
- Lastly, the application can verify the current write endpoint and read endpoint chosen by the SDK by checking two properties, WriteEndpoint and ReadEndpoint, available in SDK version 1.8 and above. And, if the PreferredLocations property is not set, all requests will be served from the current write region.
- However, if you don’t specify the preferred locations but used the setCurrentLocation method, the SDK automatically populates the preferred locations based on the current region that the client is running in. The SDK orders the regions based on the proximity of a region to the current region.
Python SDK
The following code shows how to set preferred locations by using the Python SDK:
Python
connectionPolicy = documents.ConnectionPolicy()
connectionPolicy.PreferredLocations = [‘West US’, ‘East US’, ‘North Europe’]client = cosmos_client.CosmosClient(ENDPOINT, {‘masterKey’: MASTER_KEY}, connectionPolicy)
Java V4 SDK
The following code shows how to set preferred locations by using the Java SDK:
Async
Java SDK V4 (Maven com.azure::azure-cosmos) Async API
Java
ArrayList preferredRegions = new ArrayList();
preferredRegions.add(“East US”);
preferredRegions.add( “West US”);
preferredRegions.add(“Canada Central”);
CosmosAsyncClient client =
new CosmosClientBuilder()
.endpoint(HOST)
.key(MASTER_KEY)
.preferredRegions(preferredRegions)
.contentResponseOnWriteEnabled(true)
.buildAsyncClient();
Online backup and on-demand data restore in Azure Cosmos DB
Azure Cosmos DB automatically takes backups of your data at regular intervals. The automatic backups are taken without affecting the performance or availability of the database operations. All the backups are stored separately in a storage service, and those backups are globally replicated for resiliency against regional disasters. However, the automatic backups are helpful in scenarios when you accidentally delete or update your Azure Cosmos account, database, or container and later require the data recovery.

Automatic and online backups
With Azure Cosmos DB, not only your data, but also the backups of your data are highly redundant and resilient to regional disasters. The following steps show how Azure Cosmos DB performs data backup:
- Firstly, Azure Cosmos DB automatically takes a full backup of your database every 4 hours and at any point of time, only the latest two backups are stored by default. If the default intervals aren’t sufficient for your workloads, you can change the backup interval and the retention period from the Azure portal.
- Secondly, Azure Cosmos DB stores these backups in Azure Blob storage whereas the actual data resides locally within Azure Cosmos DB.
- Thirdly, to guarantee low latency, the snapshot of your backup is stored in Azure Blob storage in the same region as the current write region (or one of the write regions, in case you have a multi-region write configuration).
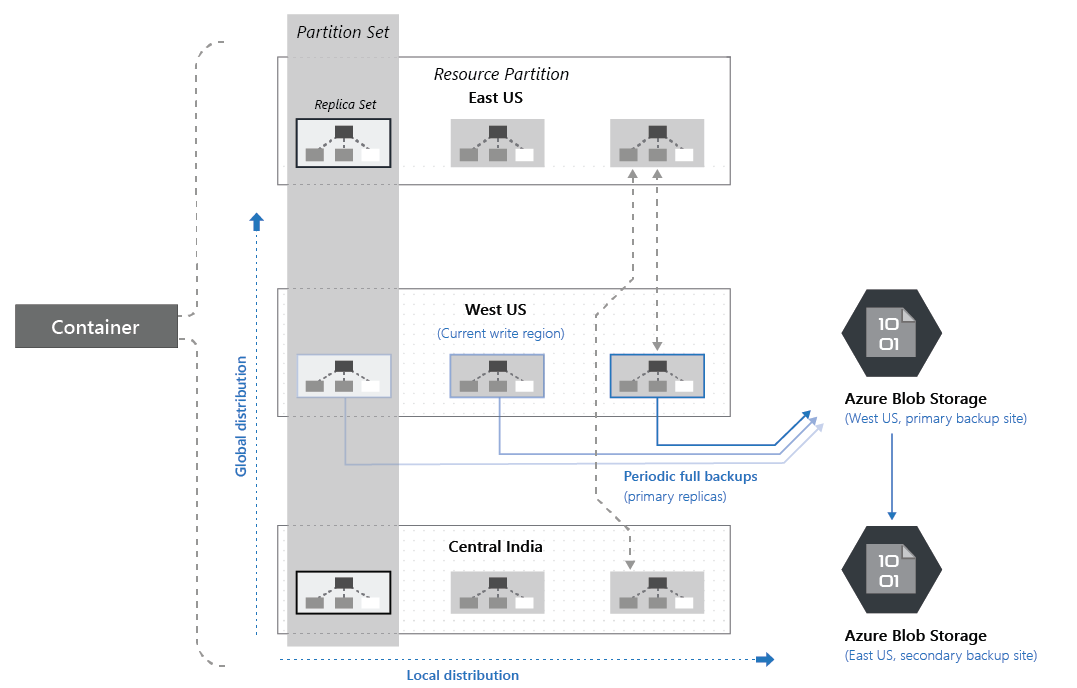
The following image shows how an Azure Cosmos container with all the three primary physical partitions in West US is backed up in a remote Azure Blob Storage account in West US and then replicated to East US:
- Lastly, the backups are taken without affecting the performance or availability of your application. Azure Cosmos DB performs data backup in the background without consuming any additional provisioned throughput (RUs) or affecting the performance and availability of your database.
Modify the backup interval and retention period
Azure Cosmos DB automatically takes a full backup of your data for every 4 hours and at any point of time, the latest two backups are stored. This configuration is the default option and it’s offered without any additional cost. You can change the default backup interval and retention period during the Azure Cosmos account creation or after the account is created. However, the backup configuration is set at the Azure Cosmos account level and you need to configure it on each account. After you configure the backup options for an account, it’s applied to all the containers within that account. Currently you can change them backup options from Azure portal only.
However, if you have accidentally deleted or corrupted your data, before you create a support request to restore the data, make sure to increase the backup retention for your account to at least seven days. It’s best to increase your retention within 8 hours of this event. This way, the Azure Cosmos DB team has enough time to restore your account.
Use the following steps to change the default backup options for an existing Azure Cosmos account:
- Firstly, sign into the Azure portal.
- Secondly, navigate to your Azure Cosmos account and open the Backup & Restore pane. Update the backup interval and the backup retention period as required.
- Backup Interval – It’s the interval at which Azure Cosmos DB attempts to take a backup of your data. Backup takes a non-zero amount of time and in some case it could potentially fail due to downstream dependencies. Azure Cosmos DB tries its best to take a backup at the configured interval, however, it doesn’t guarantee that the backup completes within that time interval.
- Backup Retention – It represents the period where each backup is retained. You can configure it in hours or days. The minimum retention period can’t be less than two times the backup interval (in hours) and it can’t be greater than 720 hours.
- Copies of data retained – By default, two backup copies of your data are offered at free of charge. There is an additional charge if you need more than two copies.
- Thirdly, if you configure backup options during the account creation. Then, you can configure the Backup policy, which is either Periodic or Continuous. The periodic policy allows you to configure the Backup interval and Backup retention. The continuous policy is currently available by sign-up only.
Request data restore from a backup
If you accidentally delete your database or a container, you can file a support ticket or call the Azure support to restore the data from automatic online backups. Azure support is available for selected plans only such as Standard, Developer, and plans higher than those. However, to restore a specific snapshot of the backup, Azure Cosmos DB requires that the data is available for the duration of the backup cycle for that snapshot. You should have the following details before requesting a restore:
- Firstly, have your subscription ID ready.
- Secondly, based on how your data was accidentally deleted or modified, you should prepare to have additional information. It is advised that you have the information available ahead to minimize the back-and-forth that can be detrimental in some time sensitive cases.
- Thirdly, if the entire Azure Cosmos DB account is deleted, you need to provide the name of the deleted account. If you create another account with the same name as the deleted account, share that with the support team because it helps to determine the right account to choose.
- Next, if one or more databases are deleted, you should provide the Azure Cosmos account, as well as the Azure Cosmos database names and specify if a new database with the same name exists.
- And, if one or more containers are deleted, you should provide the Azure Cosmos account name, database names, and the container names. And specify if a container with the same name exists.
- Lastly, if you have accidentally deleted or corrupted your data, you should contact Azure support within 8 hours so that the Azure Cosmos DB team can help you restore the data from the backups.

Reference: Microsoft Documentation, Documentation 2