Granting a user access to Azure resources
This tutorial will help you in Granting a user access to Azure resources. Azure role-based access control (Azure RBAC) is a good way in that you manage access to Azure resources.
Granting a user access to Azure resources involves assigning them a role that defines the level of access they have to the resources. The steps to grant a user access to Azure resources are as follows:
- Identify the user or group that requires access to the resources. This can be done by obtaining their Azure AD user or group object ID.
- Determine the appropriate role that the user or group requires. Azure provides built-in roles that define a set of permissions for different types of users. For example, the Contributor role allows users to create and manage resources, while the Reader role only allows them to view resources.
- Assign the appropriate role to the user or group. This can be done through the Azure portal or using Azure CLI or PowerShell. In the Azure portal, navigate to the Access control (IAM) tab for the resource, click Add, select the role you want to assign, and enter the user or group’s Azure AD object ID. Alternatively, you can use Azure CLI or PowerShell commands to assign the role.
- Test the user’s access to the resources. Once the role has been assigned, the user should be able to access the resources they require. You can use Azure RBAC (Role-Based Access Control) to view the user’s access level and ensure it matches their requirements.
Sign in to Azure
First step, always, Signing in to the Azure portal.
Creating a resource group
- Firstly, In the navigation list, select Resource groups.
- Select Add to open the Resource group blade.
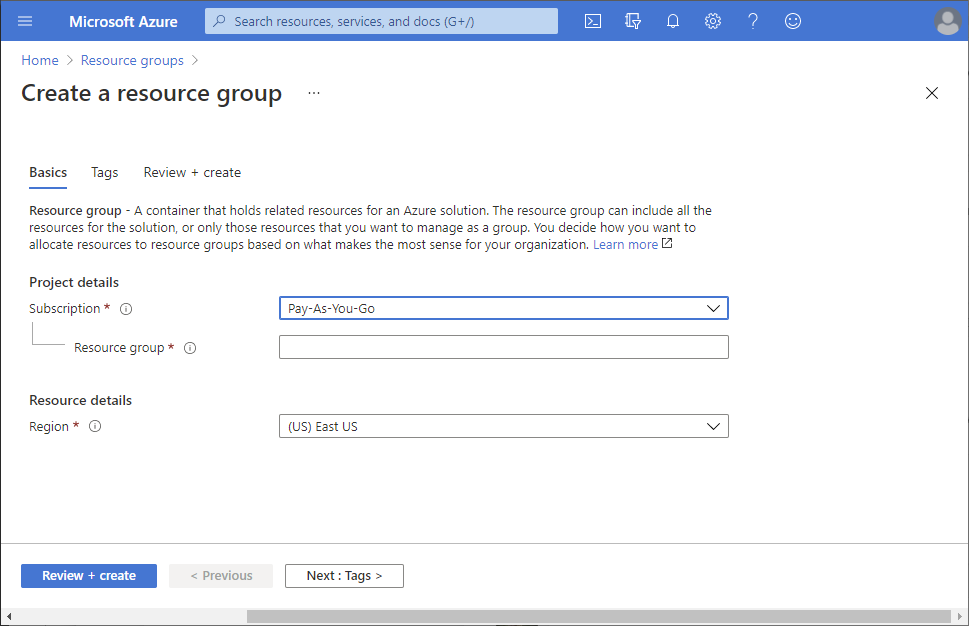
- Subsequently, For Resource group name, type rbac-resource-group.
- Choose a subscription and a location.
- ChooseCreate to make the resource group.
- Select Refresh to refresh the list of resource groups.The new resource group will appear in your resource groups list.

Granting access
To provide access in Azure RBAC, you must create a role assignment.
- Firstly, In the list of Resource groups, select the new rbac-resource-group resource group.
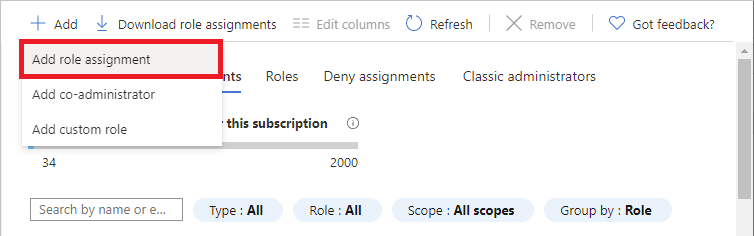
- Chose Access control (IAM).
- Choose the Role assignments tab to watch the current list of role assignments.

Select Add > Add role assignment to view the Add role assignment pane.
If you do not have permissions to assign roles, the Add role assignment option will be not be enabled.
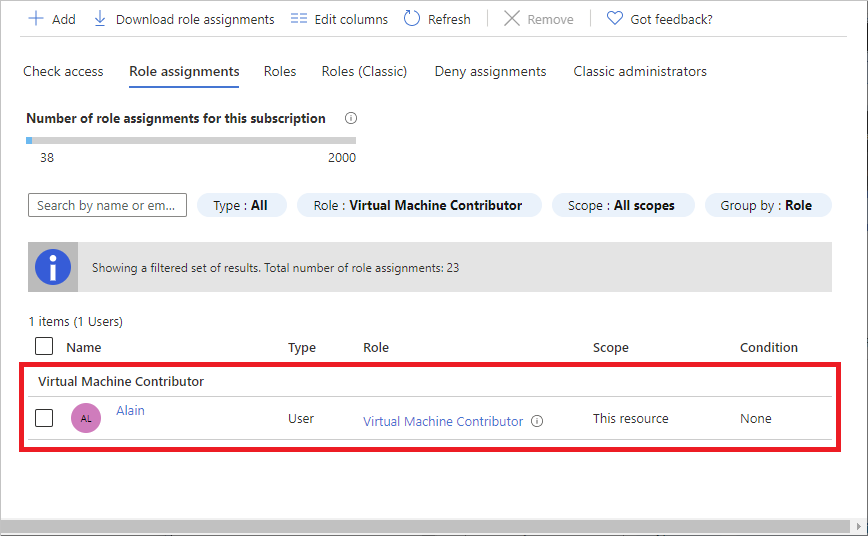
- Subsequently, In the Role drop-down list, choose Virtual Machine Contributor.
- Now, In the Select list,choose yourself or another user.
- Click Save to create the role assignment. Aftersome time, the user is assigned the Virtual Machine Contributor role at the rbac-resource-group resource group scope.
Removing access
In Azure RBAC, for removing access, you have to remove a role assignment.
- In the list of role assignments, add a checkmark next to the user with the Virtual Machine Contributor role.
- Select Remove.
- In the remove role assignment message that appears, choose Yes.

Clean up
- Firstly, In the navigation list, select Resource groups.
- Select rbac-resource-group to open the resource group.
- Select Delete resource group to delete the resource group.

- Furthermore, On the Are you sure you want to delete blade, write the resource group name: rbac-resource-group.
- Finally, Click Delete to delete the resource group and we are done!

AZ-305 Exam Practice Questions
Question: Sarah is a developer who needs to create, update, and delete resources in a specific Azure resource group. Which built-in role should be assigned to Sarah?
A) Reader
B) Contributor
C) Owner
D) Security Administrator
Answer: b) Contributor
Explanation: The Contributor role allows users to create, update, and delete resources within a resource group, but they cannot grant access to other users. This role is appropriate for developers who need to manage resources in a specific resource group.
Question: John is an IT administrator who needs to manage access to Azure resources across multiple subscriptions. Which built-in role should be assigned to John?
A) Reader
B) Contributor
C) Owner
D) User Access Administrator
Answer: d) User Access Administrator
Explanation: The User Access Administrator role allows users to manage access to resources across all subscriptions within an Azure AD tenant. This role is appropriate for IT administrators who need to manage access to resources across multiple subscriptions.
Question: Tom is a consultant who needs to view resources in a specific Azure resource group, but should not be able to make any changes. Which built-in role should be assigned to Tom?
A) Reader
B) Contributor
C) Owner
D) Virtual Machine Contributor
Answer: a) Reader
Explanation: The Reader role allows users to view resources within a resource group but cannot make any changes. This role is appropriate for users who need read-only access to resources, such as consultants or auditors.
Question: Emily is a security analyst who needs to monitor Azure resources for security threats and vulnerabilities. Which built-in role should be assigned to Emily?
A) Reader
B) Security Administrator
C) Contributor
D) Virtual Machine Contributor
Answer: b) Security Administrator
Explanation: The Security Administrator role allows users to manage security-related aspects of Azure resources, such as threat detection, vulnerability assessment, and access control. This role is appropriate for security analysts who need to monitor Azure resources for security threats and vulnerabilities.
Reference documentation – Tutorial: Grant a user access to Azure resources using the Azure portal