Extract, transform, and load data by using Azure Databricks
In this we will learn about how to perform an ETL (extract, transform, and load data) operation by using Azure Databricks. Here, we will learn to extract data from Azure Data Lake Storage Gen2 into Azure Databricks, run transformations on the data in Azure Databricks. And then, load the transformed data into Azure Synapse Analytics.
Prerequisites
- Firstly, create an Azure Synapse, create a server-level firewall rule, and connect to the server as a server admin.
- Secondly, create a master key for the Azure Synapse.
- Then, create an Azure Blob storage account, and a container within it. Also, retrieve the access key to access the storage account.
- After that, create an Azure Data Lake Storage Gen2 storage account.
- Create a service principal. See How to: Use the portal to create an Azure AD application and service principal that can access resources.
Create an Azure Databricks service
In this section, you create an Azure Databricks service by using the Azure portal.
- Firstly, from the Azure portal menu, select Create a resource. Then, select Analytics > Azure Databricks.
- Secondly, under Azure Databricks Service, provide the following values to create a Databricks service:
- Property Description
- Workspace name: Provide a name for your Databricks workspace.
- Subscription: From the drop-down, select your Azure subscription.
- Resource group: Specify whether you want to create a new resource group or use an existing one. However, a resource group is a container that holds related resources for an Azure solution.
- Location: Select West US 2.
- Pricing Tier: Select Standard.
- Property Description
- Thirdly, the account creation takes a few minutes. To monitor the operation status, view the progress bar at the top.
- Lastly, select Pin to dashboard and then select Create.
Create a Spark cluster in Azure Databricks
- Firstly, in the Azure portal, go to the Databricks service that you created, and select Launch Workspace.
- Then, you’re redirected to the Azure Databricks portal. From the portal, select Cluster.
- Thirdly, in the New cluster page, provide the values to create a cluster.
- Lastly, fill in values for the following fields, and accept the default values for the other fields:
- Enter a name for the cluster.
- Make sure you select the Terminate after __ minutes of inactivity check box. If the cluster isn’t being used, provide a duration (in minutes) to terminate the cluster.
- Select Create cluster. After the cluster is running, you can attach notebooks to the cluster and run Spark jobs.
Create a file system in the Azure Data Lake Storage Gen2 account
In this section, you create a notebook in Azure Databricks workspace and then run code snippets to configure the storage account
- Firstly, in the Azure portal, go to the Azure Databricks service that you created, and select Launch Workspace.
- Secondly, on the left, select Workspace. From the Workspace drop-down, select Create > Notebook.
- Next, in the Create Notebook dialog box, enter a name for the notebook. Select Scala as the language, and then select the Spark cluster that you created earlier.
- Fourthly, select Create.
- Below, the following code block sets default service principal credentials for any ADLS Gen 2 account accessed in the Spark session. The second code block appends the account name to the setting to specify credentials for a specific ADLS Gen 2 account.
Session configuration
Scala
val appID = “”
secret = “”
val tenantID = “”
spark.conf.set(“fs.azure.account.auth.type”, “OAuth”)
spark.conf.set(“fs.azure.account.oauth.provider.type”, “org.apache.hadoop.fs.azurebfs.oauth2.ClientCredsTokenProvider”)
spark.conf.set(“fs.azure.account.oauth2.client.id”, “”)
spark.conf.set(“fs.azure.account.oauth2.client.secret”, “”)
spark.conf.set(“fs.azure.account.oauth2.client.endpoint”, “https://login.microsoftonline.com//oauth2/token”)
spark.conf.set(“fs.azure.createRemoteFileSystemDuringInitialization”, “true”)
Account configuration
Scala
val storageAccountName = “”
val appID = “”
secret = “”
val fileSystemName = “”
val tenantID = “”
spark.conf.set(“fs.azure.account.auth.type.” + storageAccountName + “.dfs.core.windows.net”, “OAuth”)
spark.conf.set(“fs.azure.account.oauth.provider.type.” + storageAccountName + “.dfs.core.windows.net”, “org.apache.hadoop.fs.azurebfs.oauth2.ClientCredsTokenProvider”)
spark.conf.set(“fs.azure.account.oauth2.client.id.” + storageAccountName + “.dfs.core.windows.net”, “” + appID + “”)
spark.conf.set(“fs.azure.account.oauth2.client.secret.” + storageAccountName + “.dfs.core.windows.net”, “” + secret + “”)
spark.conf.set(“fs.azure.account.oauth2.client.endpoint.” + storageAccountName + “.dfs.core.windows.net”, “https://login.microsoftonline.com/” + tenantID + “/oauth2/token”)
spark.conf.set(“fs.azure.createRemoteFileSystemDuringInitialization”, “true”)
dbutils.fs.ls(“abfss://” + fileSystemName + “@” + storageAccountName + “.dfs.core.windows.net/”)
spark.conf.set(“fs.azure.createRemoteFileSystemDuringInitialization”, “false”)
- Then, in this code block, replace the , , , and placeholder values in this code block with the values that you collected while completing the prerequisites of this tutorial. Replace the placeholder value with whatever name you want to give the file system.
- Lastly, press the SHIFT + ENTER keys to run the code in this block.

Transform data in Azure Databricks
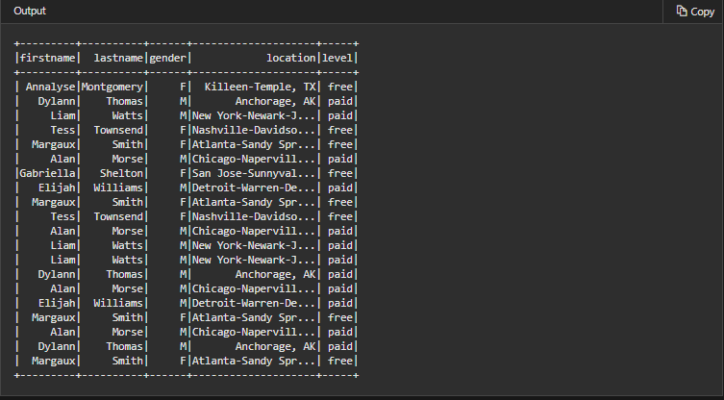
The raw sample data small_radio_json.json file captures the audience for a radio station and has a variety of columns. In this section, you transform the data to only retrieve specific columns from the dataset.
- Firstly, retrieve only the columns firstName, lastName, gender, location, and level from the dataframe that you created.
Scala
val specificColumnsDf = df.select(“firstname”, “lastname”, “gender”, “location”, “level”)
specificColumnsDf.show()
You receive output as shown in the following snippet:
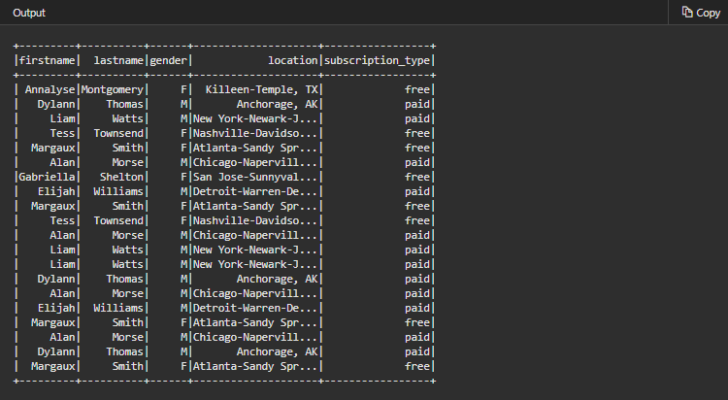
- Secondly, you can further transform this data to rename the column level to subscription_type.
Scala
val renamedColumnsDF = specificColumnsDf.withColumnRenamed(“level”, “subscription_type”)
renamedColumnsDF.show()
You receive output as shown in the following snippet.
Load data into Azure Synapse
In this section, you upload the transformed data into Azure Synapse. You use the Azure Synapse connector for Azure Databricks to directly upload a dataframe as a table in a Synapse Spark pool.
- Firstly, provide the configuration to access the Azure Storage account from Azure Databricks.
- Secondly, specify a temporary folder to use while moving data between Azure Databricks and Azure Synapse.
Scala
val tempDir = “wasbs://” + blobContainer + “@” + blobStorage +”/tempDirs”
- Thirdly, run the following snippet to store Azure Blob storage access keys in the configuration. This action ensures that you don’t have to keep the access key in the notebook in plain text.
Scala
val acntInfo = “fs.azure.account.key.”+ blobStorage
sc.hadoopConfiguration.set(acntInfo, blobAccessKey)
- After that, provide the values to connect to the Azure Synapse instance. You must have created an Azure Synapse Analytics service as a prerequisite. Use the fully qualified server name for dwServer.
- Then, run the following snippet to load the transformed dataframe, renamedColumnsDF, as a table in Azure Synapse. Moreover, this snippet creates a table called SampleTable in the SQL database.
Scala
spark.conf.set(
“spark.sql.parquet.writeLegacyFormat”,
“true”)
renamedColumnsDF.write.format(“com.databricks.spark.sqldw”).option(“url”, sqlDwUrlSmall).option(“dbtable”, “SampleTable”) .option( “forward_spark_azure_storage_credentials”,”True”).option(“tempdir”, tempDir).mode(“overwrite”).save()
- Next, connect to the SQL database and verify that you see a database named SampleTable.
- Lastly, run a select query to verify the contents of the table.However, the table should have the same data as the renamedColumnsDF dataframe.

Reference: Microsoft Documentation