Enabling Azure AD Domain Services Authentication on Azure Files
In this tutorial, we will learn and understand about enabling and configuring Azure AD domain services authentication with Azure file shares.
Through two kinds of Domain Services, Azure Files enables identity-based authentication across Server Message Block (SMB). On-premises Active Directory Domain Services (AD DS) and Azure Active Directory Domain Services are examples of this (Azure AD DS).
Prerequisites:
Before enabling Azure AD over SMB for Azure file shares, first make sure you have completed the following prerequisites:
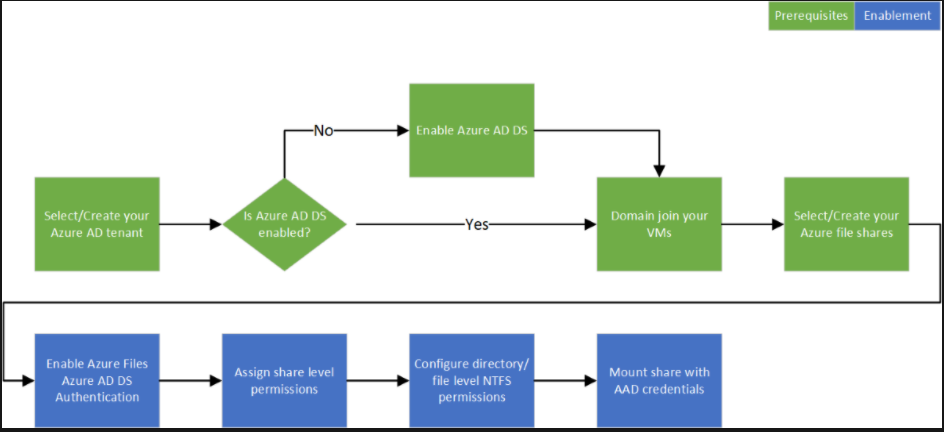
- Firstly, select or create an Azure AD tenant.
- Secondly, enable Azure AD Domain Services on the Azure AD tenant.
- Thirdly, domain-join an Azure VM with Azure AD DS for accessing a file share by using Azure AD credentials from a VM.
- After that, select or create an Azure file share.
- Lastly, verify Azure Files connectivity by mounting Azure file shares using your storage account key.
Workflow overview
Firstly, make sure your Azure AD and Azure Storage environments are configured correctly before enabling Azure AD DS Authentication over SMB for Azure file sharing. After that, undertake the following steps to allow Azure AD credentials access to Azure Files resources:
The diagram below explains the end-to-end workflow for enabling Azure AD DS authentication over SMB for Azure Files.
Enable Azure AD DS authentication for your account
You may use the Azure portal, Azure PowerShell, or Azure CLI to specify a property on storage accounts to enable Azure AD DS authentication via SMB for Azure Files. Setting this attribute, on the other hand, “domain connects” the storage account with the Azure AD DS deployment. Then, for all new and existing file shares in the storage account, Azure AD DS authentication via SMB is enabled.
Azure portal
For enabling Azure AD DS authentication over SMB with the Azure portal, follow these steps:
- Firstly, in the Azure portal, go to your existing storage account, or create a storage account.
- Secondly, in the Settings section, select Configuration.
- Thirdly, under Identity-based access for file shares switch the toggle for Azure Active Directory Domain Service (AAD DS) to Enabled.
- Lastly, select Save.
PowerShell
Install the newest Az module (2.4 or greater) or the Az.Storage module to enable Azure AD DS authentication via SMB with Azure PowerShell (1.5 or newer).
Call New-AzStorageAccount and set the EnableAzureActiveDirectoryDomainServicesForFile option to true to create a new storage account. As an example,
PowerShell:
# Create a new storage account
New-AzStorageAccount -ResourceGroupName “<resource-group-name>” `
-Name “<storage-account-name>” `
-Location “<azure-region>” `
-SkuName Standard_LRS `
-Kind StorageV2 `
-EnableAzureActiveDirectoryDomainServicesForFile $true
For enabling this feature on existing storage accounts, use the following command:
PowerShell:
# Update a storage account
Set-AzStorageAccount -ResourceGroupName “<resource-group-name>” `
-Name “<storage-account-name>” `
-EnableAzureActiveDirectoryDomainServicesForFile $true
Azure CLI
Install the latest Azure CLI version to enable Azure AD authentication via SMB using Azure CLI (Version 2.0.70 or newer). Call az storage account create and set the —enable-files-aadds option to true to establish a new storage account. As an example,
Azure CLI:
# Create a new storage account
az storage account create -n <storage-account-name> -g <resource-group-name> –enable-files-aadds $true
For enabling this feature on existing storage accounts, use the following command:
Azure CLI:
# Update a new storage account
az storage account update -n <storage-account-name> -g <resource-group-name> –enable-files-aadds $true

Assigning access permissions to an identity
An identity (a user, group, or service principal) must have the relevant permissions at the share level to access Azure Files resources using identity-based authentication. This approach, however, is comparable to setting Windows share permissions, which allows you to specify the type of access a user has to a file share.
In this there are three Azure built-in roles for granting share-level permissions to users:
- Firstly, Storage File Data SMB Share Reader that allows read access in Azure Storage file shares over SMB.
- Secondly, Storage File Data SMB Share Contributor that allows read, write, and delete access in Azure Storage file shares over SMB.
- Lastly, Storage File Data SMB Share Elevated Contributor that allows read, write, delete and modify NTFS permissions in Azure Storage file shares over SMB.
However, you can use the Azure portal, PowerShell, or Azure CLI for assigning the built-in roles to the Azure AD identity of a user for granting share-level permissions.
Azure portal
For assigning an Azure role to an Azure AD identity, using the Azure portal, follow these steps:
- Firstly, in the Azure portal, go to your file share, or Create a file share.
- Secondly, select Access Control (IAM).
- Thirdly, select Add a role assignment
- Then, in the Add role assignment blade, select the appropriate built-in role from the Role list. And, leave Assign access to at the default setting: Azure AD user, group, or service principal.
- After that, select the target Azure AD identity by name or email address.
- Lastly, select Save to complete the role assignment operation.
Configuring NTFS permissions over SMB
You must assign suitable NTFS rights at the root, directory, or file level after assigning share-level permissions using RBAC. Consider share-level permissions to be the high-level gatekeeper that determines whether or not a user has access to the share. NTFS permissions, on the other hand, work at a more granular level, determining what activities a user may perform on a directory or file level.
The full range of NTFS basic and advanced permissions is supported by Azure Files. That is, by mounting an Azure file share, you may examine and adjust NTFS permissions on directories and files. Additionally, you can use Windows File Explorer or the Windows icacls or Set-ACL commands.
You must mount the share using your domain-joined VM’s storage account key to configure NTFS with superuser rights.
The sets of permissions below supports on the root directory of a file share:
- BUILTIN\Administrators:(OI)(CI)(F)
- NT AUTHORITY\SYSTEM:(OI)(CI)(F)
- BUILTIN\Users:(RX)
- BUILTIN\Users:(OI)(CI)(IO)(GR,GE)
- NT AUTHORITY\Authenticated Users:(OI)(CI)(M)
- NT AUTHORITY\SYSTEM:(F)
- CREATOR OWNER:(OI)(CI)(IO)(F)
Mount a file share from the command prompt
Use the Windows net use command for mounting the Azure file share. And, for example,
$connectTestResult = Test-NetConnection -ComputerName <storage-account-name>.file.core.windows.net -Port 445
if ($connectTestResult.TcpTestSucceeded)
{
net use <desired-drive letter>: \\<storage-account-name>.file.core.windows.net\<fileshare-name>
}
else
{
Write-Error -Message “Unable to reach the Azure storage account via port 445. Check to make sure your organization or ISP is not blocking port 445, or use Azure P2S VPN, Azure S2S VPN, or Express Route to tunnel SMB traffic over a different port.”
}
Configuring NTFS permissions with Windows File Explorer
Use Windows File Explorer for granting permission to all directories and files under the file share, including the root directory.
- Firstly, open Windows File Explorer and right click on the file/directory and select Properties.
- Secondly, select the Security tab.
- Then, select Edit.. to change permissions. Here, you can change the permissions of existing users or select Add… to grant permissions to new users.
- Then, in the prompt window for adding new users, enter the target user name you want to grant permission to in the Enter the object names to select box. Then, select Check Names to find the full UPN name of the target user.
- After that, select OK.
- Lastly, in the Security tab, select all permissions you want to grant your new user and select Apply.
Mounting a file share from a domain-joined VM
This procedure ensures that your file share and access rights have been properly configured, and that you may access an Azure File share from a domain-joined VM.
To mount the Azure file share, use the command below. For authentication using either on-premises AD DS or Azure AD DS, a single sign-on experience is provided. If you have troubles mounting using AD DS credentials, follow the instructions in Troubleshoot Azure Files Issues on Windows.
$connectTestResult = Test-NetConnection -ComputerName <storage-account-name>.file.core.windows.net -Port 445
if ($connectTestResult.TcpTestSucceeded)
{
net use <desired-drive letter>: \\<storage-account-name>.file.core.windows.net\<fileshare-name>
}
else
{
“Unable to reach the Azure storage account via port 445. Check to make sure your organization or ISP is not blocking port 445, or use Azure P2S VPN, Azure S2S VPN, or Express Route to tunnel SMB traffic over a different port.” Write-Error -Message
}

Reference: Microsoft Documentation