Creating and Managing Resource Group
In this, we will learn about Creating and Managing Resource groups. However, we will primarily focus on moving resources and removing RGs. We shall first begin to learn how to move Azure resources to either another Azure subscription or another resource group under the same subscription. The important points to keep in mind while moving resources –
- The source group and the target group are locked during the move operation.
- Write and delete operations are blocked on the resource groups until the move completes.
- This lock means you can’t add, update, or delete resources in the resource groups.
- The resources are not frozen. It can still read and write to the database.
- The lock can last for a maximum of four hours, but most moves completely in much less time.
- Moving a resource only moves it to a new resource group or subscription. It doesn’t change the location of the resource.
- If you are using Azure Stack Hub, you cannot move resources between groups.
Prerequisites for Moving Resources
- Resources you want to move must support the move operation.
- Some services have specific limitations or requirements when moving resources. Check the guideline before moving
- Source and destination subscriptions must be active. If you have trouble enabling an account that has been disabled, create an Azure support request.
- Source and destination subscriptions must exist within the same Azure Active Directory tenant.
For Azure PowerShell
(Get-AzSubscription -SubscriptionName ).TenantId
(Get-AzSubscription -SubscriptionName ).TenantId
For Azure CLI
az account show –subscription –query tenantId
az account show –subscription –query tenantId
- Destination subscription must be registered for the resource provider of the resource being moved. If not, you receive an error stating that the subscription is not registered for a resource type.
- The account moving the resources must have at least the following permissions – Microsoft.Resources/subscriptions/resourceGroups/moveResources/action on the source resource group. OR Microsoft.Resources/subscriptions/resourceGroups/write on the destination resource group.
- Before moving the resources, check the subscription quotas for the subscription you’re moving the resources to. If moving the resources means the subscription will exceed its limits, you need to review whether you can request an increase in the quota.
- For a move across subscriptions, the resource and its dependent resources must be located in the same resource group and they must be moved together.
Outline for Moving Resource Group across Subscriptions
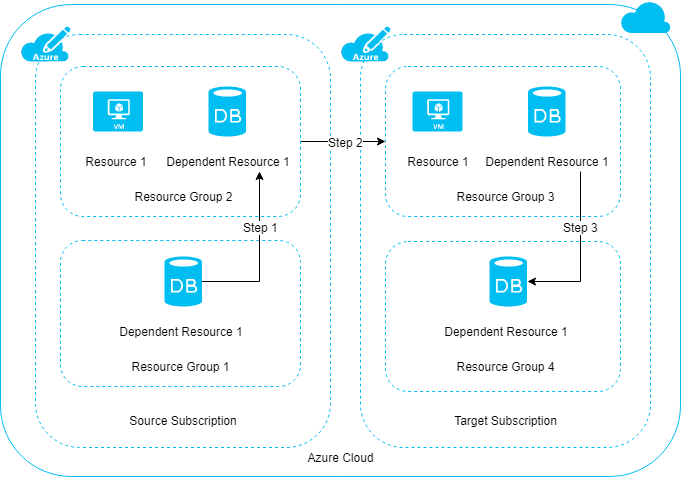
- In the first step, Check if dependent resources are distributed across different resource groups, first move them into one resource group.
- In the next step, move the resource and dependent resources together from the source subscription to the target subscription.
- Lastly, you may optionally, redistribute the dependent resources to different resource groups within the target subscription.
Why Validate move?
The validate move operation lets you test your move scenario without having to transfer any resources. This procedure is used to determine whether or not the relocation will be successful. Furthermore, when you send a move request, validation is automatically invoked. As a result, this procedure should only be used when you need to know the outcome ahead of time. To do this operation, you’ll need the name of the source resource group, the target resource group’s resource ID, the resource ID of each resource to move, and your account’s access token.
Steps to Use Portal to Move Resource
- Select the resource group with the resources to be moved, and then select the Move button.
- Secondly, select whether you moving the resources to a new resource group or a new subscription.
- Select the resources to move and the destination resource group. Acknowledge that you need to update scripts for these resources and select OK.
- In case you selected the edit subscription icon in the previous step, then you must also select the destination subscription.
- Then in Notifications, you see that the move operation is running.
- When the process is complete, you will be notified of the result.

Steps to Use Azure PowerShell
Use the Relocate-AzResource command to move existing resources to another resource group or subscription.
Example –
$webapp = Get-AzResource -ResourceGroupName OldRG -ResourceName ExampleSite
$plan = Get-AzResource -ResourceGroupName OldRG -ResourceName ExamplePlan
Move-AzResource -DestinationResourceGroupName NewRG -ResourceId $webapp.ResourceId, $plan.ResourceId
Steps to Use Azure CLI
Use the az resource move command to relocate existing resources to another resource group or subscription. However, the resource IDs of the resources to be moved must be provided. In the —ids argument, it is recommended to give a space-separated list of resource IDs to relocate.
webapp=$(az resource show -g OldRG -n ExampleSite –resource-type “Microsoft.Web/sites” –query id –output tsv)
plan=$(az resource show -g OldRG -n ExamplePlan –resource-type “Microsoft.Web/serverfarms” –query id –output tsv)
az resource move –destination-group newgroup –ids $webapp $plan
In order to move to a new subscription, provide the –destination-subscription-id parameter.
Steps to use REST API
Use the Relocate resources operation to move existing resources to another resource group or subscription.
Example –
POST https://management.azure.com/subscriptions/{source-subscription-id}/resourcegroups/{source-resource-group-name}/moveResources?api-version={api-version}
In the request body, you specify the target resource group and the resources to move.
{
“resources”: [“”, “”],
“targetResourceGroup”: “/subscriptions//resourceGroups/”
}

Reference: Microsoft Documentation