Creating and Managing Multiple Directories
We need to create multiple Windows Azure Active Directories that can be used for the purpose of development and testing. Moreover, creating multiple directories allows separate directories to synchronize with their local Windows Server AD forests. We shall now discuss the steps of adding a new directory.
Steps to Add a New Directory
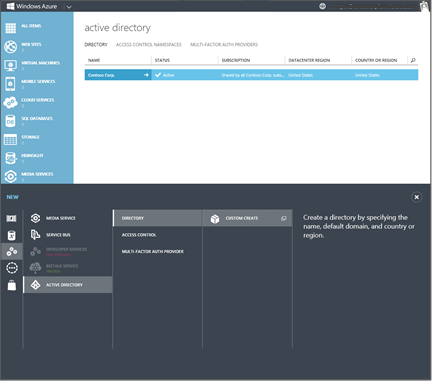
- In the first step to add a directory, sign in to the management portal, and select New > Application Services > Active Directory > Directory > Custom Create
- In the second step, in the Add directory dialog, you are required to configure the basic properties for the new directory. This includes – name, default domain name, and the country or region.
- You should then, click the checkbox in the bottom right of the dialog box. Then in a few seconds, you will see that your new directory has been created and is available for use.
- Finally, a new directory has been successfully created
Note – Once you create a directory, it cannot be deleted.

Accessing Microsoft account user with One Directory
In order to configure a Microsoft account for managing an existing directory. We will be required to add our Microsoft account as a global administrator of that directory. In the first steps, we perform the same actions as adding a new directory –
- First Step – in the management portal, select New > Application Services > Active Directory > Directory > Custom Create.
- Second Step – In the Add Directory dialog, change the Directory dropdown from the default – Create a new directory to Use existing directory.
- In the third step, we will see instructions in the dialog to sign out of your Microsoft account, which you will do by ticking the box. Then click the checkmark in the lower right of the dialog.
Steps to Sign in as Global Administrator
- Go on the sign-in screen for Windows Azure Active Directory. Enter your user name and password for the global administrator account in the directory that you want to manage using your Microsoft account.
- Once signed in, we will see the dialog below. Then click the continue button in green to add your Microsoft account as a global administrator of the existing directory.
- In order to add the Microsoft account as a global administrator of the existing directory, click on the link to sign out of your organizational account. Thereafter, you can sign in to the Windows Azure Management Portal as your Microsoft account user. We can then manage the directory to which you added the Microsoft account.
Benefits of Managing Multiple Directories
We can manage each Azure Active Directory as a fully independent resource such that each directory acts as a peer, fully-featured, and logically independent of other directories. Moreover, there is no parent-child relationship between directories. The independence between directories is related to –
- Resource independence – When we create or delete a resource in one directory, it has no impact on any resource in another directory.
- Administrative independence – In case a non-administrative user creates a test directory, the user is added as an external user in that new directory by default. Also, the administrators of the directory have no direct administrative privileges to the directory, unless granted.
- Synchronization independence – We can configure each Windows Azure AD independently to get data synchronized from a single instance
Steps to add a user from Another Directory
You will notice that when we create a directory, the user account is included in that new directory. There you will be assigned to the global administrator role. This allows us to manage the directory created without signing in as a different user of that directory.
Being the administrator of a directory, you can also add users from another directory of which you’re a member. Note, a user can be a member of up to 20 directories.
- Firstly, find the user name of the user you want to add, to add a member of another directory. We can find the user name for a particular user by opening the source directory the user’s account is in
- Then click on the USERS tab, and find the value in the user name column.
- Now, open the directory in which we want to add the user by clicking the name of the directory in the list.
- Next, click ADD USER in the command bar. Choose User in another Windows Azure AD directory in TYPE OF USER dropdown menu.
How to rename a directory?
Microsoft Azure AD offers the ability to change the name of a directory. It is suggested to have a meaningful name of the production directory to users in the directory. Also, for non-production directories, it is suggested to have the name of the directory identify the environment to which the directory corresponds. Example – test’ or ‘staging.’

Reference: Microsoft Documentation