Creating a virtual machine scale
Here you will learn about virtual machine scale set in the Azure portal. We will discuss each and every step for the following. So, let’s begin.
A virtual machine scale set enables you to deploy and maintain a set of auto-scaling virtual machines. Also, you can scale the amount of VMs in the scale set manually. Not to mention, you can specify rules to autoscale on the basis of resource usages like CPU, memory demand, or network traffic. Moreover, an Azure load balancer, later on, allocates traffic to the VM instances in the scale set.
So, to the following scenario, follow the following steps:
Creating a load balancer
An Azure load balancer divides incoming traffic among healthy VMs instances.
Therefore, first, create a public Standard Load Balancer by utilising the portal.
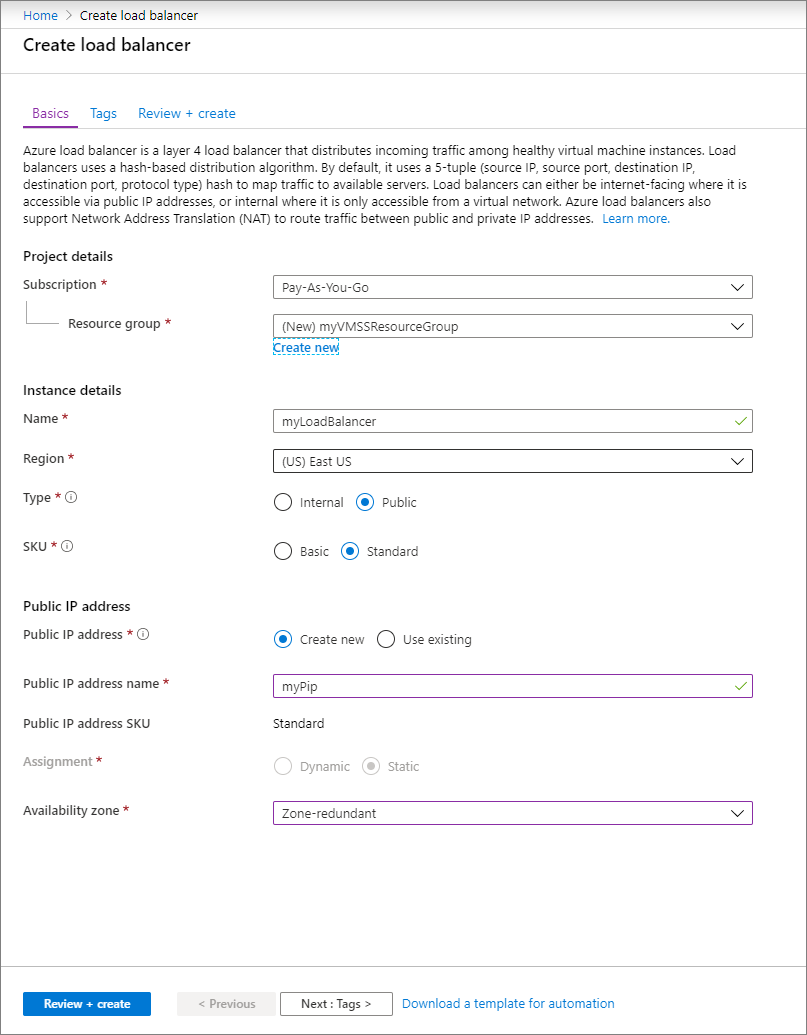
- To begin with, in the search box, typewrite load balancer. Under Marketplace in the search results, select Load balancer.
- Next, in the Basics tab of the Create load balancer page, enter or select the following information:
| Setting | Value |
| Subscription | Select your subscription. |
| Resource group | Select Create new and type myVMSSResourceGroup in the text box. |
| Name | myLoadBalancer |
| Region | Select East US. |
| Type | Select Public. |
| SKU | Select Standard. |
| Public IP address | Select Create new. |
| Public IP address name | myPip |
| Assignment | Static |
| Availability zone | Select Zone-redundant. |
- Later, when you are done, click select Review + create
- Lastly, after it passes validation, click and select Create.
Creating a virtual machine scale set
You can easily deploy a scale set with a Windows Server image or Linux images such as RHEL, CentOS, Ubuntu, or SLES.

- First of all, type Scale set in the search box. And, then, under Marketplace, choose Virtual machine scale sets. Next, choose to Create on the Virtual machine scale sets page, that will open the Create a virtual machine scale set page.
- After this, in the Basics tab, beneath Project details, make sure the correct subscription is chosen and then select to Create a new resource group. Also, type myVMSSResourceGroup for the name and then select OK.
- Thirdly, type my scale set as the name for your scale set.
- After this, in Region, choose a region that is close to your area.
- Now, leave the default value of ScaleSet VMs for Orchestration mode.
- Further, choose a marketplace image for Image.
- Now, enter the desired username, and pick which authentication type you prefer.
- Select Next to move the other pages.
- Now, make sure to leave the defaults for the Instance and Disks pages.
- Moving onto the Networking page, following Load balancing, choose Yes to put the scale set instances behind a load balancer.
- After this, in Load balancing options, choose Azure load balancer.
- Now, select myLoadBalancer that you generated earlier.
- Now, select Create new, type myBackendPool, then choose to Create.
- Moving on, pick and select Review + create.
- After it announces validation, now, select Create to deploy the scale set.
Cleaning up resources
When no longer required, delete the resource group, scale set, and all related resources. In order to do so, select the resource group for the scale set and then select Delete.

Reference: Microsoft Documentation