Create an internal load balancer to load balance VMs
In this, we will learn about Azure Load Balancer with using the Azure portal to create an internal load balancer and three virtual machines.
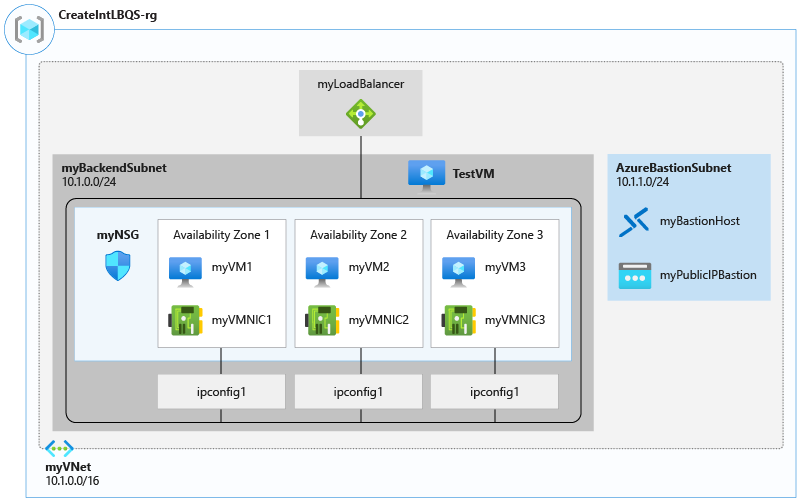
Create the virtual network
- Firstly, On the upper-left side of the screen, select Create a resource > Networking > Virtual network or search for Virtual network in the search box.
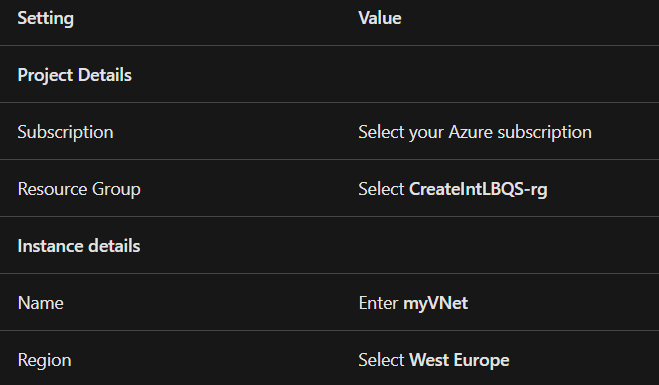
- Then, In Create virtual network, enter or select this information in the Basics tab:
- After that, Select the IP Addresses tab or select the Next: IP Addresses button at the bottom of the page.
- Then, Under Subnet name, select the word default. And, Select Save.
- Select the Security tab.
- Lastly, Under BastionHost, select Enable. Enter this information:
Bastion name: Enter myBastionHost
AzureBastionSubnet address space: Enter 10.1.1.0/24
Public IP Address: Select Create new.
For Name, enter myBastionIP.
Select OK.
- Then, Select the Review + create tab or select the Review + create button.
- Lastly, Select Create.
Create load balancer
On the top left-hand side of the screen, select Create a resource > Networking > Load Balancer.
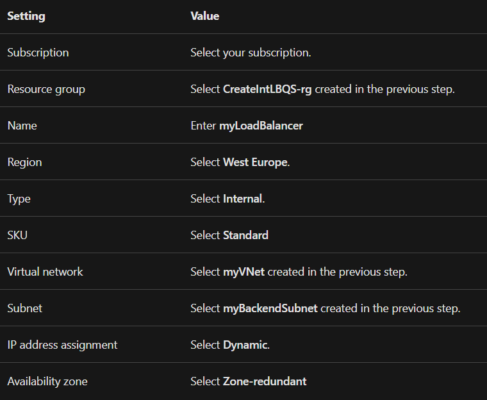
In the Basics tab of the Create load balancer page, enter, or select the following information:
Create a backend pool
A backend address pool contains the IP addresses of the virtual (NICs) connected to the load balancer.
Create the backend address pool myBackendPool to include virtual machines for load-balancing internet traffic.
- Select All services in the left-hand menu, select All resources, and then select myLoadBalancer from the resources list.
- Under Settings, select Backend pools, then select Add.
- On the Add a backend pool page, for name, type myBackendPool, as the name for your backend pool, and then select Add.

Create a load balancer rule
A load balancer rule is used to define how traffic is distributed to the VMs. You define the frontend IP configuration for the incoming traffic and the backend IP pool to receive the traffic. The source and destination port are defined in the rule.
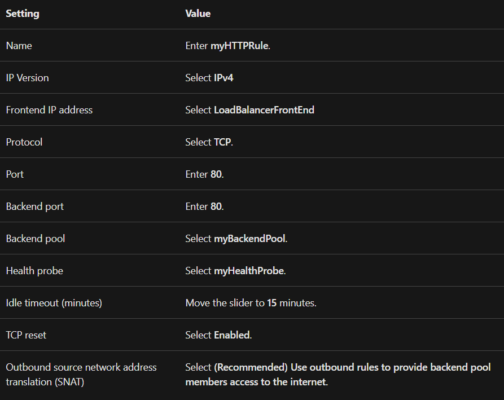
In this section, you’ll create a load balancer rule:
- Named myHTTPRule.
- In the frontend named LoadBalancerFrontEnd.
- Listening on Port 80.
- Directs load balanced traffic to the backend named myBackendPool on Port 80.
- Select All services in the left-hand menu, select All resources, and then select myLoadBalancer from the resources list.
- Under Settings, select Load balancing rules, then select Add.
- Use these values to configure the load-balancing rule:
Test the load balancer
- Find the private IP address for the load balancer on the Overview screen. Select All services in the left-hand menu, select All resources, and then select myLoadBalancer.
- Make note or copy the address next to Private IP Address in the Overview of myLoadBalancer.
- Select All services in the left-hand menu, select All resources, and then from the resources list, select myTestVM that is located in the CreateIntLBQS-rg resource group.
- On the Overview page, select Connect, then Bastion.
- Enter the username and password entered during VM creation.
- Open Internet Explorer on myTestVM.
- Enter the IP address from the previous step into the address bar of the browser. The default page of IIS Web server is displayed on the browser.

Reference: Microsoft Documentation