Create a Log Analytics workspace and Manage access to log data
In this we will learn about managing access to log data and workspaces in Azure Monitor as well as creating a log analytics workspace.
Azure Monitor, on the other hand, keeps log data in a Log Analytics workspace. A workspace is a storage container for data and configuration settings. You execute numerous administrative duties connected to your workspace to manage log data access.
Creating a Log Analytics workspace in the Azure portal
Create a Log Analytics workspace using the Log Analytics workspaces menu. A Log Analytics workspace, on the other hand, is a one-of-a-kind environment for Azure Monitor log data. Data sources and solutions are set to store their data in a specific workspace, and each workspace has its own data repository and configuration. If you want to gather data from the following sources, you’ll need a Log Analytics workspace:
- Firstly, Azure resources in your subscription
- Secondly, On-premises computers monitored by System Center Operations Manager
- Thirdly, Device collections from Configuration Manager
- Lastly, Diagnostics or log data from Azure storage
Create a workspace
- Firstly, in the Azure portal, click All services. In the list of resources, type Log Analytics. As you begin typing, the list filters based on your input. Select Log Analytics workspaces.
- Secondly, click Add, and then select choices for the following items:
- Provide a name for the new Log Analytics workspace, such as DefaultLAWorkspace.
- Select a Subscription to link to by selecting from the drop-down list if the default selected is not appropriate.
- For Resource Group, choose to use an existing resource group already setup or create a new one.
- Select an available Location. For more information, see which regions Log Analytics is available in and search for Azure Monitor from the Search for a product field.
- However, if you are creating a workspace in a new subscription created after April 2, 2018, it will automatically use the Per GB pricing plan and the option to select a pricing tier will not be available.
- Lastly, after providing the required information on the Log Analytics Workspace pane, click OK.
Once the workspace is created, you can manage access to the log data by following these steps:
- Go to the Log Analytics workspace in the Azure portal.
- Click on the “Access control (IAM)” button in the left-hand menu.
- Click on the “Add” button to add a new role assignment.
- Choose the role you want to assign, such as “Reader” or “Contributor.”
- Select the user, group, or application you want to grant access to.
- Click on the “Save” button to save the role assignment.
You can also use Azure Active Directory (Azure AD) to manage access to the Log Analytics workspace. By adding users and groups to Azure AD, you can grant access to log data to specific individuals or groups. You can also use role-based access control (RBAC) to control access to specific resources within the workspace, such as query packs or saved searches.
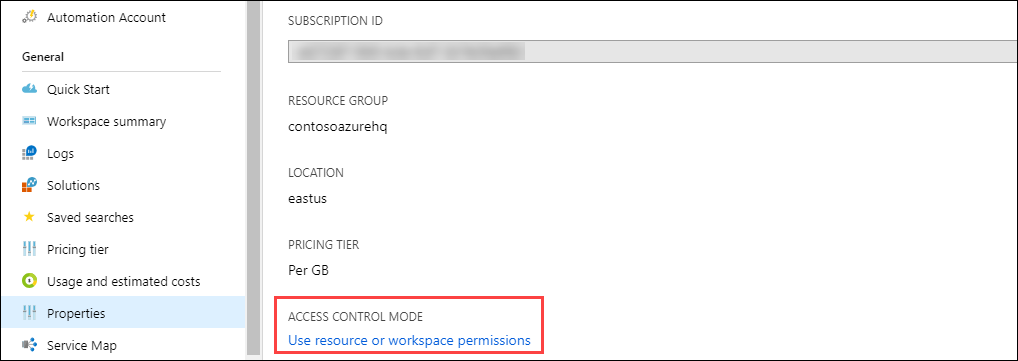
Configure access control mode
You can view the access control mode configured on a workspace from the Azure portal or with Azure PowerShell. You can change this setting using one of the following supported methods:
- Firstly, Azure portal
- Secondly, Azure PowerShell
- Lastly, Azure Resource Manager template
From the Azure portal
You can view the current workspace access control mode on the Overview page for the workspace in the Log Analytics workspace menu.
- Firstly, Sign in to the Azure portal at https://portal.azure.com.
- Secondly, In the Azure portal, select Log Analytics workspaces > your workspace.
However, you may modify this option on the workspace’s Properties page. If you don’t have access to customise the workspace, you won’t be able to change the settings.
Using PowerShell
To evaluate the access control mode for all workspaces in the subscription, use the following command:
PowerShell
Get-AzResource -ResourceType Microsoft.OperationalInsights/workspaces -ExpandProperties | foreach {$_.Name + “: ” + $_.Properties.features.enableLogAccessUsingOnlyResourcePermissions}
The output should resemble the following:
DefaultWorkspace38917: True
DefaultWorkspace21532: False
A value of False means the workspace is configured with the workspace-context access mode. A value of True means the workspace is configured with the resource-context access mode.
Use the following script to set the access control mode for a specific workspace to the resource-context permission:
PowerShell
$WSName = “my-workspace”
$Workspace = Get-AzResource -Name $WSName -ExpandProperties
if ($Workspace.Properties.features.enableLogAccessUsingOnlyResourcePermissions -eq $null)
{ $Workspace.Properties.features | Add-Member enableLogAccessUsingOnlyResourcePermissions $true -Force }
else
{ $Workspace.Properties.features.enableLogAccessUsingOnlyResourcePermissions = $true }
Set-AzResource -ResourceId $Workspace.ResourceId -Properties $Workspace.Properties -Force
Use the following script to set the access control mode for all workspaces in the subscription to the resource-context permission:
PowerShell
Get-AzResource -ResourceType Microsoft.OperationalInsights/workspaces -ExpandProperties | foreach {
if ($_.Properties.features.enableLogAccessUsingOnlyResourcePermissions -eq $null)
{ $_.Properties.features | Add-Member enableLogAccessUsingOnlyResourcePermissions $true -Force }
else
{ $_.Properties.features.enableLogAccessUsingOnlyResourcePermissions = $true }
Set-AzResource -ResourceId $_.ResourceId -Properties $_.Properties -Force
}

Using a Resource Manager template
To configure the access mode in an Azure Resource Manager template, set the enableLogAccessUsingOnlyResourcePermissions feature flag on the workspace to one of the following values.
- false: Set the workspace to workspace-context permissions. However, this is the default setting if the flag isn’t set.
- true: Set the workspace to resource-context permissions.
Troubleshooting
When you create a workspace that was deleted in the last 14 days and in soft-delete state, the operation could have different outcome depending on your workspace configuration:
- Firstly, if you provide the same workspace name, resource group, subscription and region as in the deleted workspace, your workspace will be recovered including its data, configuration and connected agents.
- Secondly, if you use the same workspace name, but different resource group, subscription or region, you will get an error This workspace name is already in use. Please try another one. However, to override the soft-delete and permanently delete your workspace and create a new workspace with the same name, follow these steps to recover the workspace first and perform permanent delete:
- Recover your workspace
- Permanently delete your workspace
- Create a new workspace using the same workspace name

AZ-104 Exam Practice Questions
Question: You have been asked to create a Log Analytics workspace for your organization’s Azure environment. Which of the following steps should you perform first?
A. Select the pricing tier that meets your needs.
B. Provide a name and select the subscription, resource group, and location for the workspace.
C. Review the settings and click on the “Create” button.
D. Click on the “Create a resource” button (+) on the top-left corner of the Azure portal.
Answer: d. Click on the “Create a resource” button (+) on the top-left corner of the Azure portal.
Explanation: To create a Log Analytics workspace, you first need to access the Azure portal and click on the “Create a resource” button. From there, you can search for “Log Analytics workspace” and follow the steps to create the workspace.
Question: You want to grant a user the ability to read log data in your Log Analytics workspace. Which of the following roles should you assign to the user?
A. Owner
B. Contributor
C. Reader
D. Security Reader
Answer: c. Reader
Explanation: The “Reader” role provides the ability to view and read log data in a Log Analytics workspace. This is a good role to assign to users who need to analyze the data but don’t need to make changes to the workspace.
Question: You want to grant a group of users the ability to create and modify saved searches in your Log Analytics workspace. Which of the following steps should you perform?
A. Add the users to the “Owner” role for the workspace.
B. Create a custom role that includes the ability to create and modify saved searches.
C. Add the users to the “Contributor” role for the workspace.
D. Add the users to the “Reader” role for the workspace.
Answer: b. Create a custom role that includes the ability to create and modify saved searches.
Explanation: The “Contributor” role provides the ability to create and modify resources in a Log Analytics workspace, but it is too broad for the specific task of creating and modifying saved searches. Instead, you should create a custom role that includes only the permissions required for this task.
Question: You want to grant an application the ability to write log data to your Log Analytics workspace. Which of the following steps should you perform?
A. Add the application to the “Contributor” role for the workspace.
B. Create a custom role that includes the ability to write log data to the workspace.
C. Use Azure AD to grant the application access to the workspace.
D. Use RBAC to grant the application access to the workspace.
Answer: c. Use Azure AD to grant the application access to the workspace.
Explanation: Applications can be granted access to a Log Analytics workspace using Azure AD. By adding the application to an Azure AD group and granting the group access to the workspace, you can control access to the log data for that application. This is a more secure and flexible option than assigning the application to a predefined role like “Contributor.”
Reference: Microsoft Documentation, Documentation 2