Configuring Vulnerability scanning
In this tutorial, we will learn about configuring vulnerability scanning for virtual machines.
You should be aware that identifying and analyzing vulnerabilities is an important part of any cyber risk and security program. The normal pricing tier of Azure Security Center, on the other hand, includes free vulnerability scanning for your virtual machines. Furthermore, the Security Center can deploy this tool for you automatically.
Security Center presents two recommendations if it doesn’t find a vulnerability assessment solution installed on a VM:
- Firstly, enabling the built-in vulnerability assessment solution on virtual machines (powered by Qualys). This recommendation only appears in standard tiers. As this is an invitation for installing an Azure Security Center vulnerability assessment extension (powered by Qualys) for you at no additional cost.
- Secondly, Vulnerability assessment solutions should be installed on your virtual machines. This is for installing any of the supported partner solutions. However, you’ll need to purchase a license for your chosen solution separately. In turn, that platform provides vulnerability and health monitoring data back to the Security Center. Moreover, you can point out vulnerable VMs on the Security Center dashboard.
Integrating vulnerability scanning for virtual machines
The vulnerability scanner is included with Azure Security Center which is powered by Qualys. Where Qualys’ scanner refers to the leading tool for real-time identification of vulnerabilities in your Azure Virtual Machines.
The vulnerability scanner extension works as follows:
- Firstly, deploying. In this, the Azure Security Center deploys the Qualys extension for the selective virtual machine/s.
- Secondly, gathering information. In this, the extension collects artifacts and sends them for analysis in the Qualys cloud service in the defined region.
- Next, analyzing. In this, the Qualys’ cloud service conducts the vulnerability assessment and sends its findings to the Security Center.
- Lastly, reporting. This means the findings are available to you in the Security Center.

Deploying the Qualys built-in vulnerability scanner
The simplest way for scanning Azure-based virtual machines for vulnerabilities is to use the built-in vulnerability scanner.
For deploying the vulnerability scanner:
- Firstly, open Azure Security Center and go to the Recommendations page for a subscription on the standard pricing tier.
- Secondly, select the recommendation named “Enable the built-in vulnerability assessment solution on virtual machines (powered by Qualys)”
- Then, your VMs will appear in one or more of the following groups:
- Healthy resources: this means the vulnerability scanner extension has been deployed to these VMs.
- Unhealthy resources: this means the vulnerability scanner extension can be deployed to these VMs.
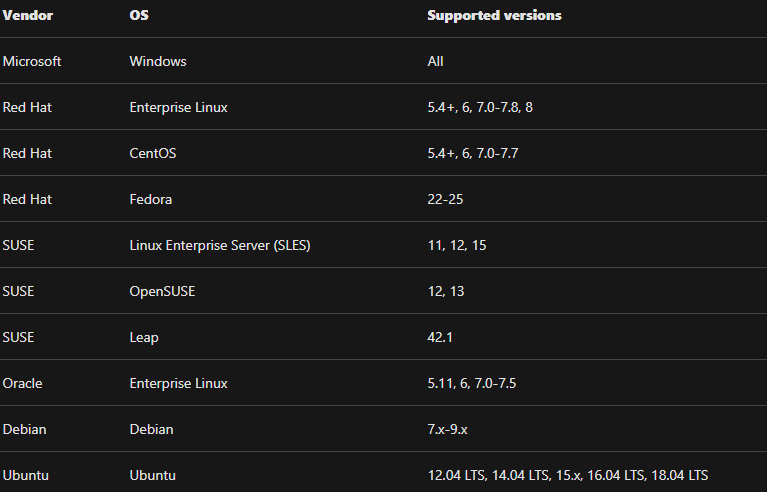
- Not applicable resources: this states these VMs cannot have the vulnerability scanner extension deployed. That means, your VM might be in this tab. The reason can be it is on the free pricing tier, it is an image in an AKS cluster or it is not running one of the supported OSes:
- Fourthly, from the Unhealthy resources tab, select the VMs on which you want to deploy the Qualys scanner and click Remediate. However, the scanner extension will install on all of the VMs within a few minutes and the scanning begins automatically as soon as the extension is successfully deployed.
- Lastly, if the deployment fails on one or more VMs, then it ensure the target VMs can communicate with Qualys’ cloud service on the two IP addresses that include:
- 64.39.104.113 – Qualys’ US data center
- 154.59.121.74 – Qualys’ European data center
Viewing and remediating discovered vulnerabilities
When the Security Center identifies vulnerabilities, then it presents findings and related information as recommendations. However, the related information includes remediation steps, related CVEs, CVSS scores, and more.
For viewing the findings and remediate the identified vulnerability:
- Firstly, open Azure Security Center and go to the Recommendations page.
- Secondly, select the recommendation named “Remediate vulnerabilities found on your virtual machines (powered by Qualys)”.
- Then, the Security Center shows you all the findings for all VMs in the currently selected subscriptions. The findings are ordered by severity.
- Fourthly, for filtering the findings by a specific VM, open the “Affected resources” section and click the VM that interests you.
- After that, for learning more about a specific vulnerability, select it.
- However, the details pane that appears contains extensive information about the vulnerability, including:
- Firstly, links to all relevant CVEs (where available)
- Secondly, remediation steps
- Thirdly, any additional reference pages
- Lastly, for remediating a finding, follow the remediation steps from this details pane.

Reference: Microsoft Documentation, Documentation 2