Configuring Azure Multi-Factor Authentication settings
There are various configuration options for settings like the account lockout thresholds or fraud alerts and notifications for customizing the end-user experience for Azure Multi-Factor Authentication. However, some settings are directly in the Azure portal for Azure Active Directory and some in a separate Azure Multi-Factor Authentication portal. The following Azure Multi-Factor Authentication settings that are available in the Azure portal include:
Account lockout
For preventing repeated MFA attempts as part of an attack. The account lockout settings let you specify how many failed attempts you want to allow before the account becomes locked out for a period of time. However, the account lockout settings enable when a pin code is entered for the MFA prompt. The following settings are available:
- Firstly, the number of MFA denials to trigger an account lockout
- Secondly, the number of minutes until the account lockout counter reset
- Lastly, the minutes until the account automatically gets unblock
For configuring account lockout settings, complete the following settings:
- Firstly, sign in to the Azure portal as an administrator.
- Then, browse to Azure Active Directory > Security > MFA > Account lockout.
- Thirdly, enter the required values for your environment, then select Save.
Block and unblock users
If a user’s device is lost, then you can block authentication attempts for the associated account. However, any authentication attempts for blocked users are automatically denied. And, the users remain blocked for 90 days from the time that they are blocked.
For blocking a user:
- Firstly, browse to Azure Active Directory > Security > MFA > Block/unblock users.
- Then, select Add to block a user.
- After that, select the Replication Group, then choose Azure Default. Then, enter the username for the blocked user as username\@domain.com and provide a comment in the Reason field.
- Lastly, select OK to block the user.
For unblocking a user:
- Firstly, browse to Azure Active Directory > Security > MFA > Block/unblock users.
- Then, in the Action column next to the desired user, select Unblock.
- Thirdly, enter a comment in the Reason for unblocking field.
- Lastly, select OK to unblock the user.
Fraud alert
The fraud alert feature allows users to report fraudulent attempts to access their resources. Moreover, when an unknown and suspicious MFA prompt is received. Then, users can report the fraud attempt using the Microsoft Authenticator app or through their phone. The fraud alert configuration options available are:
- Firstly, automatically block users who report fraud. This means if a user reports fraud, their account is blocked for 90 days until an administrator unblocks their account. However, an administrator can review sign-ins by using the sign-in report and take appropriate action to prevent future fraud. And, it can then unblock the user’s account.
- Secondly, Code to report fraud during initial greeting. This means when users receive a phone call for performing multi-factor authentication, they normally press # to confirm their sign-in. For reporting fraud, the user enters a code before pressing #. This code is 0 by default.

Notifications
Email notifications configuration enables when a user reports fraud alerts. However, these notifications are sent to identity administrators, as the user’s account credentials are likely compromised. For configuring fraud alert notifications, complete the following settings:
- Firstly, browse to Azure Active Directory > Security > Multi-Factor Authentication > Notifications.
- Secondly, enter the email address to add into the next box.
- Then for removing an existing email address, select the … option next to the desired email address, then select Delete.
- Lasty, select Save.
OATH tokens
Azure AD uses OATH-TOTP SHA-1 tokens that refresh codes every 30 or 60 seconds. However, OATH TOTP hardware tokens come with a secret key, or seed, pre-programmed in the token. These secret keys have limit of 128 characters, that may not be compatible with all tokens. So, they can only contain the characters a-z or A-Z and digits 1-7 and must be encoded in Base32. And, once tokens are acquired they must be uploaded in a comma-separated values (CSV) file format including the UPN, serial number, secret key, time interval, manufacturer, and model.
MFA service settings
In MFA services settings, there are various services such as settings for app passwords, trusted IPs, verification options, and remember multi-factor authentication for Azure Multi-Factor Authentication.
However, service settings are accessible from the Azure portal by browsing to Azure Active Directory > Security > MFA > Getting start > Configure > Additional cloud-based MFA settings.
Trusted IPs
The Trusted IPs feature of Azure Multi-Factor Authentication avoid MFA for users who sign in from a defined IP address range. Moreover, you can set trusted IP ranges for your on-premises environments to when users are in one of those locations. And, if your organization deploys the NPS extension for providing MFA to on-premises applications, note the source IP address. As it will always appear to be the NPS server the authentication attempt flows through.
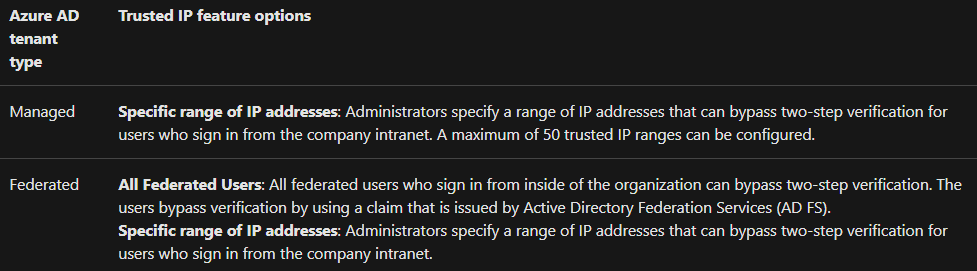
However, trusted IP bypass works only from inside of the company intranet. And, if you select the All Federated Users option and a user signs in from outside the company intranet. Then, the user has to authenticate by using two-step verification.
End-user experience inside of corpnet
When the trusted IPs feature is disabled, then multi-factor authentication is necessay for browser flows. Here, app passwords are necessary for older rich client applications.
And, when trusted IPs are in use, then there is no requirement of multi-factor authentication for browser flows. In this, app passwords are not necessary for older rich client applications.
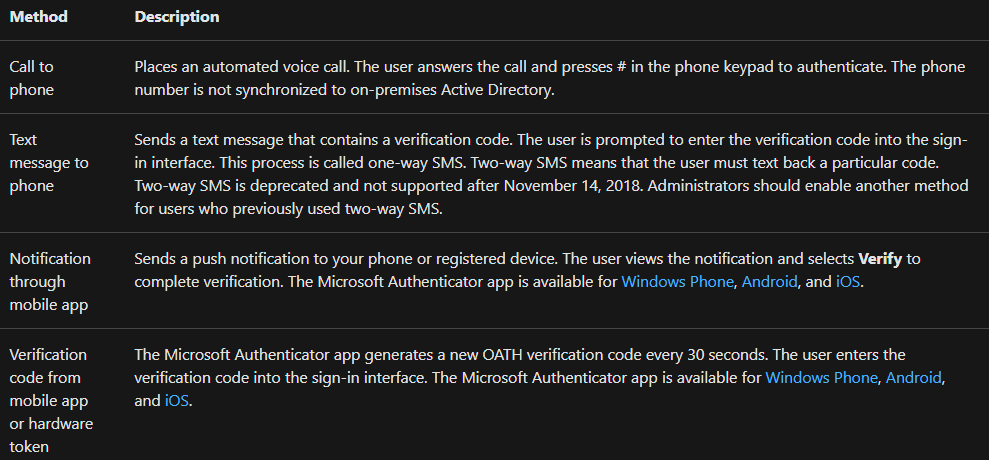
Verification methods
You have access to choose the verification methods available for your users in the service settings portal. However, when users enroll their accounts for Azure Multi-Factor Authentication, then they prefer the verification method from the options that you have enabled. For this, the guidance for the user enrollment process is provided in Set up my account for two-step verification.
The following verification methods are available:
Remember Multi-Factor Authentication
The remember Multi-Factor Authentication feature allows users to avoid subsequent verifications for a specified number of days. This is after they have successfully signed-in to a device by using Multi-Factor Authentication. Moreover, this feature enhances usability by minimizing the number of times a user performs MFA on the same device.
Enabling remember Multi-Factor Authentication
For enabling and configuring the option for users to remember their MFA status and bypass prompts, complete the following steps:
- Firstly, in the Azure portal, select Azure Active Directory, then choose Users.
- Secondly, select Multi-Factor Authentication.
- After that, under Multi-Factor Authentication, select service settings.
- Then, on the Service Settings page, manage to remember multi-factor authentication, Select the Allow users to remember multi-factor authentication on devices they trust option.
- After that, set the number of days to allow trusted devices to bypass two-step verification. The default is 14 days.
- Lastly, select Save.

Reference: Microsoft Documentation