Configuring App Registration Permission and Scopes
In this tutorial, we will learn and understand the basic concepts of scopes, permission, and authorization models. However, applications that integrate with the Microsoft identity platforms follow an authorization model providing users and administrators control over how data can be accessed.
Scopes and permissions
The Microsoft identity platform is responsible for implementing the OAuth 2.0 authorization protocol. However, OAuth 2.0 is a method through which a third-party app can access web-hosted resources on behalf of a user. And, any web-hosted resource integrating with the Microsoft identity platform has a resource identifier, or Application ID URI. Some of Microsoft’s web-hosted resources include:
- Microsoft Graph: https://graph.microsoft.com
- Office 365 Mail API: https://outlook.office.com
- Azure Key Vault: https://vault.azure.net
However, the same is true for any third-party resources that have integrated with the Microsoft identity platform. These resources can also define a set of permissions for dividing the functionality of that resource into smaller chunks. For example, Microsoft Graph define permissions to do the following tasks:
- Firstly, Read a user’s calendar
- Secondly, Write to a user’s calendar
- Lastly, Send mail as a user
By explaining these types of permissions, the resource has control over its data and how API functionality is exposed. Moreover, a third-party app can request these permissions from users and administrators, who must approve the request before the app can access data. In this, the users and administrators can know what data the app has access to. And, developers should always follow the concept of least privilege, asking for only the permissions they need for their applications functioning.
In OAuth 2.0, these types of permissions are scopes that also refer to permissions. However, permission is a string value in Microsoft Identity Platform. Where the string value for each permission is:
- Firstly, Read a user’s calendar by using Calendars.Read
- Secondly, Write to a user’s calendar by using Calendars.ReadWrite
- Lastly, Send mail as a user using by Mail.Send
Permission types
In Microsoft identity platform, there are two types of permissions delegated permissions and application permissions.
1. Delegated permissions:
They work with apps that have a sign-in user present. However, for these apps, either the user or an administrator consents to the permissions that the app requests. And, the app has assigned permission to act as the signed-in user while making calls to the target resource. You should know that some delegated permissions can be consented to by non-administrative users, but some higher-privileged permissions require administrator consent.
2. Application permissions:
They work with apps running without a sign-in user present. Apps that operate as background services or daemons, for example. The application permissions, on the other hand, may only be approved by an administrator.
Further, there are Effective permissions that refer to the permissions that your app will have when making requests to the target resource. Firstly, for delegated permissions, the effective permissions will be the least beneficial intersection of the assigned permissions the app has been granted (via consent). And, for application permissions, the effective permissions of your app will be the full level of privileges implied by the permission.

OpenID Connect scopes
The Microsoft identity platform implementation of OpenID Connect has a few well-defined scopes that are also hosted on the Microsoft Graph, this includes:
openid
If an app performs sign-in by using OpenID Connect, then it must request the openid scope. That is, the openid scope appears as the “Sign you in” permission on the work account consent page.
The email scope can work with the openid scope. So because email claim offers the app access to the user’s primary email address. Where the email claim is included in a token only if the user account has an email address, which isn’t always the case.
profile
The openid scope can also be used with the profile scope. As a result, the app has access to a significant quantity of data on the user. The user’s given name, surname, chosen username, and object ID are among the data to which it has access.
offline_access
The offline_access scope provides app access to resources for extending time. However, on the consent page, this scope appears as the “Maintain access to data you have given it access to” permission. Your app can also get refresh tokens from the Microsoft identity platform token endpoint when a user confirms the offline_access scope.
Admin-restricted permissions
Some high-privilege permissions in the Microsoft ecosystem can be adjusted to admin-restricted. This includes the following:
- Firstly, read all user’s full profiles by using User.Read.All
- Secondly, write data to an organization’s directory by using Directory.ReadWrite.All
- Lastly, read all groups in an organization’s directory by using Groups.Read.All
However, if your app requires access to admin-restricted scopes for organizations, you should request them directly from a company administrator by using the admin consent endpoint.
- And, if the application is requesting high privilege delegated permissions and an administrator grants these permissions via the admin consent endpoint. As consent is granted for all users in the tenant.
- Lastly, if the application is requesting application permissions and an administrator grants these permissions via the admin consent endpoint, this grant isn’t done on behalf of any specific user.
Requesting the permissions in the app registration portal
Applications are able to note which permissions they require in the app registration portal. Moreover, this gives access to use of the /.default scope and the Azure portal’s “Grant admin consent” option. And, in general, it’s best practice to ensure that the permissions statically defined for a given application are a superset of the permissions that it will be requesting dynamically/incrementally.
For configuring the list of statically requested permissions for an application
- Firstly, go to your application in the Azure portal – App registrations experience, or create an app if you haven’t already.
- Then, locate the API Permissions section, and within the API permissions click Add permission.
- After that, select Microsoft Graph from the list of available APIs and then add the permissions that your app requires.
- Lastly, Save the app registration.
Requesting the permissions from a directory admin
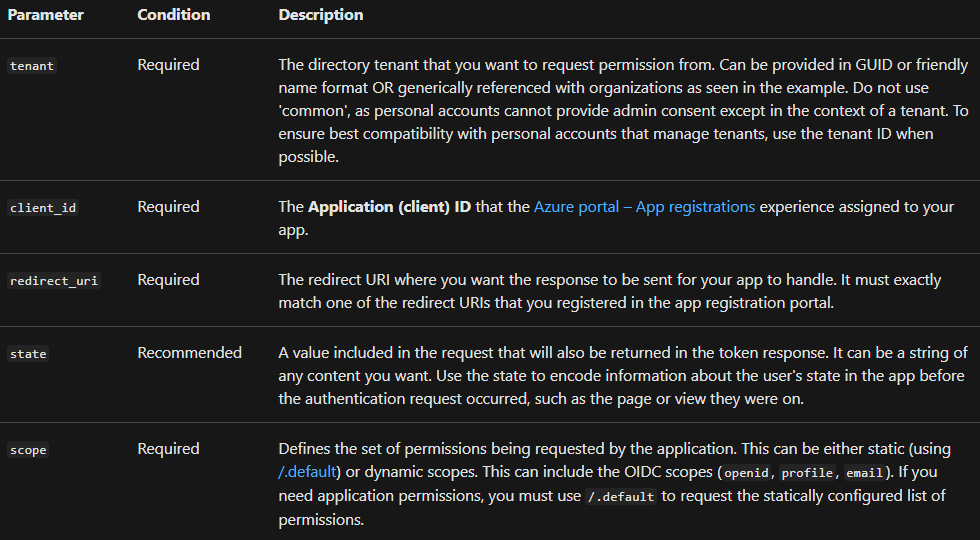
When you set to request permissions from your organization’s admin, then you can redirect the user to the Microsoft identity platform admin consent endpoint.
HTTP
// Line breaks are for legibility only.
GET https://login.microsoftonline.com/{tenant}/v2.0/adminconsent?
client_id=6731de76-14a6-49ae-97bc-6eba6914391e
&state=12345
&redirect_uri=http://localhost/myapp/permissions
&scope=
“https://graph.microsoft.com/calendars.read”
“https://graph.microsoft.com/mail.send”
Using permissions
After the user consents to permissions for your app, your app can acquire access tokens that represent your app’s permission for accessing a resource in some capacity. Moreover, an access token can be used only for a single resource. But the encoding inside the access token is every permission that your app have for that resource. For acquiring an access token, your app can make a request to the Microsoft identity platform token endpoint by:
HTTP
POST common/oauth2/v2.0/token HTTP/1.1
Host: https://login.microsoftonline.com
Content-Type: application/json
{
“grant_type”: “authorization_code”,
“client_id”: “6731de76-14a6-49ae-97bc-6eba6914391e”,
“scope”: “https://outlook.office.com/mail.read https://outlook.office.com/mail.send”,
“code”: “AwABAAAAvPM1KaPlrEqdFSBzjqfTGBCmLdgfSTLEMPGYuNHSUYBrq…”
“redirect_uri”: “https://localhost/myapp”,
“client_secret”: “zc53fwe80980293klaj9823”
}
So, you can use the resulting access token in HTTP requests to the resource. And, it reliably indicates to the resource that your app has the proper permission to perform a specific task.

Reference: Microsoft Documentation