Configuring Access Reviews in Azure AD
In this tutorial, we will learn and understand about configuring Access Reviews in Azure AD. And, how to create them for group members or application access.
However, access to groups and applications for employees and guests changes over time. So, for reducing the risk with stale access assignments, administrators can use Azure Active Directory (Azure AD) for creating access reviews for group members or application access.
Creating one or more Access reviews
- Firstly, sign in to the Azure portal and open the Identity Governance page.
- Secondly, in the left menu, click Access reviews.
- Thirdly, click New access review for creating new.
- After that, name the access review. Here, you have the option to give the review description.
- Then, set the Start date. However, by default, an access review occurs once, starts the same time it’s created, and it ends in one month. You can even change the start and end dates to have an access review start in the future and last however many days you want.
- For making the access review recurring, just change the Frequency setting from One time to Weekly, Monthly, Quarterly, Semi-annually, or Annually.
- After that, use the End setting for specifying how to end the recurring access review series. However, the series can end in three ways such as it runs continuously to start reviews indefinitely, until a specific date.
- In the Users section, specify the users that the access review applies to. However, the Access reviews can be for the members of a group or for users who were assigned to an application.
- In the Group section, select one or more groups that you would like to review membership of.
- If in the Applications section you selected Assigned to an application in step 8, then select the applications that you would like to review access to.
- Then, in the Reviewers section, select either one or more people to review all the users in scope. Here, you can select to have the members review their own access.
- Lastly, in the Programs section, select the program you want to use. The Default Program is always present.

Upon completion settings
- Firstly, for specifying what happens after completing review, expand the Upon completion settings section.
- Secondly, if you want to automatically remove access for users that were denied, set Auto apply results to resource to Enable. However, if you want to manually apply the results when the review completes, set the switch to Disable.
- Lastly, use the Should reviewer not respond list for specifying what happens for users that are not reviewed by the reviewer within the review period. As, this setting does not impact users who have been reviewed by the reviewers manually. If the final reviewer’s decision is Deny, then the user’s access will be removed.
- No change – It leave user’s access unchanged
- Remove access – It remove user’s access
- Approve access – It approve user’s access
- Take recommendations – This take the system’s recommendation on denying or approving the user’s continued access
Advanced settings
- Firstly, for specifying additional settings, expand the Advanced settings section.
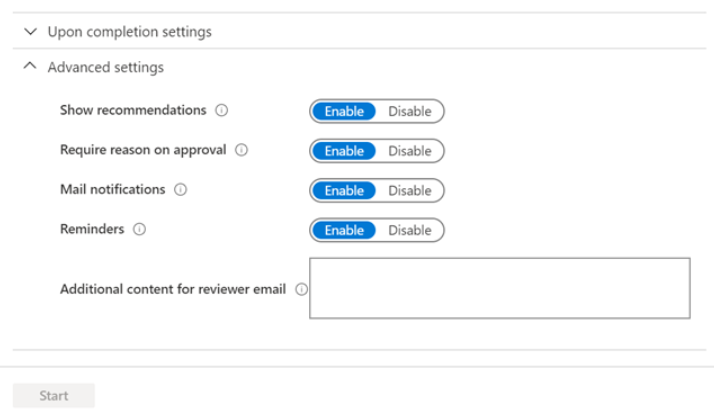
- Secondly, set Show recommendations to Enable for showing the reviewers the system recommendations on the basis of the user’s access information.
- Thirdly, Set Require reason for approval for Enable to require the reviewer to supply a reason for approval.
- Then, Set Mail notifications for Enabling to have Azure AD send email notifications to reviewers when an access review starts, and to administrators when a review completes.
- After that, Set Reminders to Enable to have Azure AD send reminders of access reviews in progress to reviewers who have not completed their review.
- Lastly, preview if the content of the email sent to reviewers is auto-generated based on the review details like review name, resource name, due date, etc. However, if you need a way to communicate additional information such as additional instructions or contact information. Then, you can specify these details in the Additional content for the reviewer email which will be included in the invitation and reminder emails sent to assigned reviewers.
Start the access review
After specifying the settings for an access review, click Start. The access review will appear in your list with an indicator of its status. However, by default, Azure AD sends an email to reviewers shortly after the review starts. And, if you choose not to have Azure AD send the email, be sure to inform the reviewers that an access review is waiting for them to complete. Then, you can show them the instructions for how to review access to groups or applications. And, if your review is for guests for reviewing their own access, then show them the instructions for how to review access for yourself to groups or applications.
Moreover, if you have assigned guests as reviewers and they have not accepted the invite, they will not receive an email from access reviews because they must first accept the invite prior to reviewing.
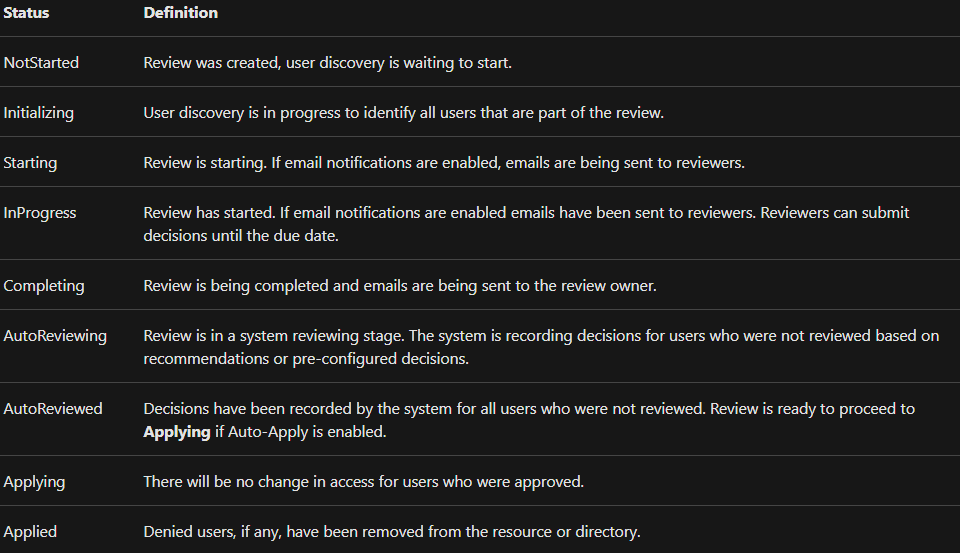
Access review status table

Reference: Microsoft Documentation