Configure Virtual Networks connectivity using Azure Portal
In this tutorial, we will learn to configure virtual networks (VNets) by using the VNet-to-VNet connection type. However, when you connect VNets from different subscriptions, the subscriptions don’t need to be associated with the same Active Directory tenant.

Connecting VNets
The sections below explain the several ways to connect virtual networks.
VNet-to-VNet
Configuring a VNet-to-VNet connection refers to connecting VNets in a simple way. That is to say, when you connect a virtual network to another virtual network with a VNet-to-VNet connection type (VNet2VNet). Then, it’s similar to creating a Site-to-Site IPsec connection to an on-premises location. However, both connection types use a VPN gateway to provide a secure tunnel with IPsec/IKE and function the same way when communicating. But, they differ in the way the local network gateway is configured.
Site-to-Site (IPsec)
If you’re working with a complex network configuration, then you may prefer to connect your VNets using a Site-to-Site connection instead. However, when you follow the Site-to-Site IPsec steps, then you create and configure the local network gateways manually. Further, these steps give access to specify additional address spaces for the local network gateway to route traffic. And, if the address space for a VNet changes, then you must manually update the corresponding local network gateway.
VNet peering
However, you can also connect your VNets by using VNet peering. That is to say, VNet peering doesn’t use a VPN gateway and even has different constraints. Additionally, VNet peering pricing is calculated in a different way than VNet-to-VNet VPN Gateway pricing.
Why is there a need to create a VNet-to-VNet connection?
The reason for which you may want to connect virtual networks by using a VNet-to-VNet connection include:
Cross region geo-redundancy and geo-presence
- Firstly, in this you can set up your own geo-replication or synchronization with secure connectivity without going over internet-facing endpoints.
- Secondly, with Azure Traffic Manager and Azure Load Balancer, you can set up a highly available workload with geo-redundancy across multiple Azure regions.
Regional multi-tier applications with isolation or administrative boundaries
- Firstly, you can set up multi-tier applications with multiple virtual networks within the same region that are connected together. This is because of isolation or administrative requirements.
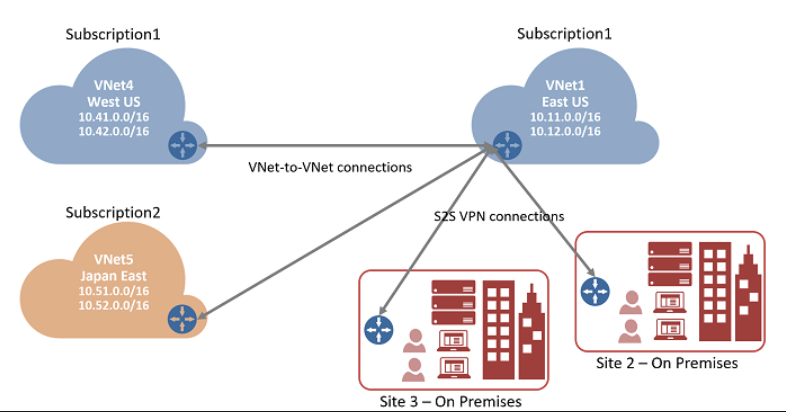
However, VNet-to-VNet communication can be combined with multi-site configurations. And, these configurations allow you to establish network topologies that combine cross-premises connectivity with inter-virtual network connectivity. Check the diagram for understanding better.
Creating and configuring VNet1
If you already have a VNet, then just verify that the settings are compatible with your VPN gateway design. Moreover, pay particular attention to any subnets that may overlap with other networks.
Creating a virtual network
You can create a VNet with the Resource Manager deployment model and the Azure portal by using the given steps.
- Firstly, sign in to the Azure portal.
- Secondly, in Search resources, service, and docs (G+/), type virtual network.
- Thirdly, select Virtual Network from the Marketplace results.
- Then, on the Virtual Network page, select Create.
- And, once you select Create, the Create virtual network page opens.
- After that, on the Basics tab, configure Project details and Instance details VNet settings.

However, when you fill in the fields, you see a green check mark when the characters you enter in the field are validated. Here, some values are autofilled, that can replace with your own values:
Subscription: This verifies that the subscription listed is the correct one. However, you can change subscriptions by using the drop-down.
Resource group: This select an existing resource group, or click Create new to create a new one.
Name: In this, enter the name for your virtual network.
Region: In this, select the location for your VNet.
- Then, on the IP Addresses tab, configure the values. This includes:
- IPv4 address space means by default, an address space is automatically created.
- IPv6 states if your configuration requires IPv6 address space, then select the Add IPv6 address space box to enter that information.
- Subnet means if you use the default address space, a default subnet is created automatically. And, If you change the address space, you need to add a subnet.
- After that, on the Security tab, at this time, leave the default values:
- DDos protection: Basic
- Firewall: Disabled
- Then, select Review + create to validate the virtual network settings.
- Lastly, after the settings have been validated, select Create.
Configure the VNet1 gateway connection
After completing the virtual network gateways, you can create your virtual network gateway connections. The steps provided will work only for VNets in the same subscription. However, if your VNets are in different resource groups in the same subscription, then you can connect them by using the portal.
- Firstly, in the Azure portal, select All resources, enter virtual network gateway in the search box, and then navigate to the virtual network gateway for your VNet.
- Secondly, select +Add to open the Add connection page.
- Thirdly, on the Add connection page, fill in the values for your connection:
- Name: Enter a name for your connection. For example, VNet1toVNet4.
- Connection type: Select VNet-to-VNet from the drop-down.
- Firstly, virtual network gateway that refers to field value which is automatically filled. This is because you are creating this connection from the specified virtual network gateway.
- Secondly, the virtual network gateway that is the field in the virtual network gateway of the VNet that you want to create a connection to.
- Lastly, select OK to save your changes.
Configure the VNet4 gateway connection
Next, create a connection from VNet4 to VNet1. Then, in the portal, locate the virtual network gateway linked with VNet4. After that, follow the steps for replacing the values to create a connection from VNet4 to VNet1.
Verifying connections
- Firstly, locate the virtual network gateway in the Azure portal.
- Secondly, on the Virtual network gateway page, select Connections to view the Connections page for the virtual network gateway. After establishing the connection, you’ll see the Status values change to Connected.
- Thirdly, under the Name column, select one of the connections to view more information.

Reference: Microsoft Documentation