Azure Site recovery capacity
In this tutorial, we will learn and understand about planning for capacity and scaling while replicating on-premises VMware VMs and physical servers to Azure by using Azure Site Recovery.
Planning capacity
To better understand Azure Site Recovery infrastructure needs, run Azure Site Recovery Deployment Planner for VMware replication to gather the essential information about the replication environment. However, Site Recovery Deployment Planner gives a report with complete information about compatible and incompatible VMs, disks per VM, and data churn per disk. Also, this tool also summarizes network bandwidth requirements for meeting the target RPO and the Azure infrastructure that is necessary for successful replication and test failover.
Capacity considerations
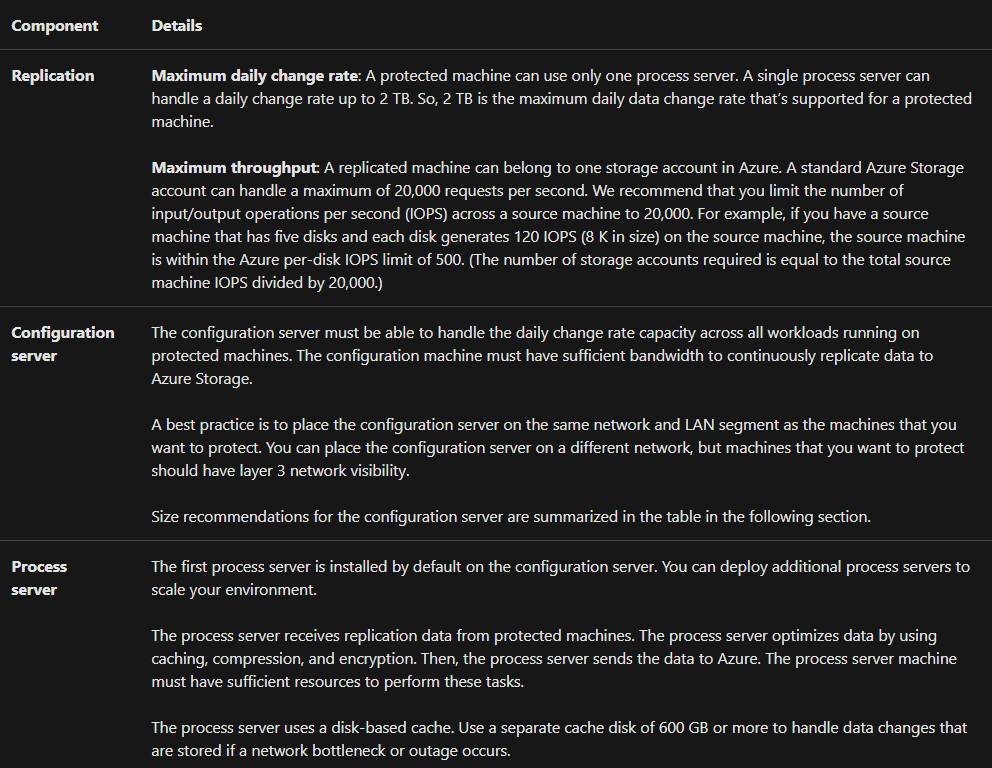
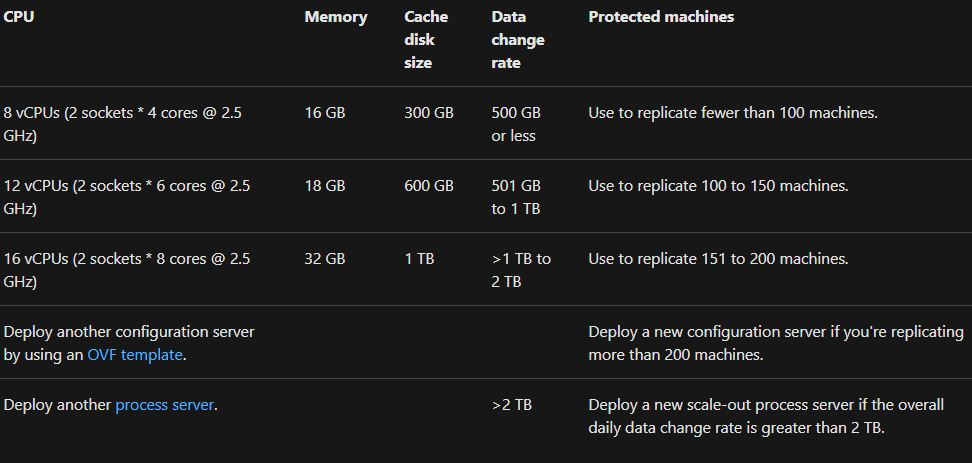
Recommending size for the configuration server and inbuilt process server
Configuration server uses an inbuilt process server for protecting the workload and can handle up to 200 virtual machines based on the following configurations:
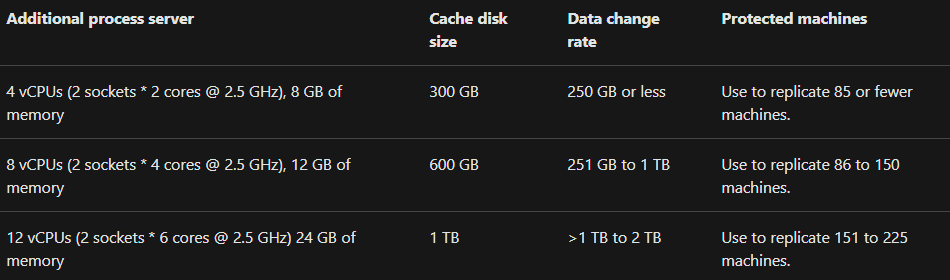
Size recommendations for the process server
In Azure Site Recovery, the process server is in charge of data replication. If the daily change rate is larger than 2 TB, scale-out process servers must be added to handle the replication demand. You can scale out in the following ways:
- Firstly, increase the number of configuration servers by deploying by using an OVF template.
- Secondly, add scale-out process servers. And, then use the scale-out process servers for handling replication traffic instead of the configuration server.
The table below explains describes the scenario:
- Firstly, you set up a scale-out process server.
- Then, you configure the protected virtual machines for using the scale-out process server.
- Lastly, each protected source machine has three disks of 100 GB each.
However, the process of scaling your servers depends on your preference for a scale-up or scale-out model. That is to say, for scaling up, deploy a few high-end configuration servers and process servers. However, for scaling out, deploy more servers that have fewer resources.
Controlling network bandwidth
After using Site Recovery Deployment Planner for calculating the bandwidth necessary for replication that is initial replication and then the delta. So, you have a couple of options for controlling the amount of bandwidth that’s used for replication:
- Firstly, Throttle bandwidth. In this, the VMware traffic that replicates to Azure goes through a specific process server. So, you can throttle bandwidth on the machines that are running as process servers.
- Secondly, Influence bandwidth. Here you can influence the bandwidth used for replication by using a couple of registry keys such as:
HKEY_LOCAL_MACHINE\SOFTWARE\Microsoft\Windows Azure Backup\Replication\UploadThreadsPerVM. This registry value specifies the number of threads for data transferring initial or delta replication of a disk.
HKEY_LOCAL_MACHINE\SOFTWARE\Microsoft\Windows Azure Backup\Replication\DownloadThreadsPerVM. This registry value specifies the number of threads for data transferring during failback.

Setting up the Site Recovery infrastructure for protecting more than 500 VMs
Before setting up the Site Recovery infrastructure, first access the environment for measuring the following factors:
- compatible virtual machines
- daily data change rate
- network bandwidth required for the RPO you want to achieve
- number of Site Recovery components that are required
- time taken for completing the initial replication
Complete the following steps for collecting the required information:
- Firstly, for measuring these parameters, run Site Recovery Deployment Planner on your environment.
- Secondly, deploy a configuration server that meets the size recommendations for the configuration server. However, if your production workload exceeds 650 virtual machines, then deploy another configuration server.
- Thirdly, on the basis of the daily data change rate measurement , deploy scale-out process servers with the help of size guidelines.
- However, if you expect the data change rate for a disk virtual machine for exceeding 2 MBps, then ensure that you use premium managed disks. That is to say, Site Recovery Deployment Planner runs for a specific time period. So, Peaks in the data change rate at other times might not be captured in the report.
- After that, set the network bandwidth based on the RPO you want to achieve.
- Lastly, when the infrastructure is set up, enable disaster recovery for your workload.
Planning capacity for Hyper-V VM disaster recovery
You should know that[Azure Site Recovery Deployment Planner] (site-recovery-hyper-v-deployment-planner.md) for Hyper-V to Azure deployment provides the following:
- Firstly, VM eligibility assessment, based on the number of disks, disk size, IOPS, churn, and a few VM characteristics
- Secondly, Network bandwidth need versus RPO assessment
- Thirdly, Azure infrastructure requirements
- Then, On-premises infrastructure requirements
- After that, Initial replication batching guidance
- Lastly, Estimated total disaster recovery cost to Azure
However, Azure Site Recovery Capacity Planner helps in determining capacity requirements when you replicate Hyper-V VMs with Azure Site Recovery. So, use Site Recovery Capacity Planner for analyzing your source environment and workloads. It also helps in estimating bandwidth needs, the server resources you need for the source location, and the resources required in the target location.
Running the tool
You can run the tool in two modes:
- Firstly, Quick planning, that provides network and server projections based on an average number of VMs, disks, storage, and change rate.
- Secondly, Detailed planning, that provides details of each workload at the VM level. With analyzing VM compatibility and getting network and server projections.
Running the Quick Planner
- Firstly, open Site Recovery Capacity Planner and run macros. After that, make selections for enabling editing and content.
- Secondly, in the Select a planner type list box, select Quick Planner.
- Thirdly, on the Capacity Planner worksheet, enter the required information.
After entering the values for the source environment, the displayed output includes:
The bandwidth required for delta replication (in Megabits/sec). Here, the Network bandwidth for delta replication is calculated on the average daily data change rate.
The bandwidth required for initial replication (in Megabits/sec). Here, Network bandwidth for initial replication is calculated on the initial replication values you enter.
Storage required (in GBs). This means the total Azure storage required.
Total IOPS on Standard Storage. This means the number is calculated based on the 8K IOPS unit size on the total standard storage accounts. However, for the Quick Planner, the number is calculated based on all the source VM disks and the daily data change rate. And, for the Detailed Planner, the number is calculated based on the total number of VMs that are mapped to standard Azure VMs and the data change rate on those VMs.
A number of Standard storage accounts required. This specifies the total number of standard storage accounts needed to protect the VMs. However, a standard storage account can hold up to 20,000 IOPS across all the VMs in standard storage. With a maximum of 500 IOPS is supported per disk.
A number of Blob disks required. This specifies the number of disks that are created on Azure storage.
The number of premium accounts required. This specifies the total number of premium storage accounts necessary for protecting the VMs. However, a source VM with a high IOPS that is greater than 20,000 needs a premium storage account. Note: Premium storage account can hold up to 80,000 IOPS.
Total IOPS on Premium Storage. The numerical calculation is on the basis of the 256K IOPS unit size on the total premium storage accounts. For the Quick Planner, the numerical calculations are on all the source VM disks and the daily data change rate. For the Detailed Planner, the numerical calculations are on the total number of VMs that are mapped to premium Azure VMs (DS and GS series) and the data change rate on those VMs.
The number of Configuration Servers required. This shows what number of configuration servers are necessary for the deployment.
A number of additional Process Servers required. This displays whether additional process servers are required, in addition to the process server that’s running on the configuration server by default.
100% additional storage on the Source. This shows the additional storage requirement in the source location.
Running the Detailed Planner
- Firstly, open Site Recovery Capacity Planner and run macros. After that, make selections for enabling editing and content.
- Then, in Select a planner type, select Detailed Planner from the list box.
- Thirdly, on the Workload Qualification worksheet, enter the required information.
Lastly, if you select Compute IaaS VMs, here’s what it does:
- Firstly, it validates the mandatory inputs.
- Secondly, it calculates IOPS and suggests the best Azure VM size match for each VM that’s eligible for replication to Azure. However, if there is no detection of an appropriate size Azure VM, then an error displays.
- Then, it suggests a storage account that can be used for an Azure VM.
- After that, it calculates the total number of standard storage accounts and premium storage accounts required for the workload.
- Lastly, it completes and sorts the rest of the table based on the required storage type assigned for a VM and the number of disks attached.

Reference: Microsoft Documentation, Documentation 2