As more and more organizations move their applications and data to the cloud, security becomes a top priority to protect sensitive data from unauthorized access. Managing access to secrets such as passwords, certificates, and encryption keys is crucial for maintaining a secure environment. Azure Key Vault is a cloud-based service that provides a secure and centralized location to store and manage these secrets. It is a vital component of any Azure-based application’s security strategy.
However, setting up and managing Azure Key Vault securely can be challenging, especially for those who are new to the service. This is why we have created a comprehensive guide that covers the best practices for securing your Azure Key Vault, along with a step-by-step guide on how to implement them. We will go through everything from proper access control to monitoring and auditing your Key Vault usage. By following these best practices, you can ensure that your Azure Key Vault is secure, and that your sensitive data is protected against potential security threats. So, whether you are new to Azure Key Vault or looking to improve your security posture, this guide will provide you with the knowledge and tools necessary to secure your Azure Key Vault and safeguard your sensitive data.
To get more details on how Azure Key Vault provides a secure environment let’s begin with the overview of Azure Key Vault Security and how it works.
Glossary for Azure Key Vault Security Terminology
- Azure Key Vault – A cloud-based service that provides secure storage of cryptographic keys, secrets, and certificates.
- Key – A cryptographic key is a string of characters that is used to encrypt and decrypt data.
- Secret – A secret is any sensitive information that needs to be protected, such as passwords, connection strings, and API keys.
- Certificate – A digital certificate is an electronic document that is used to authenticate the identity of a person, organization, or device.
- Key Management – The process of generating, storing, using, and disposing of cryptographic keys.
- Secret Management – The process of securely storing, retrieving, and managing sensitive data such as passwords, certificates, and API keys.
- Cryptography – The science of secure communication in the presence of third parties, known as adversaries.
- HSM – Hardware Security Module is a physical device that provides extra security for storing cryptographic keys.
- RBAC – Role-Based Access Control is a method of controlling access to resources based on the roles assigned to users or groups.
- ACL – Access Control List is a list of permissions attached to an object that specifies which users or groups have access to that object.
- Multi-Factor Authentication – A security mechanism that requires users to provide multiple forms of identification, such as a password and a token or biometric information, to access a resource.
- Azure AD – Azure Active Directory is a cloud-based identity and access management service that provides authentication and authorization for Azure resources and Microsoft services.
- Encryption – The process of converting plaintext into ciphertext to protect it from unauthorized access.
- Decryption – The process of converting ciphertext into plaintext to make it readable.
- TLS – Transport Layer Security is a cryptographic protocol that provides secure communication over the internet.
- HTTPS – Hypertext Transfer Protocol Secure is an extension of the HTTP protocol that uses TLS encryption to provide secure communication over the Internet.
- Audit Trail – A record of all actions taken on a resource, including who performed the action and when it was performed.
- Key Rotation – The process of generating new cryptographic keys and replacing old keys to enhance security.
- Backup and Restore – The process of creating and restoring backups of cryptographic keys, secrets, and certificates to prevent data loss in case of disaster or accidental deletion.
- Disaster Recovery – The process of restoring system functionality in the event of a disaster, such as a natural disaster or cyber attack.
What is Azure Key Vault security?
Azure Key Vault protects encryption keys and secrets in the cloud that can be certificates, connection strings, and passwords. However, you should take steps for maximizing the security of your vaults and the data stored in them while storing sensitive and business-critical data.
Further, there are various features of Azure Key Vault Security. This will provide you more clarity about the areas of the key vault.
Features:
The features that makes Azure Key Vault best for providing security includes:
1. Network security
- Firstly, you can decrease the exposure of your vaults by specifying which IP addresses have access to them. That is to say, for restricting access for a specific virtual network, the virtual network service endpoints for Azure Key Vault provide an allowance. Moreover, the endpoints here, also allow you to restrict access to a list of IPv4 address ranges.
- Secondly, after the firewall rules start functioning, then, users can only read data from Key Vault when their requests derive from allowed virtual networks or IPv4 address ranges.
- Thirdly, Azure Private Link Service allows you to access Azure Key Vault and Azure-hosted customer/partner services over a Private Endpoint in your virtual network. Here, Azure Private Endpoint defines a network interface for connecting privately and securely to a service powered by Azure Private Link. In this, the private endpoint uses a private IP address from your VNet. However, all traffic to the service can be routed through the private endpoint, so no need of,
- Gateways
- NAT devices
- ExpressRoute or VPN connections
- Public IP addresses
2. TLS and HTTPS
- The Key Vault front end (data plane) refers to a multi-tenant server. That is to say, key vaults from different customers can share the same public IP address. However, for achieving isolation, each HTTP request has to go through authentication and authorization independently of other requests.
- Secondly, you may identify older versions of TLS for reporting vulnerabilities. This is because the public IP address is shared that makes it impossible for the key vault service team to disable old versions of TLS for individual key vaults at the transport level.
- Thirdly, the HTTPS protocol allows the client to participate in TLS negotiation. However, the clients can enforce the most recent version of TLS, and whenever a client does so, the entire connection will use the corresponding level protection.
- Lastly, there is no known attack for all known vulnerabilities in TLS protocol that allows a malicious agent for removing any information from your key vault when the attacker begins a connection with a TLS version with vulnerabilities. Here, the attacker still has to authenticate and authorize. And there is no way that credentials could have been leaked from vulnerabilities at old TLS versions as long as legitimate clients always connect with recent TLS versions.
3. Identity management
When creating a key vault in an Azure subscription, it automatically gets linked with the Azure AD tenant of the subscription. As a result, anybody attempting to administer or retrieve content from a vault should use Azure AD authentication. In both circumstances, however, apps can access Key Vault in one of three ways:
- Firstly, Application-only. The application reflects a service principal or managed identity. This identity refers to the most common scenario for applications that require to access certificates, keys, or secrets from the key vault. For this scenario to work, you must specify the objectId of the application in the access policy and do not specify the applicationId.
- Secondly, User-only. The user can access the key vault from any application registered in the tenant. For example, Azure PowerShell and the Azure portal. However, for this scenario to work, you must specify the objectId of the user in the access policy and do not specify the applicationId.
- Lastly, Application-plus-user (compound identity).: The user needs to access the key vault from a specific application and the application must use the on-behalf-of authentication (OBO) flow for impersonating the user. However, for this scenario to work, both applicationId and objectId must be specified in the access policy. The applicationId is for identifying the required application and the objectId identifies the user.
4. Key Vault authentication options
When creating a key vault in an Azure subscription, it automatically gets associated with the Azure AD tenant of the subscription. All callers in both planes, however, must register with this tenant and authenticate in order to have access to the key vault. In both circumstances, applications can access Key Vault in one of three ways:
- Firstly, Application-only. The application reflects a service principal or managed identity. This identity refers to the most common scenario for applications that require to access certificates, keys, or secrets from the key vault. For this scenario to work, you must specify the objectId of the application in the access policy and do not specify the applicationId.
- Secondly, User-only. In this, the user accesses the key vault from any application registered in the tenant. For example, Azure PowerShell and the Azure portal. However, for this scenario to work, you must specify the objectId of the user in the access policy and do not specify the applicationId.
- Lastly, Application-plus-user (compound identity).: The user needs to access the key vault from a specific application and the application must use the on-behalf-of authentication (OBO) flow for impersonating the user. However, for this scenario to work, both applicationId and objectId must be specified in the access policy. The applicationId is for identifying the required application and the objectId identifies the user.
Further, the model of a single mechanism for authentication to both planes has several benefits:
- Firstly, organizations have the power to control access centrally for all key vaults in their organization.
- Secondly, if a user leaves, then, they right away lose access to all key vaults in the organization.
- Lastly, organizations can customize authentication by using the options in Azure AD, such as enabling multi-factor authentication for added security.
5. Access model overview
The management plane and the data plane are the two interfaces that control access to a key vault. The management plane is where Key Vault itself is managed. This plane’s operation include:
- Firstly, creating and deleting key vaults
- Secondly, retrieving Key Vault properties
- Lastly, updating access policies
On the other hand, a data plane is a place for working with data stored in a key vault. Using this, you will be able to perform tasks like adding, deleting, and modifying keys, secrets, and certificates. Further, for having access to a key vault in either plane, all callers must have complete authentication and authorization. Where the authentication protections indicate the identity of the caller. And, authorization decide which operations the caller can execute.
Security Principle:
For requesting access to Azure resources, a security principal is an object that represents a person, group, service, or application. All security principals, on the other hand, are given a unique object ID by Azure.
- Firstly, a user security principal identifies an individual with a profile in Azure Active Directory.
- Secondly, a group security principal recognizes a set of users developed in Azure Active Directory. Any roles or permissions allocated to the group are allowed to all of the users within the group.
- Thirdly, a service principal identifies an application or service that is a piece of code rather than a user or group. Here, the service principal’s client secret or certificate acts like its password. Many Azure Services support assigning Managed Identity with automated management of client ID and certificate.
Above we have understood the features of Azure Key Vault security. In the next section, we will be learning about the best practices and methods to create Azure Key Vault.
Best practices for using Key Vault
1. Use separate Key Vaults
It is advised to employ a vault per application per environment for Development, Pre-Production, and Production. This will prevent you from sharing secrets between environments and reduce the risk of a compromise.
2. Control Access to your vault
Azure Key Vault refers to a cloud service that protects encryption keys and secrets like certificates, connection strings, and passwords. The data stored is sensitive and business-critical. So, it is required to have secured access for your key vaults in which only authorized applications and users are allowed.
Some suggestions during controlling access for your vault:
- Firstly, lock down access for your subscription, resource group, and Key Vaults (Azure RBAC)
- Secondly, create Access policies for every vault
- Thirdly, use the least privilege access principle to grant access
- Lastly, turn on Firewall and VNET Service Endpoints
3. Backup
Just make sure to take regular backups of your vault for updating/deleting/creating objects within a Vault.
4. Azure PowerShell Backup Commands
1. Backup Certificate
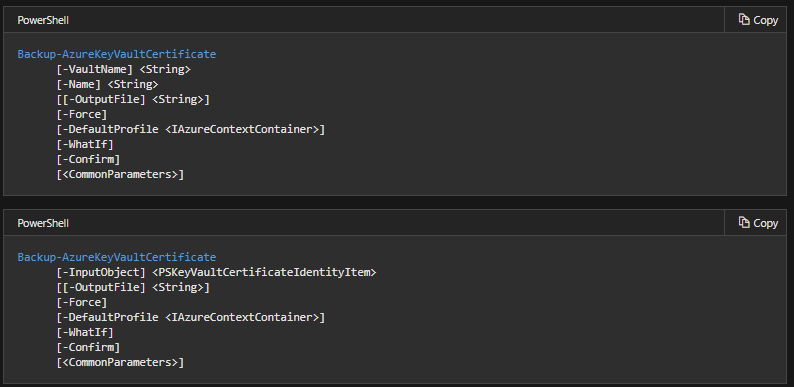
The Backup-AzureKeyVaultCertificate cmdlet is used to back up a certificate in a key vault. This is accomplished by downloading the information and saving it to a file. If, on the other hand, the certificate contains many versions, the backup will include all of them. This is due to the fact that the downloaded material is encrypted and can only be utilized within Azure Key Vault. Furthermore, a backed-up certificate for any key vault in the subscription can be restored—but only if the vault is in the same Azure region. There are a variety of reasons to utilize this cmdlet, including:
- Firstly, you want to retain an offline copy of the certificate in case you accidentally delete the original from the vault.
- Secondly, if you created a certificate using Key Vault and want to copy the object into a different Azure region. Use the Backup-AzureKeyVaultCertificate cmdlet for getting back the certificate in an encrypted format. After that, use the Restore-AzureKeyVaultCertificate cmdlet for specifying a key vault in the second region.
2. Backup Key
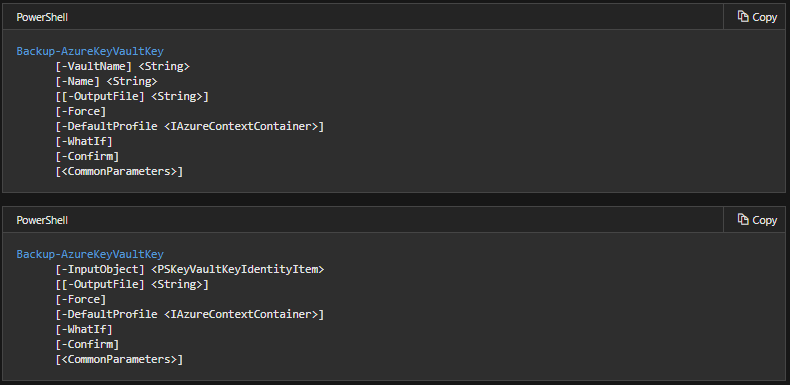
The Backup-AzureKeyVaultKey cmdlet is for backing up a specific key in a key vault. This is done by downloading it and storing it in a file. However, if there are multiple versions of the key then, all versions are included in the backup. This is because the downloaded content is encrypted and cannot be used outside of Azure Key Vault. Moreover, it is possible to restore a backed-up key to any key vault in the subscription. Further, there are typical reasons to use this cmdlet are:
- Firstly, you want to retain a copy of your key, so that you have an offline copy in case you accidentally delete your key in your key vault.
- Secondly, after creating a key using Key Vault you want to copy the key into another Azure region. This is so that you can use it from all instances of your distributed application. However, use the Backup-AzureKeyVaultKey cmdlet for getting back the key in an encrypted format. After that, use the Restore-AzureKeyVaultKey cmdlet and specify a key vault in the second region.
3. Backup Secret

The Backup-AzureKeyVaultSecret cmdlet is for backing up a specific key in a key vault. This is done by downloading it and storing it in a file. However, if there are multiple versions of the key then, all versions are included in the backup. This is because the downloaded content is encrypted and cannot be used outside of Azure Key Vault. Moreover, restoring a backed-up secret for any key vault is possible in the subscription that it was backed up from. Further, there are typical reasons to use this cmdlet are:
- Firstly, you want to retain a copy of your secret, so that you have an offline copy in case you accidentally delete your key in your key vault.
- Secondly, after creating a key using Key Vault you want to clone the secret into another Azure region. This is so that you can use it from all instances of your distributed application. However, use the Backup-AzureKeyVaultSecret cmdlet for getting back the key in an encrypted format. After that, use the Restore-AzureKeyVaultSecret cmdlet by specifying a key vault in the second region.
5. Turn on Logging
- Turn on logging for your Vault. Also, set up alerts.
- After creating one or more key vaults, you will want the process of monitoring to check the key vault access for when, how, and by whom. However, you can perform this by enabling logging for Azure Key Vault. This will save the information provided in an Azure storage account.
- Further, you can access your logging information 10 minutes after the key vault operation. It’s up to you for managing your logs in your storage account:
- Firstly, use standard Azure access control methods in your storage account for securing your logs by restricting who can access them.
- Secondly, delete logs that you do not want to keep in your storage account.
6. Turn on recovery options
- Turn on Soft Delete.
- Key Vault’s soft-delete feature provides recovery of the deleted vaults and key vault objects basically known as soft-delete. This safeguard offers the following protections:
- Firstly, once there is the deletion of a secret, key, certificate, or key vault, then, it will remain recoverable for a period of 7 to 90 calendar days. However, if there is no specified configuration then, the default recovery period will be set to 90 days. Further, this gives users sufficient time for noticing an accidental secret deletion and respond.
- Secondly, two operations must be made for permanently deleting a secret.
- Firstly, a user must delete the object that puts it into the soft-deleted state.
- Secondly, a user must purge the object in the soft-deleted state. The purge operation needs additional access policy permissions which helps in reducing the risk of a user accidentally or maliciously deleting a secret or a key vault.
- Lastly, for purging a secret in the soft-deleted state, a service principal must be allowed an additional “purge” access policy permission. However, the purge access policy permission is not given by default for any service principal including key vault and subscription owners and must be deliberately set. Also, it reduces the probability of accidentally deleting a secret, by needing an elevated access policy permission to purge a soft-deleted secret.
- Key Vault’s soft-delete feature provides recovery of the deleted vaults and key vault objects basically known as soft-delete. This safeguard offers the following protections:
Moving on, in the below section, we will learn about the process of creating a vault in different ways.
Creating a key vault using the Azure CLI
Azure Key Vault refers to a cloud service that provides a secure store for keys, secrets, and certificates.
Creating a resource group
- A resource group refers to a logical container into which Azure resources are deployed and managed. Use the az group creates command for creating a resource group named myResourceGroup in the eastus location.
Azure CLI
az group create –name “myResourceGroup” -l “EastUS”
Create a key vault
Use the Azure CLI az keyvault create command for creating a Key Vault in the resource group from the previous step. However, you will need to provide some information:
- Firstly, Key vault name. A string of 3 to 24 characters containing only numbers (0-9), letters (a-z, A-Z), and hyphens (-)
- Secondly, Resource group name. That is myResourceGroup.
- Thirdly, the location, EastUS.
Azure CLI
az keyvault create –name “<your-unique-keyvault-name>” –resource-group “myResourceGroup” –location “EastUS”
However, the output of this command shows the properties of the newly created key vault. The two properties are listed below:
- Firstly, Vault Name. This is the name that you provided to the –name parameter.
- Secondly, Vault URI. For example, this is https://<your-unique-keyvault-name>.vault.azure.net/. Applications using vault with its REST API must use this URL.
For cleaning up resources:
- Use the Azure CLI az group delete command for removing the resource group and its related resources:
Azure CLI
az group delete –name “myResourceGroup”
Create a key vault using PowerShell
Create a resource group
- A resource group refers to a logical container into which Azure resources are deployed and managed. Here, use the Azure PowerShell New-AzResourceGroup cmdlet for creating a resource group named myResourceGroup in the eastus location.
Azure PowerShell
New-AzResourceGroup -Name “myResourceGroup” -Location “EastUS”
Create a key vault
For creating a Key Vault in the resource group from the previous step, use the Azure PowerShell New-AzKeyVault cmdlet. However, you will need to provide some information:
- Firstly, Key vault name. A string of 3 to 24 characters containing only numbers (0-9), letters (a-z, A-Z), and hyphens (-)
- Secondly, Resource group name. That is myResourceGroup.
- Thirdly, the location, EastUS.
Azure PowerShell
New-AzKeyVault -Name “<your-unique-keyvault-name>” -ResourceGroupName “myResourceGroup” -Location “East US”
However, the output of this cmdlet displays the properties of the newly created key vault. The two properties are listed below:
- Firstly, Vault Name. This is the name that you provided to the –name parameter.
- Secondly, Vault URI. For example, this is https://<your-unique-keyvault-name>.vault.azure.net/. Applications using vault with its REST API must use this URL.
For cleaning up resources:
- Use the Azure PowerShell Remove-AzResourceGroup cmdlet for removing the resource group and all related resources.
Azure PowerShell
Remove-AzResourceGroup -Name “myResourceGroup”
Creating a key vault using the Azure portal
Azure Key Vault is a cloud service used for providing a secure store for keys, secrets, and certificates.
- Firstly, select Create a resource from the Azure portal menu, or from the Home page.
- Secondly, in the Search box, enter Key Vault.
- Thirdly, from the results list, choose Key Vault.
- Then, on the Key Vault section, select Create.
- After that, on the Create key vault section fill in the following details:
- Firstly, Name. A unique name is necessary. For this, we use Contoso-vault2.
- Secondly, Subscription. Choose a subscription.
- Thirdly, Under Resource Group, select Create new and enter a resource group name.
- Then, in the Location pull-down menu, select a location.
- Leave the other options to their defaults.
- Lastly, after providing the information above, select Create.
Check for the two properties listed below:
- Firstly, Vault Name. In the example, this is Contoso-Vault2.
- Secondly, Vault URI. In the example, this is https://contoso-vault2.vault.azure.net/. Applications using vault with its REST API must use this URL.
For Cleaning up resources:
For deleting the resource group through the portal:
- Firstly, enter the name of your resource group in the Search box at the top of the portal. And, after seeing the resource group used in this quickstart in the search results, just, select it.
- Secondly, select Delete resource group.
- Lastly, in the TYPE THE RESOURCE GROUP NAME: box type in the name of the resource group and select Delete.
Final Words
Azure Key Vault is responsible for providing a secure environment to protect the files on all the layers. This has proven to be beneficial for most organizations. Above, we have understood the useful features and best practices for securing the data. Use the links, steps and check for the process of creating the key vault and get yourself familiar with this environment.