Implement Azure Backup
Exam AZ-103: Microsoft Azure Administrator is retired. AZ-104 is available.
Configure and Review Backup Reports
Steps to configure the storage account for a Recovery Services vault by using the Azure portal.
Note – This is a one-time configuration. Such that the after the storage account is configured, we can go directly to Power BI to view the template app and use reports.
Step 1 – In case we already have a Recovery Services vault open, go to the next step. Also in case we don’t have a Recovery Services vault open, in the Azure portal, select All services.
- In the list of resources, enter Recovery Services.
- As we begin searching, the list filters based on input. Select the Recovery Services vaults.
- List of Recovery Services vaults appears. Then from the list of Recovery Services vaults, select a vault. The selected vault dashboard opens.
Step 2 – From the list of items that appears under the vault, under the Monitoring and Reports section, select Backup Reports to configure the storage account for reports.
Step 3 – On the Backup Reports blade, select the Diagnostics Settings link. This link opens the Diagnostics settings UI, which is used to push data to a customer storage account.
Step 4 – Select Turn on diagnostics to open a UI to use to configure a storage account.
Step 5 – In the Name box, enter a setting name. Select the Archive to a storage account check box so that reporting data can start flowing into the storage account.
Step 6 – Select Storage account, select the relevant subscription and the storage account from the list for storing reporting data, and select OK.
Step 7 – Under the Log section, select the AzureBackupReport check box. Move the slider to select a retention period for this reporting data. Reporting data in the storage account is kept for the period selected by using this slider.
Step 8 – Review all the changes, and select Save. This action ensures that all changes are saved, and the storage account is now configured to store reporting data.
Step 9 – The Diagnostic settings table now shows the new setting enabled for the vault. If it doesn’t appear, refresh the table to see the updated setting.
How to view reports in Power BI?
Once we have configured a storage account for reports by using a Recovery Services vault, it takes around 24 hours for reporting data to start flowing in. Such that after 24 hours of setting up a storage account, follow these steps to view reports in Power BI.
- Sign in to Power BI.
- Navigate to Apps > Get More Apps from Microsoft Appsource. Thereafter follow the steps in the Power BI documentation to connect to a service.
- In the Search bar, enter Azure Backup and select Get it now.
- Enter the name of the storage account that was configured in the previous step, and select Next.
- Using Authentication method “Key”, enter the storage account key for this storage account. To view and copy storage access keys, go to the storage account in the Azure portal.
- Select Sign in. After sign-in is successful, we see an importing data notification.
- After data imports successfully, the Azure Backup template app is visible in Apps in the navigation pane. Under Dashboards, Reports, and Datasets, the list now shows Azure Backup.
- Under Dashboards, select Azure Backup, which shows a set of pinned key reports.
- To view the complete set of reports, select any report in the dashboard.
- Select each tab in the reports to view reports in that area.
Performing Backup Operation
High-level architecture and data flow of the proposed solution to support incremental back-up.
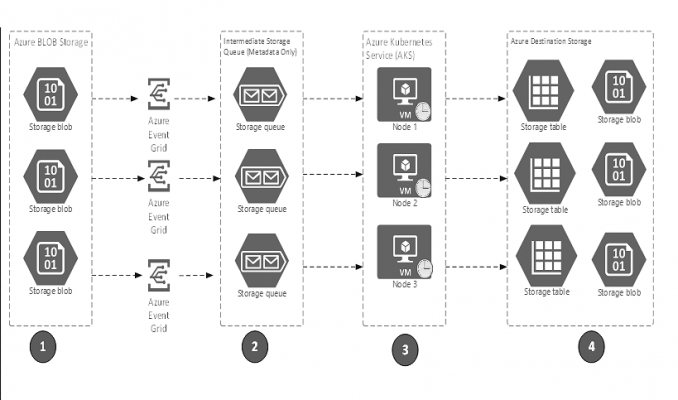

Steps while performing the back-up operation
- Firstly, create a new blob container in the destination storage account for every year like “2019”.
- Secondly, create a logical sub folder for each week under the year container like “wk21”. In case there are no files created or deleted in wk21 no logical folder will be created. CalendarWeekRule.FirstFullWeek has been used to determine the week number.
- Thirdly, create a logical sub folder for each day of the week under the year and week container like dy0, dy1, dy2. In case there are no files created or deleted for a day no logical folder will be created for that day.
- Fourthly, while copying the files, the listener changes the source container names to logical folder names in the destination storage account.
Steps to configure incremental backup
- Firstly, create a new storage account (destination) where we want to take the back-up.
- Secondly, create an event grid subscription for the storage account (source) to store the create/replace and delete events into Azure Storage queue.
- Thirdly, create a table in Azure Table storage where the event grid events will finally be stored by the .Net Listener.
- Fourthly, configure the .Net Listener (backup.utility) to start taking the incremental backup. Note there can be as many as instances of this listener as needed to perform the backup, based the load on your storage account.
Steps to configure full backup
- Schedule AZCopy on the start of week, to move the complete data from the source storage account to the destination storage account.
- Use AZcopy to move the data in a logical folder like “fbkp” to the corresponding year container and week folder in the destination storage account.
- Thereafter we can schedule AZCopy on a VM, on a Jenkins job, etc., depending on your technology landscape.
Steps to Configure Restore
- Firstly, create a new storage account (destination) where the data needs to be restored.
- Secondly, move data from full back up folder “fbkp” using AZCopy to the destination storage account.
- Thirdly, initiate the incremental restore process by providing the start date and end date to restore.utility.
Create and Configure a Backup Policy
Azure backup policy defines when we want to take a backup and for how long you would retain each backup copy.
Commands
| az backup policy delete | Before you can delete a Backup protection policy, the policy must not have any associated Backup items. To associate another policy with a Backup item, use the backup item set-policy command. |
| az backup policy get-default-for-vm | Get the default policy with default values to backup a VM. |
| az backup policy list | List all policies for a Recovery services vault. |
| az backup policy list-associated-items | List all items protected by a backup policy. |
| az backup policy set | Update the properties of the backup policy. |
| az backup policy show | Show details of a particular policy. |
az backup policy delete

az backup policy get-default-for-vm

az backup policy list

az backup policy list-associated-items

az backup policy set

az backup policy show

Perform a Restore Operation
As we know that SQL Database backups are stored in geo-replicated blob storage (RA-GRS), by default. Some of the given options are available for database recovery using automated database backups –
- Create a new database on the same SQL Database server recovered to a specified point in time within the retention period.
- Create a database on the same SQL Database server recovered to the deletion time for a deleted database.
- Create a new database on any SQL Database server in the same region recovered to the point of the most recent backups.
- Create a new database on any SQL Database server in any other region recovered to the point of the most recent replicated backups.
Recovery time
Recovery time to restore a database using automated database backups is impacted by several factors –
- Size of the database
- Compute size of the database
- Number of transaction logs involved
- Amount of activity that needs to be replayed to recover to the restore point
- Network bandwidth if the restore is to a different region
- Number of concurrent restore requests being processed in the target region
In general, restore a database to an earlier point for recovery purposes. Also we can treat the restored database as a replacement for the original database or use it as a source data to update the original database.
- Database replacement – In case the restored database is intended as a replacement for the original database, then we must specify the original database’s compute size and service tier. We can thereafter rename the original database and give the restored database the original name using the ALTER DATABASE command in T-SQL.
- Data recovery – In case there is a plan to retrieve data from the restored database to recover from a user or application error, it is required to write and execute a data recovery script that extracts data from the restored database and applies to the original database. Even though the restore operation may take a long time to complete, the restoring database is visible in the database list throughout the restore process.
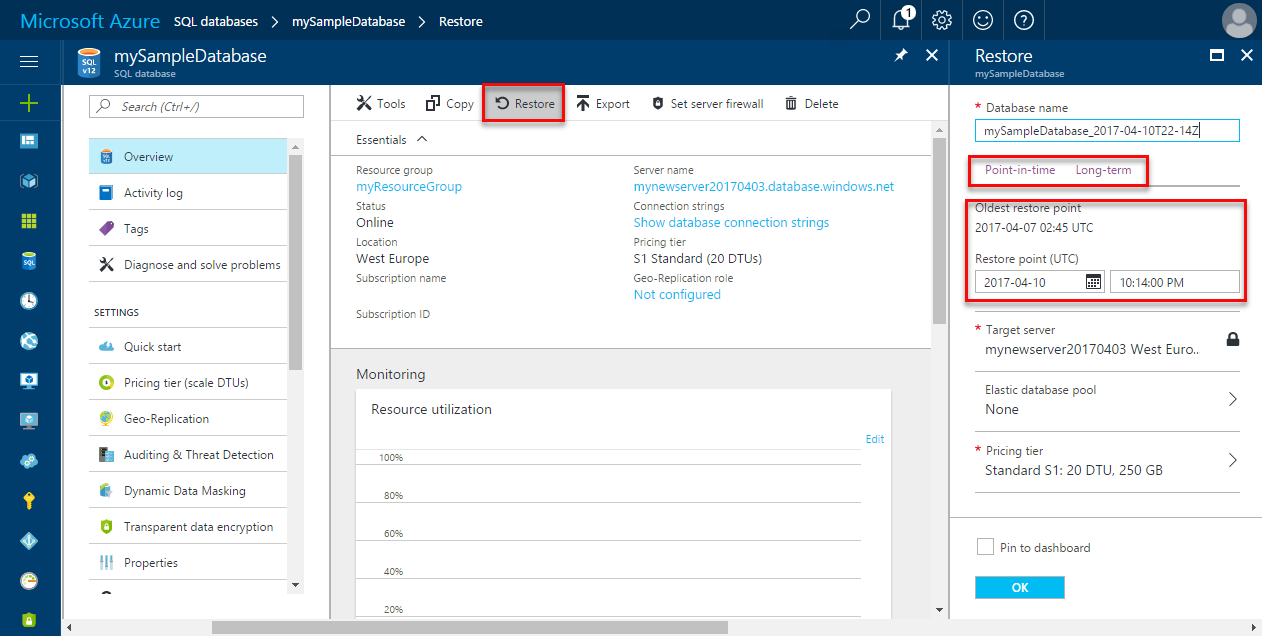
In order to recover a single, pooled, or instance database to a point in time using the Azure portal, open the page for your database and click Restore on the toolbar.
How to delete database restore using the Azure portal?
In order to recover a deleted database using the Azure portal, open the page for your server and in the Operations area, click Deleted databases.
