Create Connectivity between Virtual Networks
Create and Configure VNET Peering
We can connect virtual networks to each other with virtual network peering. Such that these virtual networks can be in the same region or different regions also referred as Global VNet peering. Post the virtual networks are peered, resources in both virtual networks are able to communicate with each other, with the same latency and bandwidth as if the resources were in the same virtual network.
How to create a virtual network?
- Select + Create a resource on the upper, left corner of the Azure portal.
- Select Networking, and then select Virtual network.
- Enter, or select, the following information, accept the defaults for the remaining settings, and then select Create
- We can then complete above again, with the following changes –
| Setting | Value |
|---|---|
| Name | myVirtualNetwork2 |
| Address space | 10.1.0.0/16 |
| Resource group | Select Use existing and then select myResourceGroup. |
| Subnet Address range | 10.1.0.0/24 |
How to peer virtual network?
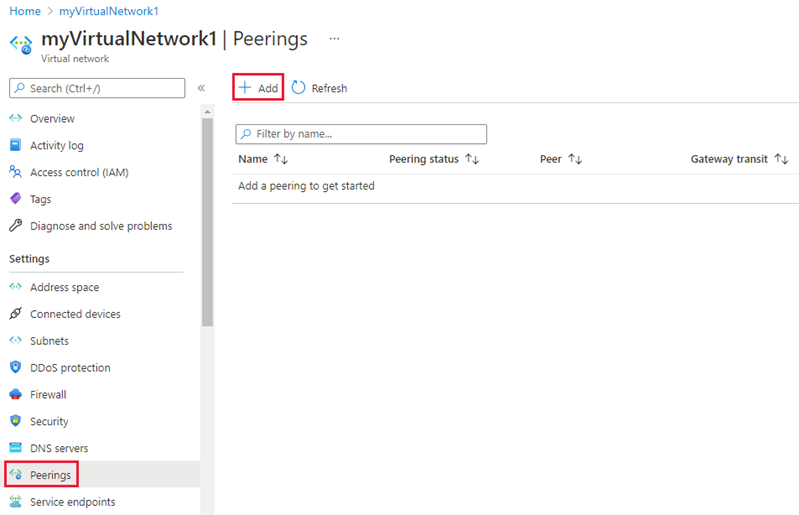
1. In the Search box at the top of the Azure portal, begin typing MyVirtualNetwork1. When myVirtualNetwork1 appears in the search results, select it.
2. Select Peerings, under SETTINGS, and then select + Add, as shown in the given picture
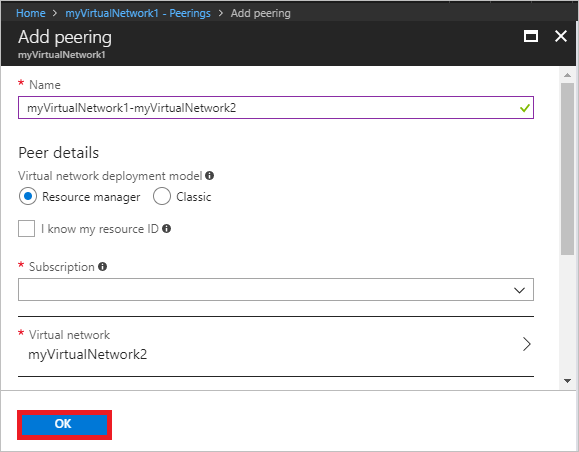
3. Enter, or select, the following information, accept the defaults for the remaining settings, and then select OK
| Setting | Value |
|---|---|
| Name | myVirtualNetwork1-myVirtualNetwork2 |
| Subscription | Select your subscription. |
| Virtual network | myVirtualNetwork2 – To select the myVirtualNetwork2 virtual network, select Virtual network, then select myVirtualNetwork2. You can select a virtual network in the same region or in a different region. |
4. In the Search box at the top of the Azure portal, begin typing MyVirtualNetwork2. When myVirtualNetwork2 appears in the search results, select it.
5. Complete steps 2-3 again, with the following changes, and then select OK:SettingValueNamemyVirtualNetwork2-myVirtualNetwork1Virtual networkmyVirtualNetwork1
How to create a virtual machines?
Following are the steps to create a virtual machine.
- Select + Create a resource on the upper, left corner of the Azure portal.
- Select Compute, and then select Windows Server 2016 Datacenter. We assume to select Windows Server 2016 Datacenter.
- Enter, or select, information for Basics (like name, username, password, resource group), then accept the defaults for the remaining settings, and then select Create
- Select a VM size under Choose a size.
- Select the given values for Settings, then select OK
| Setting | Value |
|---|---|
| Virtual network | myVirtualNetwork1 – If it’s not already selected, select Virtual network and then select myVirtualNetwork1 under Choose virtual network. |
| Subnet | Subnet1 – If it’s not already selected, select Subnet and then select Subnet1 under Choose subnet. |
- Under Create in the Summary, select Create to start the VM deployment.
Create and Configure VNET to VNET
We must first understand the reason to create a VNet-to-VNet connection
To Cross region geo-redundancy and geo-presence
- Firstly, We can set up our own geo-replication or synchronization with secure connectivity without going over Internet-facing endpoints.
- Secondly, with Azure Traffic Manager and Load Balancer, we can set up highly available workload with geo-redundancy across multiple Azure regions.
Regional multi-tier applications with isolation or administrative boundary
- Firstly, within the same region, we can set up multi-tier applications with multiple virtual networks connected together due to isolation or administrative requirements.
- Secondly, VNet-to-VNet communication can be combined with multi-site configurations. This helps in establishing network topologies which combines cross-premises connectivity with inter-virtual network connectivity.
Ways to connect VNets
- VNet-to-VNet – One of the best ways to configure a VNet-to-VNet and easily connect VNets. The process of connecting a virtual network to another virtual network using the VNet-to-VNet connection type (VNet2VNet) is somewhat similar to creating a Site-to-Site IPsec connection to an on-premises location. Here both connectivity types use a VPN gateway in order to provide a secure tunnel using IPsec/IKE, together with both function the same way while communicating.
- Site-to-Site (IPsec) – While we are working with a complicated network configuration, we may prefer to connect VNets using the Site-to-Site steps, instead the VNet-to-VNet steps. Such that when we use the Site-to-Site steps, we create and configure the local network gateways manually.
- VNet peering – We would want to consider connecting VNets using VNet Peering. Such that VNet peering does not use a VPN gateway and has different constraints. Together with, VNet peering pricing is calculated differently than VNet-to-VNet VPN Gateway pricing.
Verify Virtual Network Connectivity
We shall now discuss the steps to illustrate the way to navigate to connection and verify
- In the Azure portal, click All resources and navigate to the virtual network gateway.
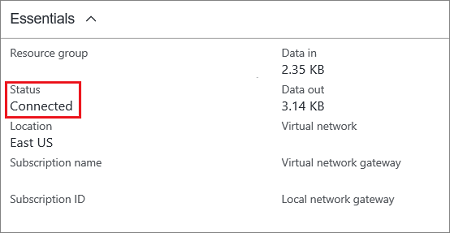
- On the blade for virtual network gateway, click Connections, where we can see the status of each connection.
- Click the name of the connection that we want to verify to open Essentials. Such that in Essentials, we can view more information about your connection. The Status is ‘Succeeded’ and ‘Connected’ when we have made a successful connection.
Steps to navigate to a connection and verify
- First, in the Azure portal, click All resources and navigate to classic virtual network.
- Second, on the virtual network blade, click Overview to access the VPN connections section of the blade.
- Third, on the VPN connections graphic, click the site.
- Fourth, on the Site-to-site VPN connections blade, view the information about the site.
- Fifth, to view more information about the connection, click the name of the connection to open the Site-to-site VPN Connection blade.
Create a Virtual Network Gateway
How to create a virtual network?
In order to create a VNet in the Resource Manager deployment model with the help of using the Azure portal, following steps are used. We may use certain terms as examples which can be changed as per requirement.
- Steps 1 – From a browser, navigate to the Azure portal and sign in with your Azure account.
- Step 2 – Click Create a resource. Thereafter, in the Search the marketplace field, type ‘virtual network’. Locate Virtual network from the returned list and click to open the Virtual Network page.
- Step 3 – Click Create. This opens the Create virtual network page.
- Step 4 – Now on the Create virtual network page, configure the VNet settings. Such that when we fill in the fields, the red exclamation mark becomes a green check mark when the characters entered in the field are valid. We will be required to fill the given values – Name, Address space, Subscription, Resource group, Location, Subnet and Address range.
- Step 5 – Leave DDoS as Basic, Service endpoints as Disabled, and Firewall as Disabled.
- Step 6 – Last step Click Create to create the VNet.
How to add a Add a gateway subnet?
We shall now discuss the steps to add a gateway subnet –
- Step 1 – In the portal, navigate to the virtual network for which we want to create a virtual network gateway.
- Step 2 – On the virtual network page, click Subnets to expand VNet1 – Subnets page.
- Step 3 – Click +Gateway subnet at the top to open the Add subnet page
- Step 4 – The Name for the subnet is automatically filled in with the required value ‘GatewaySubnet’. Adjust the auto-filled Address range (CIDR block) to match the value – Address range (CIDR block)
- Step 5 – Leave the rest of the settings as the defaults of None or 0 selected. Then, click OK to create the gateway subnet.
How to Configure and Create the Gateway?
Steps to configure and create the gateway are as follows –
- Step 1 – In the Azure portal, on the left side, click + Create a resource and type ‘Virtual Network Gateway’ in search. Thereafter, locate Virtual network gateway in the search return and click the entry. On the Virtual network gateway page, click Create. This will open the Create virtual network gateway page.
- Step 2 – In the second step, on the Create virtual network gateway page, fill in the values for teh virtual network gateway. Such that these values include – Project details, Instance details, Gateway subnet address range, Public IP address and Active-Active mode etc.
- Step 3 – Click Review + Create to run validation. Such that once validation passes, click Create to deploy the VPN gateway. Note, a gateway may take up approximately 45 minutes to fully create and deploy.
Once the gateway has been created, we can view the IP address that has been assigned to it by reviewing the virtual network in the portal. Such that the gateway appears as a connected device.