Create and configure a VM for Windows and Linux
Configuring High Availability
We can define ‘availability set’ is a logical grouping capability for isolating VM resources from each other when they are deployed. Azure ensures that the VMs we place within an Availability Set run across multiple physical servers, compute racks, storage units, and network switches. In case a hardware or software failure happens, only a subset of the VMs are impacted and the overall solution stays operational. Availability Sets are essential for building reliable cloud solutions.
How to create an availability set?
The availability Set is a logical grouping capability for isolating VM resources from each other when they are deployed. Azure ensures that the VMs we place within an Availability Set run across multiple physical servers, compute racks, storage units, and network switches. In case a hardware or software failure happens, only a subset of the VMs are impacted and the overall solution stays operational. Note that availability Sets are essential for building reliable cloud solutions.
Create a resource group

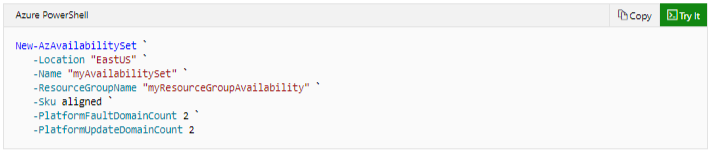
Create a managed availability set using New-AzAvailabilitySet with the -sku aligned parameter.
How to create VMs inside an availability set?
VMs should be created within the availability set to make sure they are correctly distributed across the hardware. But we cannot add an existing VM to an availability set after it’s created. Such that when we create a VM with New-AzVM, we must use the -AvailabilitySetName parameter to specify the name of the availability set.
- First, set an administrator username and password for the VM with Get-Credential
- Now create two VMs with New-AzVM in the availability set.
- Within few minutes create and configure both VMs. When finished, we have two virtual machines distributed across the underlying hardware.
- When we look at the availability set in the portal by going to Resource Groups > myResourceGroupAvailability > myAvailabilitySet, we should see how the VMs are distributed across the two fault and update domains.
Configure monitoring, networking, storage, and virtual machine size deploy and configure scale sets
Azure Monitoring
The process of azure monitoring uses agents to collect boot and performance data from Azure VMs, store this data in Azure storage, and make it accessible through portal, the Azure PowerShell module, and the Azure CLI. Such that update management allows to manage updates and patches for your Azure Windows VMs.
- Launch Azure Cloud Shell: Azure Cloud Shell is a free interactive shell that we can use to run the steps. It has common Azure tools preinstalled and configured to use with your account. In order to open the Cloud Shell, just select Try it from the upper right corner of a code block. We can also launch Cloud Shell in a separate browser tab by going to https://shell.azure.com/powershell. Select Copy to copy the blocks of code, paste it into the Cloud Shell, and press enter to run it.
- Create virtual machine: In order to configure Azure monitoring and update management in this tutorial, we required a Windows VM in Azure. First, set an administrator username and password for the VM with Get-Credential – $cred = Get-Credential. Now create the VM with New-AzVM.
- View boot diagnostics: As Windows virtual machines boot up, the boot diagnostic agent captures screen output that can be used for troubleshooting purpose. This capability is enabled by default. The captured screenshots are stored in an Azure storage account, which is also created by default.
- View host metrics: A Windows VM has a dedicated Host VM in Azure that it interacts with. Metrics are automatically collected for the Host and can be viewed in the Azure portal.
- Install diagnostics extension: The diagnostic extension is installed through the Azure portal as follows – (1) In the Azure portal, click Resource Groups, select myResourceGroupMonitor, and then select myVM in the resource list. (2) Click Diagnosis settings. The list shows that Boot diagnostics are already enabled. Then, click the check box for Basic metrics. (3) Click the Enable guest-level monitoring button
- View VM metrics: We can view the VM metrics in the same way that has been viewed the host VM metrics – (1) In the Azure portal, click Resource Groups, select myResourceGroupMonitor, and then select myVM in the resource list. (2) In order to see how the VM is performing, click Metrics on the VM blade, and then select any of the diagnostics metrics under Available metrics.
- Create alerts: We can create alerts based on specific performance metrics. Alerts can be used to notify you when average CPU usage exceeds a certain threshold or available free disk space drops below a certain amount.
Azure Networking
Azure virtual networks enables secure network connections between virtual machines, the internet, and other Azure services such as Azure SQL database. Virtual networks are broken down into logical segments referred as subnets. Subnets are used to control network flow, and as a security boundary. When deploying a VM, it generally includes a virtual network interface, which is attached to a subnet.
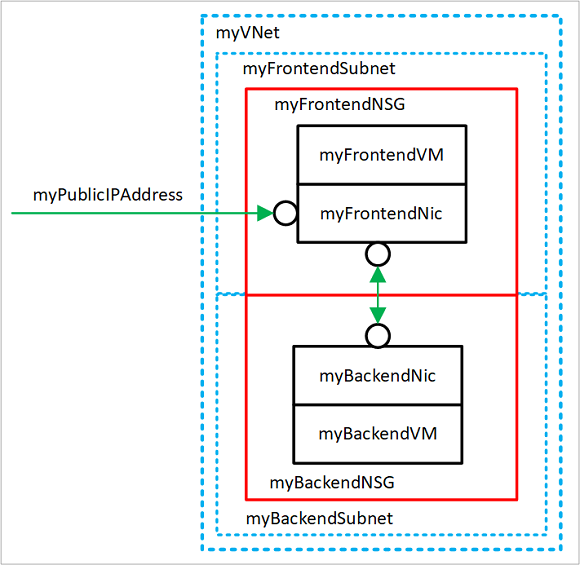
- Create Subnet: A single virtual network is created with two subnets. A front-end subnet for hosting a web application, and a back-end subnet for hosting a database server. Such that before creating a virtual network, create a resource group using New-AzResourceGroup.
- Create a virtual network: Create a VNET named myVNet using myFrontendSubnet and myBackendSubnet using New-AzVirtualNetwork. At this point, a network has been created and segmented into two subnets, one for front-end services, and another for back-end services.
- Create a public IP address: Create a public IP address named myPublicIPAddress using New-AzPublicIpAddress. Such that we could change the -AllocationMethod parameter to
Staticto assign a static public IP address. - Create a front-end VM: For a VM to communicate in a virtual network, it needs a virtual network interface (NIC). Create a NIC using New-AzNetworkInterface. Set the username and password needed for the administrator account on the VM using Get-Credential. We use these credentials to connect to the VM in additional steps – Create the VMs using New-AzVM.
Azure Storage
We first define, Azure managed disk which is a virtual hard disk (VHD). We can think of it like a physical disk in an on-premises server but, virtualized. As we know azure managed disks are stored as page blobs, that are a random IO storage object in Azure. We call a managed disk ‘managed’ since it is an abstraction over page blobs, blob containers, and Azure storage accounts.
Benefits of managed disks
- Highly durable and available
- Simple and scalable VM deployment
- Integration with availability sets
- Integration with Availability Zone
- Azure Backup support
- Granular access control
Encryption
Managed disks offer two different kinds of encryption. The first is Storage Service Encryption (SSE), which is performed by the storage service. The second one is Azure Disk Encryption, which we can enable on the OS and data disks for your VMs.
- Storage Service Encryption (SSE): Azure Storage Service Encryption provides encryption-at-rest and safeguards your data to meet the organizational security and compliance commitments. SSE is enabled by default for all managed disks, snapshots, and images in all the regions where managed disks are available. Visit the Managed Disks FAQ page for more details.
- Azure Disk Encryption (ADE): Azure Disk Encryption allows to encrypt the OS and Data disks used by an IaaS Virtual Machine. This encryption includes managed disks. For Windows, the drives are encrypted using industry-standard BitLocker encryption technology.
Azure Size
| Type | Sizes | Description |
|---|---|---|
| General purpose | B, Dsv3, Dv3, Dasv3, Dav3, DSv2, Dv2, Av2, DC | Balanced CPU-to-memory ratio. Ideal for testing and development, small to medium databases, and low to medium traffic web servers. |
| Compute optimized | Fsv2 | High CPU-to-memory ratio. Good for medium traffic web servers, network appliances, batch processes, and application servers. |
| Memory optimized | Esv3, Ev3, Easv3, Eav3, Mv2, M, DSv2, Dv2 | High memory-to-CPU ratio. Great for relational database servers, medium to large caches, and in-memory analytics. |
| Storage optimized | Lsv2 | High disk throughput and IO ideal for Big Data, SQL, NoSQL databases, data warehousing and large transactional databases. |
| GPU | NC, NCv2, NCv3, ND, NDv2 (Preview), NV, NVv3 (Preview) | Specialized virtual machines targeted for heavy graphic rendering and video editing, as well as model training and inferencing (ND) with deep learning. Available with single or multiple GPUs. |
| High performance compute | HB, HC, H | Our fastest and most powerful CPU virtual machines with optional high-throughput network interfaces (RDMA). |
Azure Scale Set
Virtual Machine scale set allows us to deploy and manage a set of identical, auto-scaling virtual machines. We can scale the number of VMs in the scale set manually, or define rules to autoscale based on resource usage like CPU, memory demand, or network traffic. An Azure load balancer then distributes traffic to the VM instances in the scale set.
How to create virtual machine scale set?
We can deploy a scale set with a Windows Server image or Linux image such as RHEL, CentOS, Ubuntu, or SLES.
- Click Create a resource in the upper left-hand corner of the Azure portal.
- Search for scale set, choose Virtual machine scale set, then select Create.
- Enter a name for the scale set, such as myScaleSet.
- Select desired OS type, such as Windows Server 2016 Datacenter.
- Enter desired resource group name, such as myResourceGroup, and location, such as East US.
- Enter desired username, and select which authentication type you prefer.
- Select a load balancing option, such as Load balancer, under Choose Load balancing options. Enter the remaining details for the load balancing option. For instance, for Load balancer we need to enter a Public IP address name and Domain name label.
- Enter the virtual network details under Configure Virtual Networks. For instance, we can create a new virtual network, myVirtualNetwork, and a new subnet, default.
- In order to confirm the scale set options, select Create.