Azure Resources – Role-based Access Control
With Azure Policy in place, all of our workers with Azure access are following our internal resource creation rules, but we still have a problem to solve: how do we safeguard those resources once they deploy? We have IT staff who need to adjust settings, developers who require read-only access, and administrators who need total control. Role-Based Access Control (RBAC) is a type of access control.
RBAC allows you to provide users the particular permissions they need to do their tasks by providing fine-grained access management for Azure resources. RBAC is a key service that comes free of charge with all membership tiers.
Using RBAC, you can:
- Allow one user to manage VMs in a subscription, and another user to manage virtual networks.
- Secondly, allow a database administrator (DBA) group to manage SQL databases in a subscription.
- Allow a user to manage all resources in a resource group, such as VMs, websites, and virtual subnets.
- Allow an application to access all resources in a resource group.
Use the Azure portal’s Access Control (IAM) blade to see access permissions. You can examine who has access to an area and what function they play on this blade. You may also give or revoke access using the same blade.

In the above screenshot, Alain Charon has assign the Backup Operator role for this resource group.
How RBAC defines access
For access, RBAC employs an allow model. RBAC lets you to do activities, such as read, write, or delete, when you allocate to a role. As a result, if one role assignment gives you read capabilities to a resource group and another gives you write permissions to the same resource group, you will have write permissions on that resource group.
Best Practices for RBAC
Here are some best practices you should use when setting up resources.
- Segregate duties within your team and grant only the amount of access to users that they need to perform their jobs. Instead of giving everybody unrestricted permissions in your Azure subscription or resources, allow only specific actions at a particular scope.
- When planning your access control strategy, grant users the lowest privilege level that they need to do their work.
- Use Resource Locks to ensure critical resources aren’t modified or deleted (more on that next!)
Use Resource Locks to Protect Resources
Your manager noted in a recent chat that there have been occasions where crucial Azure resources have been accidentally removed. Because their Azure environment was disorganized, some good intentions to clear away superfluous resources resulted in unintended destruction. On Azure, you’ve probably heard about resource locks. You tell your boss that you believe you can help avoid another situation like this from happening in the future. Let’s look at how resource locks may fix this issue.
What are Resource Locks?
A resource lock is a setting that may apply to any resource to prevent it from modification or deletion. You can set resource locks to Delete or Read-only. All activities on the resource will be allowed, but the ability to remove it will be disabled. Read-only restricts access to the resource to just read operations, preventing it from being modified or deleted. When applied at higher levels, resource locks can be applied to subscriptions, resource groups, and individual resources, and they are inherited.
To conduct an activity after a resource lock has been applied, you must first remove the lock. It helps safeguard resources from unintended activities and protects your administrators from doing something they didn’t want to do by adding an extra step before allowing the action to be made on the resource. Regardless of RBAC permissions, resource locks apply. Even if you are the owner of the resource, you must first remove the lock before you may conduct the banned activity.
Let’s take a look at how a resource lock works in action.
Create a Resource Lock
Recall the resource group msftlearn-core-infrastructure-rg? We now have two VNets with a storage account in each of them. These resources are key components of our Azure ecosystem, and we want to make sure they aren’t accidentally erased. To prohibit the resource group and its included resources from being destroyed, add a resource lock to the resource group.
- Go ahead and pull up the Azure portal in a web browser if you haven’t already. In the search box in the top navigation bar, search for msftlearn-core-infrastructure-rg and click on the resource group.
- Now, in the Settings section in the left menu, select Locks. You should see that the resource currently has no locks. Let’s add one.
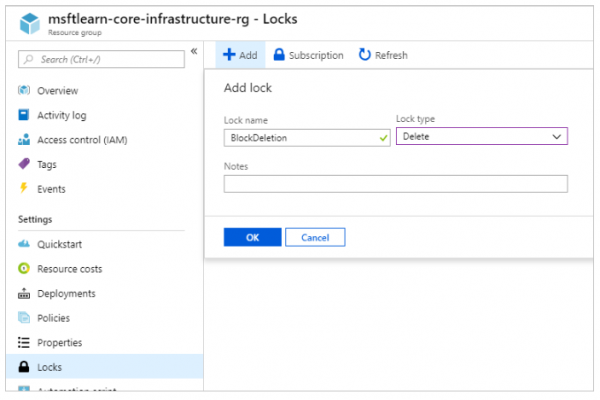
- After that, click + Add. Name the lock BlockDeletion and select a Lock type of Delete. Click OK.
You now have a lock applied to the resource group that will prevent deletion of the resource group, and is inherited by all resources within the resource group. Let’s try to delete one of the VNets to see what happens.
- Go back to Overview, and click on msftlearn-vnet1 to view the resource.
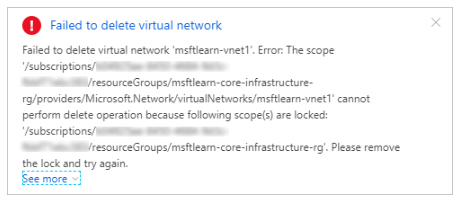
- In the Overview pane for msftlearn-vnet1, click Delete at the top, then Yes to confirm. You should receive an error, stating that there is a lock on the resource preventing its deletion.
- In the Settings section in the left menu, select Locks. You should see here that our msftlearn-vnet1 has a lock that inherits by from the resource group.
- Navigate back to the msftlearn-core-infrastructure-rg resource group, and bring up the Locks pane. Let’s remove our lock so we can clean up. Click the … on the BlockDeletion lock and select Delete.
Using Resource Locks in Practice
We’ve seen how resource locks may guard against unintentional deletion. The lock has to remove in order to deactivate the virtual network. This coordinated action ensures that you truly mean to remove or edit the resource at hand. However, use resource locks to safeguard Azure components that might have a significant impact if removed or updated. ExpressRoute circuits, virtual networks, crucial databases, and domain controllers are just a few examples.
Further, examine your resources and install locks where you’d like to provide an extra degree of security against unintentional acts.
For more on Tutorial visit – Microsoft Azure Fundamental (AZ-900)