Azure Policies – Enforcing Standards
You’re organizing your resources better in resource groups, and you’ve applied tags to your resources to use them in billing reports and in your monitoring solution. Existing resources have benefited from resource grouping and labeling, but how do you guarantee that new resources follow the rules? Let’s look at how policies may aid in the implementation of standards in your Azure environment.
What is Azure Policy?
- Azure Policy is a tool for creating, assigning, and managing policies. These policies implement and enforce the rules that must be followed by your resources.
- When resources are generated, these policies can enforce these rules, and they can be compared to existing resources to provide insight into compliance.
- Policies can make it such that only certain types of resources can be generated, or that resources can only be created in specified Azure regions.
- You may use naming standards to guarantee consistency throughout your Azure environment. You can also require that resources be tagged with specified tags.
Let’s look at how policies function.
Create a policy
We’d want to make sure that all resources have the Department tag attached to them, and if it doesn’t, we’d like to prevent them from being created. We’ll need to make a new policy definition and then assign it to a scope; in this example, our mslearn-core-infrastructure-rg resource group will be the scope. The Azure portal, Azure PowerShell, and the Azure CLI may all be used to build and assign policies. Let’s have a look at how to make a policy in the portal.
Create the Policy Definition
- Go ahead and pull up the Azure portal in a web browser if you haven’t already. In the search box in the top navigation bar, search for Policy and select the Policy service.
- In Authoring section in the left menu, select Definitions.
- You should see a list of built-in policies that you can use. In this case, we’re going to create our own custom policy. Click + Policy definition in the top menu.
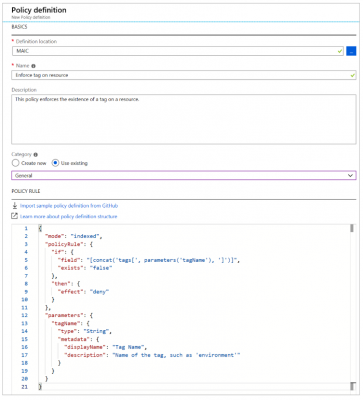
- This brings up the New policy definition dialog. To set the Definition location, click the blue …. Select the subscription for the policy to be stored in, which should be the same subscription as our resource group. Click Select.
- Back on the New policy definition dialog, for Name give your policy a name of Enforce tag on resource.
- For the Description, enter This policy enforces the existence of a tag on a resource.
- And, for Category select Use existing and then select the General category.
- For the Policy rule, delete all text in the box and paste in the following JSON.
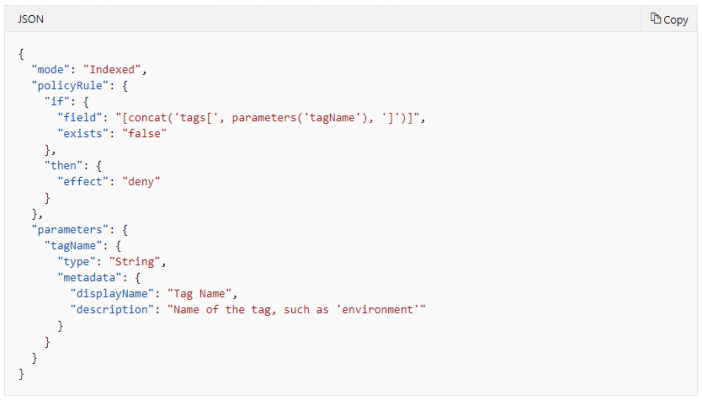
Your policy definition should look like below. Click Save to save your policy definition.
Create a Policy Assignment
We’ve developed the policy, but we haven’t yet put it into action. We’ll need to make an assignment to enable the policy. In this scenario, we’ll add it to the scope of our msftlearn-core-infrastructure-rg resource group, making it applicable to anything within it.
- In the policy pane, in the Authoring section on the left, select Assignments.
- Select Assign policy at the top.
- In the Assign policy pane, we’ll assign our policy to our resource group. For Scope, click the blue …. Select your subscription and the msftlearn-core-infrastructure-rg resource group, then click Select.
- For Policy definition, click the blue …. In the Type drop-down, select Custom, select the Enforce tag on resource policy you created, then click Select.
- In the Parameters section, for Tag name enter Department. Click Assign to assign the policy.
Test out the Policy
Any attempts to create a resource without the Department tag should fail now that we’ve applied the policy to our resource group. Let’s give it a go.
- Click + Create a resource in the top left of the portal.
- Search for Storage Account and select Storage account in the results. Click Create.
- Select your subscription, and the msftlearn-core-infrastructure-rg resource group.
- For Storage account name, give it any name of your choice, but note that it does have to be a globally unique name.
- Leave the rest of the options at their default, click Review + create.
Validation of your resource creation will fail because we don’t have a Department tag applied to the resource.
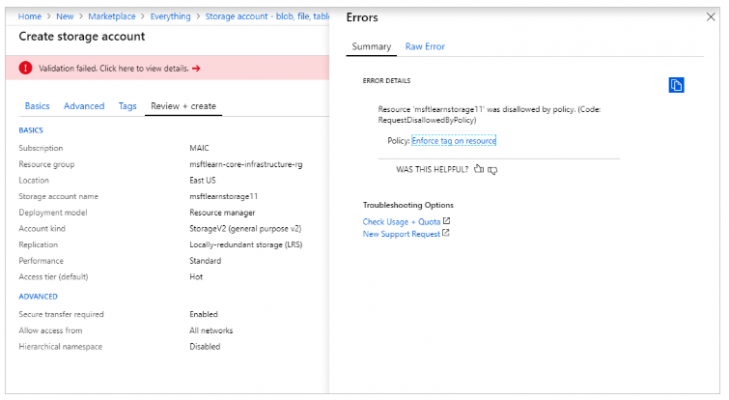
Let’s fix the violation so we can successfully deploy the storage account.
- Select Tags at the top of the Create storage account pane.
- Add a Department:Finance tag to the list.
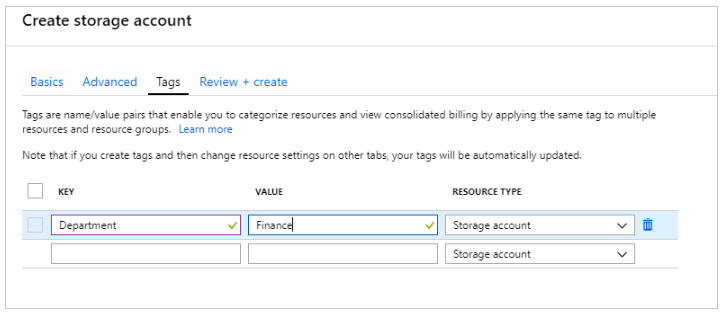
- Now click Review + create. Validation should now pass, and if you click Create your storage account will create.
Use Policies to Enforce Standards
- We’ve seen how policies guarantee that our resources have the tags that help organise them. There are additional ways that policies can be beneficial to us.
- Secondly, we may use policies to limit the Azure regions to which we can deploy resources. Policies assist guarantee that resources aren’t allocated in geographic locations that would go against these criteria for firms that are tightly regulated or have legal or regulatory constraints on where data can reside.
- Thirdly, policy might be used to limit the sorts of virtual machine sizes that can be installed. In your production subscriptions, you may wish to enable huge VM sizes, while in your development subscriptions, you may want to keep prices low.
- Lastly, you may prevent huge VM sizes from being provisioned in these settings by refusing them through policy in your dev subscriptions. We might also impose naming norms through policy. If our business has adopted unique name standards, enforcing those rules through policy allows us to maintain a uniform naming standard across all Azure services.
For more on Tutorial visit – Microsoft Azure Fundamental (AZ-900)