On-premises disaster recovery failover and failback
In this tutorial, we will understand and learn about failover and failback during disaster recovery of on-premises machines to Azure with Azure Site Recovery. Moreover, we will cover the process of running a disaster recovery drill to Azure, using a Site Recovery test failover.
Recovery stages
Failover and failback in Site Recovery has four stages:
Stage 1:
Failover from on-premises in which after setting up replication to Azure for on-premises machines, when your on-premises site goes down, you fail those machines over to Azure.
Stage 2:
Reprotecting Azure VM so that they start replicating back to the on-premises site. The on-premises VM is set off during reprotection, to help ensure data consistency.
Stage 3:
Failover from Azure, this specifies when the on-premises site is running as normal again then you run another fail over. However, this time to failback Azure VMs to your on-premises site. You can failback to the original location from which you failed over, or to an alternate location.
Stage 4:
Reprotecting on-premises machines after failing back, again enables replication of the on-premises machines to Azure.
Failover
Performing a failover is part of your business continuity and disaster recovery (BCDR) strategy.
- Firstly, in BCDR strategy, replicate your on-premises machines to Azure on an ongoing basis. However, users access workloads and apps running on the on-premises source machines.
- Secondly, if the need arises, like there’s an outage on-premises and you fail the replicating machines over to Azure. Azure VMs are created using the replicated data.
- Lastly, for business continuity, users can continue accessing apps on the Azure VMs.
Failover is a two-phase activity:
- Firstly, Failover that creates and brings up an Azure VM using the selected recovery point.
- Secondly, Commit, in this after failover you verify the VM in Azure and then you can then commit the failover to the selected recovery point, or select a different point for the commit.

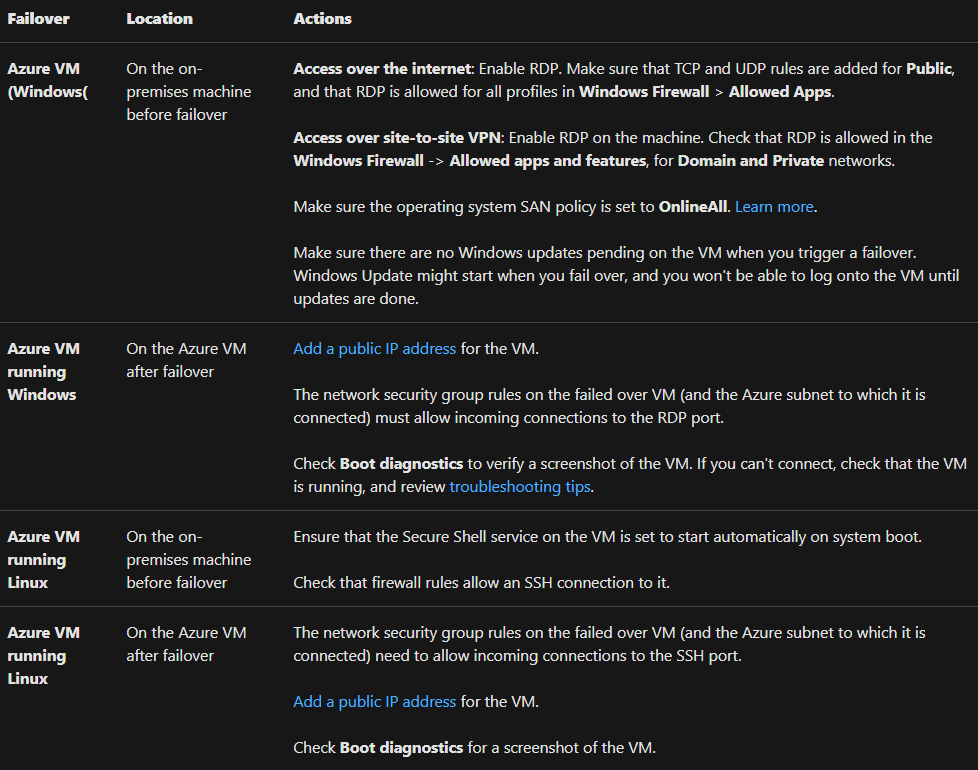
Connecting Azure after Failover
For connecting to the Azure VMs created after failover using RDP/SSH, there are a number of requirements.
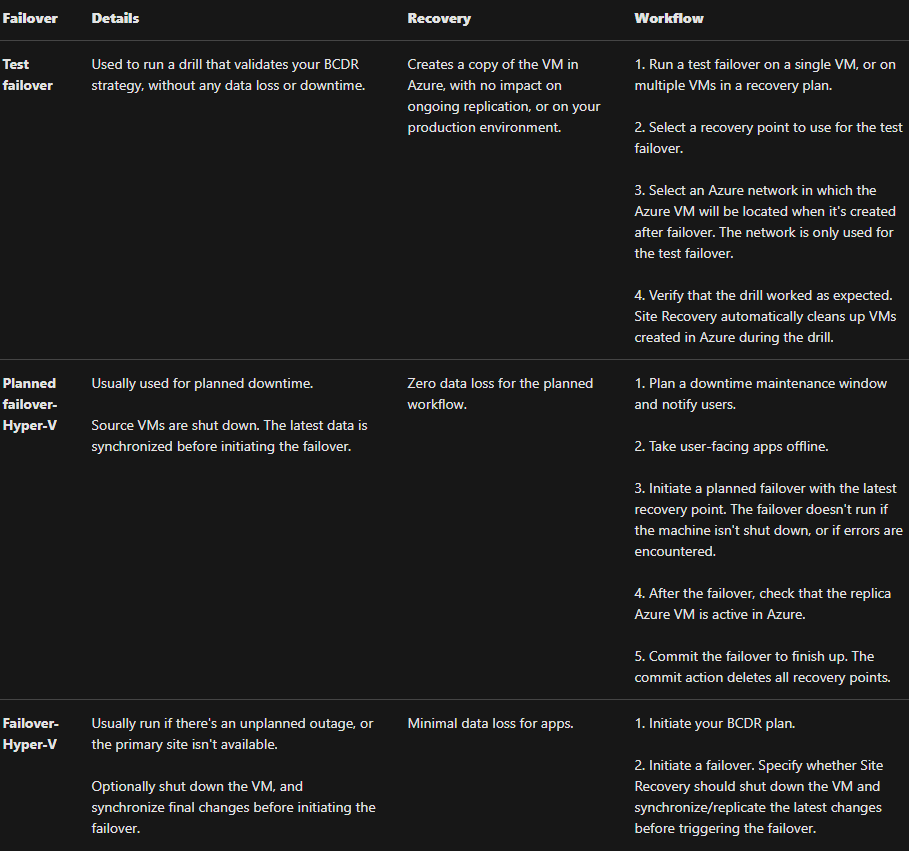
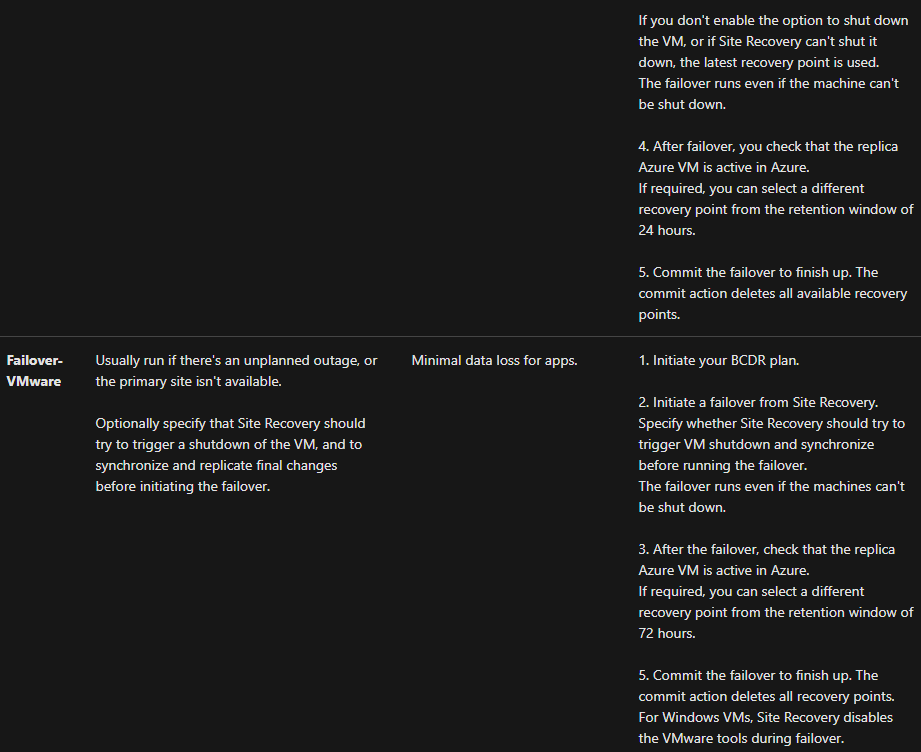
Types of Failover
Site Recovery provides different failover options.
Reprotection/failback
After failing over to Azure, the replicated Azure VMs are in an unprotected state.
- Firstly, as failing back to your on-premises site, you need to start the Azure VMs replicating to on-premises. Then, the reproduction process depends on the type of machines you failed over.
- However, after machines are replicating from Azure to on-premises, you can run a failover from Azure to your on-premises site.
- Then, after machines are running on-premises again, enable the replication so that they replicate to Azure for disaster recovery.
Working of Failback
- For failing back, a VM needs at least one recovery point in order to fail back. However, in a recovery plan, all VMs in the plan need at least one recovery point.
- However, there is an app-consistent recovery point option. In this, a single VM recovers to its latest available app-consistent recovery point. And, for a recovery plan with a replication group, each replication group recovers to its common available recovery point.
- Thirdly, during failover from Azure to the on-premises site, Site Recovery shuts down the Azure VMs. And, then you commit the failover, Site Recovery removes the failed back Azure VMs in Azure.
Hyper-V reprotection/failback
For reprotecting and failing back Hyper-V VMs from Azure to on-premises:
- Firstly, you can only fail back Hyper-V VMs replicating using a storage account. However, Failback of Hyper-V VMs that replicate using managed disks is not supported.
- Secondly, On-premises Hyper-V hosts should be connected to Azure.
- Thirdly, you run a planned failback from Azure to on-premises. Moreover, there are no specific components necessary to be set up for Hyper-V VM failback.
- However, during planned failover, you can select options for synchronizing data before failback:
Synchronizing data before failover: This minimizes downtime for virtual machines as it synchronizes machines without shutting them down.
Phase 1: This takes a snapshot of the Azure VM and copies it to the on-premises Hyper-V host.
Phase 2: This shuts down the Azure VM so that no new changes occur there. However, the final set of delta changes is transferred to the on-premises server and the on-premises VM is started up.
Synchronizing data during failover only: This option is faster as we expect that most of the disk has changed, and thus don’t perform checksum calculations. It performs a download of the disk.
Running a test failover to Azure
Running a test failover can help in validating your replication and disaster recovery strategy, without any data loss or downtime. However, a test failover doesn’t impact ongoing replication, or your production environment. So, you can run a test failover on a specific virtual machine (VM), or on a recovery plan containing multiple VMs.
However, if you want to run a test failover for a single VM, follow the steps below:
- Firstly, in Site Recovery in the Azure portal, click Recovery Plans > recoveryplan_name > Test Failover.
- Secondly, select a Recovery Point to which to failover.
For this, you can use one of the following options:
Firstly, Latest processed, this fails over all VMs in the plan to the latest recovery point processed by Site Recovery.
Secondly, Latest app-consistent, this fails over all the VMs in the plan to the latest application-consistent recovery point processed by Site Recovery.
Then, the Latest option, this first processes all the data sent to the Site Recovery service for creating a recovery point for each VM before failing over to it. Moreover, this option provides the lowest RPO (Recovery Point Objective).
Then, Latest multi-VM processes, this option is available for recovery plans with one or more VMs that have multi-VM consistency enabled.
After that, Latest multi-VM app-consistent, this option is available for recovery plans with one or more VMs that have multi-VM consistency enabled.
Lastly, Custom, use this option to fail over a specific VM to a particular recovery point.
- Thirdly, select an Azure virtual network in which test VMs will be created.
- However, if you are failing over to Azure and data encryption is on. Then, in Encryption Key, select the certificate that was issued when you enabled encryption during Provider installation.
- After that, track failover progress on the Jobs tab. Then, you should be able to see the test replica machine in the Azure portal.
- Then, for initiating an RDP connection to the Azure VM, you need to add a public IP address on the network interface of the failed VM.
- After that, click Cleanup test failover. Further, this deletes the VMs that were created during test failover.
- Lastly, in Notes, record and save any observations associated with the test failover.

Reference: Microsoft Documentation, Documentation 2