Managing User Profile and Group Information using Azure Active Directory
Return to AZ-104 Tutorial Page
We will learn in these topics the process of adding or updating a user profile information using Azure Active Directory. Also, you will learn to edit group information.
Steps to Add or Change User Profile Information
Before we start with the steps to update User Profile Information it is very important to note that we should use Windows Server Active Directory to update the identity, contact info, or job info for users whose source of authority is Windows Server Active Directory. Thereafter completing the update, you must wait for the next synchronization cycle to complete before you’ll see the changes.
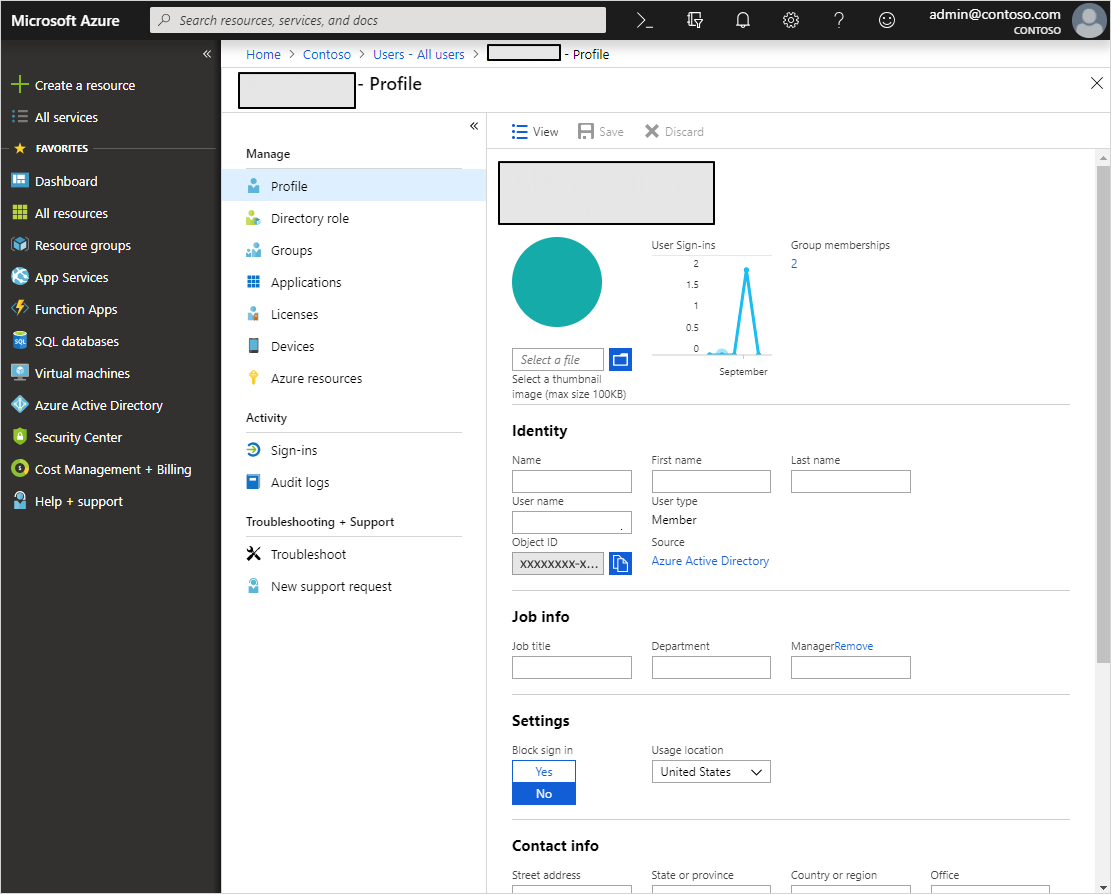
- Firstly, you must sign in to the Azure portal as a User administrator for the organization.
- In the second step, select Azure Active Directory, select Users, and then select a user.
- Then, select Edit to add or update the information optionally included in each of the available sections including –
- Profile picture: Choose a thumbnail image for the user’s account that appears in Azure Active Directory and on the user’s personal pages.
- Identity: Now, add or update an additional identity value for the user
- Job info: You may add any job-related information including job title, and department.
- Settings: Then you must decide whether the user can sign in to Azure Active Directory tenant.
- Contact information: Used to add any relevant contact information for the user, except for some user’s phone or mobile contact info (Note: only a global administrator can update for users in administrator roles).
- Authentication contact info: It is important to verify this information to ensure there are an active phone number and email address for the user.

- Lastly, Select Save.
Steps to Edit Group Setting Using Azure Directory
Whilst using the Azure Active Directory (Azure AD), we can edit group settings such as updating its name, description, or membership type. Following are the steps to edit your group settings –
- Firstly, sign in to the Azure portal using a Global administrator account for the directory.
- In the second step select Azure Active Directory, and then select Groups. Such that all groups page appears, showing all of your active groups.
- In the third step from the Groups – All groups page, type as much of the group name as you can into the Search box. For the purposes of this article, we’re searching for the MDM policy – West group. Then, the search results appear under the Search box, updating as you type more characters.
- In the fourth step, select the group MDM policy – West, and then select Properties from the Manage area.
- Next, update the General settings information as needed, including – Group name, Group description, Group type, Membership type, and Object ID

Reference: Microsoft Documentation