How to unlock account or reset passwords?
This tutorial will help to learn about how to Enable users to unlock their account or reset passwords using Azure Active Directory self-service password reset. Azure Active Directory (Azure AD) self-service password reset (SSPR) gives users the ability to change or reset their password, with no administrator or help desk involvement. If a user’s account is locked or they forget their password, they can follow prompts to unblock themselves and get back to work. This ability reduces help desk calls and loss of productivity when a user can’t sign in to their device or an application.
Enable self-service password reset
To enable users to unlock their account or reset their passwords using Azure Active Directory (Azure AD) self-service password reset, you can follow these steps:
- Sign in to the Azure portal and navigate to the Azure AD service.
- Click on the “Password reset” option in the left-hand menu.
- Choose the appropriate authentication method for your organization, such as email or mobile phone verification.
- Configure the password reset registration and verification options, such as setting up security questions or a secondary email address.
- Configure the notification options for password reset, such as sending email notifications to administrators or users.
- Enable the self-service password reset feature for your users by selecting the “Enabled” option.
- Optionally, you can customize the user interface and branding for the self-service password reset experience.
- After completing these steps, users will be able to unlock their account or reset their password using the Azure AD self-service password reset feature, as long as they have completed the registration process and have access to the registered verification options.
Select authentication methods and registration options
- On the Authentication methods page from the menu in the left-hand side, set the Number of methods required to reset to 1.To improve security, you can increase the number of authentication methods required for SSPR.
- Choose the Methods available to users that your organization wants to allow. For this tutorial, check the boxes to enable the following methods:
- Mobile app notification
- Mobile app code
- Mobile phone
- To apply the authentication methods, select Save.
Before users can unlock their account or reset a password, they must register their contact information. This contact information is used for the different authentication methods configured in the previous steps.
An administrator can manually provide this contact information, or users can go to a registration portal to provide the information themselves. In this tutorial, configure the users to be prompted for registration when they next sign in.
- On the Registration page from the menu in the left-hand side, select Yes for Require users to register when signing in.
- It’s important that contact information is kept up to date. If the contact information is outdated when an SSPR event is started, the user may not be able to unlock their account or reset their password.Set Number of days before users are asked to reconfirm their authentication information to 180.
- To apply the registration settings, select Save.
Configure notifications and customizations
To keep users informed about account activity, you can configure e-mail notifications to be sent when an SSPR event happens. These notifications can cover both regular user accounts and admin accounts. For admin accounts, this notification provides an additional layer of awareness when a privileged administrator account password is reset using SSPR. All global admins would be notified when SSPR is used on an admin account.
- On the Notifications page from the menu in the left-hand side, configure the following options:
- Set Notify users on password resets option to Yes.
- Set Notify all admins when other admins reset their password to Yes.
- To apply the notification preferences, select Save.
If users need additional help with the SSPR process, you can customize the link for “Contact your administrator”. This link is used in the SSPR registration process and when a user unlocks their account or resets their password. To make sure your users get the support needed, it’s highly recommended to provide a custom helpdesk email or URL.
- On the Customization page from the menu in the left-hand side, set Customize helpdesk link to Yes.
- In the Custom helpdesk email or URL field, provide an email address or web page URL where your users can get additional help from your organization, such as
https://support.contoso.com/ - To apply the custom link, select Save.
Test self-service password reset
- To see the manual registration process, open a new browser window in InPrivate or incognito mode, and browse to https://aka.ms/ssprsetup. Users should be directed to this registration portal when they next sign-in.
- Sign in with a non-administrator test user, such as testuser, and register your authentication methods contact information.
- Once complete, select the button marked Looks good and close the browser window.
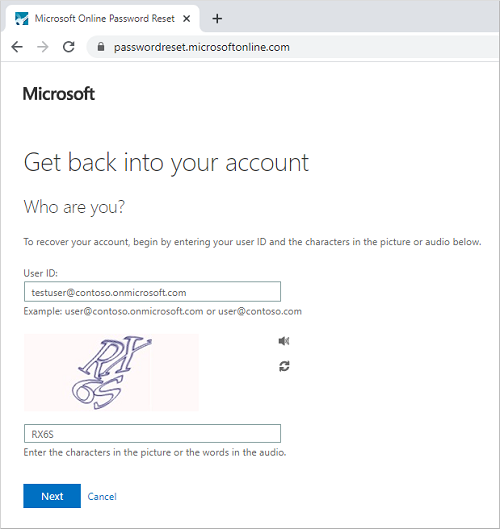
- Open a new browser window in InPrivate or incognito mode, and browse to https://aka.ms/sspr.
- Enter your non-administrator test users’ account information, such as testuser, the characters from the CAPTCHA, and then select Next.
- Follow the verification steps to reset your password. When complete, you should receive an e-mail notification that your password was reset.
Clean up resources
If you no longer want to use the SSPR functionality you have configured as part of this tutorial, set the SSPR status to None using the following steps:
- Sign in to the Azure portal.
- Search for and select Azure Active Directory, then choose Password reset from the menu on the left-hand side.
- From the Properties page, under the option Self service password reset enabled, choose None.
- To apply the SSPR change, select Save.

Reference documentation – Tutorial: Enable users to unlock their account or reset passwords using Azure Active Directory self-service password reset