Direct web traffic with Azure Application Gateway
In this tutorial, we will learn about Azure PowerShell to create an application gateway. However, the application gateway directs application web traffic to specific resources in a backend pool. You assign listeners to ports, create rules, and add resources to a backend pool.
Create a resource group
Use the New-AzResourceGroup cmdlet to establish a new resource group:
Azure PowerShell
New-AzResourceGroup -Name myResourceGroupAG -Location eastus
Create network resources
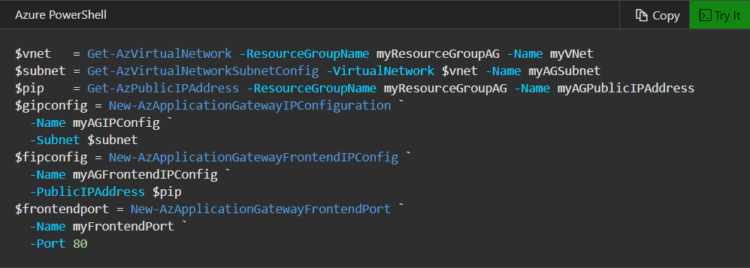
A virtual network is required for Azure to interact between the resources you construct. Only application gateways are allowed in the application gateway subnet. Other resources are not permitted. You can utilize an existing subnet or build a new one for Application Gateway. In this example, two subnets are created: one for the application gateway and the other for the backend servers. Depending on your needs, you may make the Application Gateway’s Frontend IP Public or Private. You’ll use a Public Frontend IP in this example.
- Firstly, Create the subnet configurations using New-AzVirtualNetworkSubnetConfig.
- Secondly, Create the virtual network with the subnet configurations using New-AzVirtualNetwork.
- Lastly, Create the public IP address using New-AzPublicIpAddress.

Create an application gateway
Create the IP configurations and frontend port
- Firstly, Use
New-AzApplicationGatewayIPConfigurationto create the configuration that associates the subnet you created with the application gateway. - Secondly, Use
New-AzApplicationGatewayFrontendIPConfigto create the configuration that assigns the public IP address that you previously created to the application gateway. - Lastly, Use
New-AzApplicationGatewayFrontendPortto assign port 80 to access the application gateway.
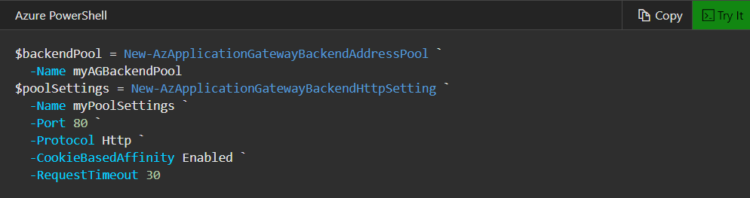
Create the backend pool
- Firstly, Use
New-AzApplicationGatewayBackendAddressPoolto create the backend pool for the application gateway. The backend pool will be empty for now. When you create the backend server NICs in the next section, you will add them to the backend pool. - Then, Configure the settings for the backend pool with
New-AzApplicationGatewayBackendHttpSetting.
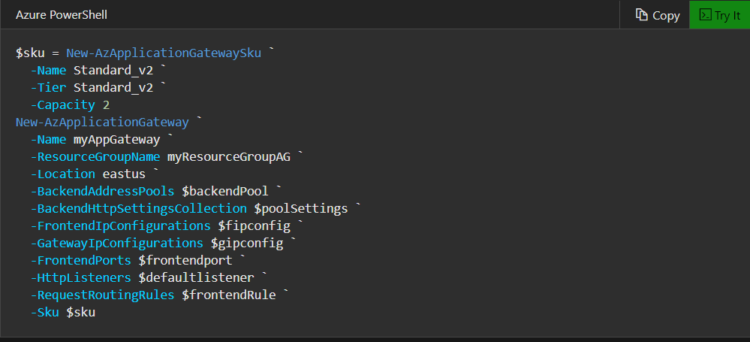
Create the application gateway
Now that you’ve created the necessary supporting resources, create the application gateway:
- Firstly, Use
New-AzApplicationGatewaySkuto specify parameters for the application gateway. - Then, Use
New-AzApplicationGatewayto create the application gateway.
Backend servers
Create the backend virtual machines that will host the websites now that you’ve finished with the Application Gateway. NICs, virtual machine scale sets, public IPs, internal IPs, fully qualified domain names (FQDN), and multi-tenant backends like Azure App Service may all be found in the backend. In this example, you’ll utilise Azure to establish two virtual machines that will function as the application gateway’s backend servers. You must also install IIS on the virtual machines to ensure that Azure generated the application gateway correctly.
Create two virtual machines
- Firstly, Get the recently created Application Gateway backend pool configuration with
Get-AzApplicationGatewayBackendAddressPool. - Secondly, Create a network interface with
New-AzNetworkInterface. - Thirdly, Create a virtual machine configuration with
New-AzVMConfig. - Lastly, Create the virtual machine with
New-AzVM.
Test the application gateway
Despite the fact that IIS isn’t necessary to establish the application gateway, you installed it in this quickstart to ensure that Azure created it successfully. To test the application gateway, use IIS:
- Firstly, Run Get-AzPublicIPAddress to get the public IP address of the application gateway.
- Secondly, Copy and paste the public IP address into the address bar of your browser. When you refresh the browser, you should see the name of the virtual machine.
Azure PowerShell
Get-AzPublicIPAddress -ResourceGroupName myResourceGroupAG -Name myAGPublicIPAddress

Reference: Microsoft Documentation