Deploying and Configuring Azure Firewall
In this tutorial, we will learn and understand about deploying and configuring Azure firewall including setting up a test network environment, creating a default route and testing the firewall.
You should know that one way you can control outbound network access from an Azure subnet is with Azure Firewall. With Azure Firewall, you can configure:
- Firstly, application rules that state fully qualified domain names (FQDNs) that can be accessed from a subnet.
- Secondly, network rules that define source address, protocol, destination port, and destination address.
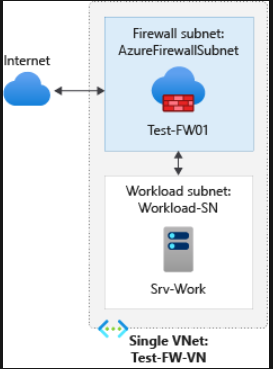
It is recommended to use a hub and spoke model for production deployments. However, the workload servers are in peered VNets in the same region with one or more subnets.
- AzureFirewallSubnet – the firewall is in this subnet.
- Workload-SN – the workload server is part of this subnet.
Setting up the network
Firstly, create a resource group to contain the resources necessary for deploying the firewall. After that, create a VNet, subnets, and a test server.
Creating a resource group
- Firstly, sign in to the Azure portal at https://portal.azure.com.
- Secondly, on the Azure portal menu, select Resource groups or search for and select Resource groups from any page. Then select Add.
- Then, for the Resource group name, enter Test-FW-RG.
- And, for Subscription, select your subscription.
- After that, for Resource group location, select a location.
- Lastly, select Create.

Creating a VNet
This VNet will contain three subnets.
- Firstly, on the Azure portal menu or from the Home page, select Create a resource.
- Then, select Networking > Virtual network.
- Thirdly, for Subscription, select your subscription. For the Resource group, select Test-FW-RG. Then, for Name, type Test-FW-VN. And, for Region, select the same location that you used previously.
- After that, select Next: IP addresses.
- Then, for IPv4 Address space, type 10.0.0.0/16.
- Under Subnet, select default.
- Next, for the Subnet name type AzureFirewallSubnet. Withthis, the firewall will be in this subnet, and the subnet name must be AzureFirewallSubnet.
- Then, for Address range, type 10.0.1.0/26.
- Lasty, select Save.
Creating a virtual machine
Now let’s create the workload virtual machine, and place it in the Workload-SN subnet.
- Firstly, on the Azure portal menu or from the Home page, select Create a resource.
- Secondly, select Compute and then select Virtual machine.
- Thirdly, windows Server 2016 Datacenter in the Featured list.
- Then, enter these values for the virtual machine:
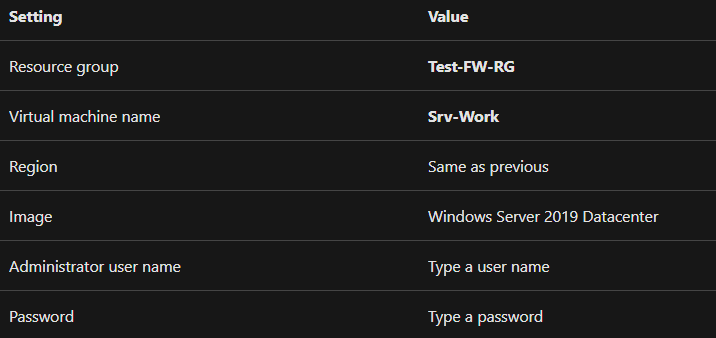
- Fifthly, under Inbound port rules, Public inbound ports, select None.
- After that, accept the other defaults and select Next: Disks.
- Then, accept the disk defaults and select Next: Networking. However, make sure that Test-FW-VN is selected for the virtual network and the subnet is Workload-SN.
- And, for Public IP, select None. Then, accept the other defaults and select Next: Management.
- After that, select Off to disable boot diagnostics. Then, accept the other defaults and select Review + create.
- Lastly, review the settings on the summary page, and then select Create.
Deploying the firewall
For deploying the firewall into the VNet,
- Firstly, on the Azure portal menu or from the Home page, select Create a resource.
- Secondly, type firewall in the search box and press Enter.
- Then, select Firewall and then select Create.
- Fourthly, on the Create a Firewall page, use the following table to configure the firewall:
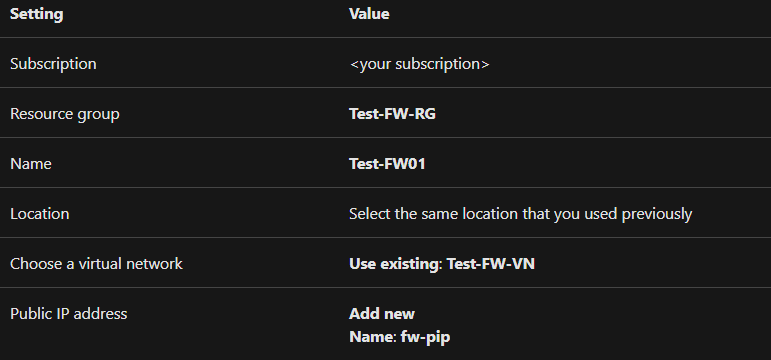
- Then, select Review + create.
- After that, review the summary, and then select Create to create the firewall.
- And, when the deployment completes, go to the Test-FW-RG resource group, and select the Test-FW01 firewall.
- Lastly, note the firewall private and public IP addresses. You’ll use these addresses later.
Configuring an application rule
This refers to the application rule that allows outbound access to www.google.com.
- Firstly, open the Test-FW-RG, and select the Test-FW01 firewall.
- Secondly, on the Test-FW01 page, under Settings, select Rules.
- Thirdly, select the Application rule collection tab.
- Fourthly, select Add application rule collection.
- Then, for Name, type App-Coll01. For Priority, type 200 and for Action, select Allow.
- After that, under Rules, Target FQDNs, for Name, type Allow-Google.
- Then, For Source type, select IP address, for Source, type 10.0.2.0/24, for Protocol:port, type http, https and for Target FQDNS, type www.google.com
- Lastly, select Add.
Configuring a network rule
This refers to the network rule that allows outbound access to two IP addresses at port 53 (DNS).
- Firstly, select the Network rule collection tab.
- Secondly, select Add network rule collection.
- Then, for Name, type Net-Coll01, for Priority, type 200 and for Action, select Allow.
- After that, under Rules, IP addresses, for Name, type Allow-DNS, for Protocol, select UDP, for Source type, select IP address and for Source, type 10.0.2.0/24. Further, for Destination type select IP address and for Destination address, type 209.244.0.3,209.244.0.4
- Lastly, for Destination Ports, type 53 and select Add.
Changing the primary and secondary DNS address for the Srv-Work network interface
For testing purposes in this tutorial, configure the server’s primary and secondary DNS addresses. This isn’t a general Azure Firewall requirement.
- Firstly, on the Azure portal menu, select Resource groups or search for and select Resource groups from any page. Select the Test-FW-RG resource group.
- Secondly, select the network interface for the Srv-Work virtual machine.
- Thirdly, under Settings, select DNS servers.
- Then, under DNS servers, select Custom.
- After that, type 209.244.0.3 in the Add DNS server text box, and 209.244.0.4 in the next text box.
- Lastly, select Save and restart the Srv-Work virtual machine.
Testing the firewall
For testing the firewall:
- Firstly, connect a remote desktop to firewall public IP address and sign in to the Srv-Work virtual machine.
- Secondly, open Internet Explorer and browse to https://www.google.com.
- Thirdly, select OK > Close on the Internet Explorer security alerts.
- After that, browse to https://www.microsoft.com. Here, you should be blocked by the firewall.

Reference: Microsoft Documentation