Creating and Configuring Azure Front Door Service
In this tutorial, we will get started with Azure Front Door by using the Azure portal to set up high availability for a web application including creating and configuring them.
Azure Front Door connects two web application instances that are hosted in separate Azure regions. The web application, on the other hand, is constantly monitored. When the nearest site is unavailable, the service enables immediate failover to the next available site.
Creating two instances of a web app
This needs two instances of a web application that run in different Azure regions. However, both the web application instances run in Active/Active mode, so either one can take traffic. And, this configuration differs from an Active/Stand-By configuration, where one acts as a failover.
- Firstly, sign in to the Azure portal at https://portal.azure.com.
- Secondly, from the home page or the Azure menu, select Create a resource.
- Thirdly, select Web > Web App.
- Fourthly, in the Web App, select the Subscription to use.
- Fifthly, for Resource Group, select Create new. Enter FrontDoorQS_rg1 for the Name and select OK.
- Then, under Instance Details, enter a unique Name for your web app. This example uses WebAppContoso-1.
- After that, select a Runtime stack, in this example, .NET Core 2.1 (LTS).
- Then, select a region, such as Central US. And, for Windows Plan, select Create new. Enter myAppServicePlanCentralUS for Name and select OK. However, be sure that the Sku and size is Standard S1 100 total ACU, 1.75 GB memory.
- Lastly, select Review + create, review the Summary, and then select Create. It might take several minutes for the deployment to complete.
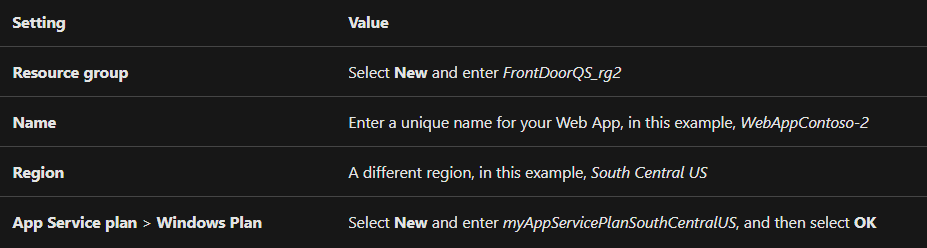
After completing deployment, create a second web app. Use the same procedure with the same values, except for the following values:
Creating a Front Door for your application
Configuring Azure Front Door to direct user traffic based on lowest latency between the two web apps servers. However, to begin, add a frontend host for Azure Front Door.
- Firstly, from the home page or the Azure menu, select Create a resource. Select Networking > Front Door.
- Secondly, in Create a Front Door, select a Subscription.
- Thirdly, for the Resource group, select New, then enter FrontDoorQS_rg0 and select OK. However, if you created a resource group, select a Resource group location, and then select Next: Configuration.
- Fourthly, in Frontends/domains, select + to open Add a frontend host. And, for Host name, enter a globally unique hostname.

After that, make a backend pool with your two web apps in it.
- Firstly, still in Create a Front Door, in Backend pools, select + to open Add a backend pool.
- Then, for Name, enter myBackendPool.
- Thirdly, select Add a backend. For Backend host type, select App Service.
- After that, select your subscription, and then choose the first web app you created from the Backend hostname. In this example, the web app was WebAppContoso-1. Select Add.
- Then, select Add a backend again. For Backend host type, select App Service.
- Lastly, select your subscription, again, and choose the second web app you created from the Backend hostname. Select Add.
Viewing Azure Front Door in action
After creating the Front Door, it will take a few minutes for the configuration to be deployed globally. And, once it is complete, then access the frontend host you created. However, if you go to contoso-frontend.azurefd.net via a browser, your request will be automatically routed to the closest server in the backend pool to you.
For testing instant global failover in action, try the following steps:
- Firstly, open a browser, and go to the frontend address: contoso-frontend.azurefd.net.
- Secondly, in the Azure portal, search for and select App services.
- Thirdly, select your web app, and then select Stop, and Yes to verify.
- Then, refresh your browser. You should see the same information page.
- After that, find the other web app, and stop it as well.
- Lastly, refresh your browser. This time, you should see an error message.
Cleaning up resources
After completing, you can remove all the items you created. But, deleting a resource group also deletes its contents. So, if you don’t intend to use this Front Door, you should remove resources to avoid unnecessary charges.
- Firstly, in the Azure portal, search for and select Resource groups, or select Resource groups from the Azure portal menu.
- Secondly, filter or scroll down to find a resource group, such as FrontDoorQS_rg0.
- Thirdly, select the resource group, then select the Delete resource group.
- Lastly, type the resource group name to verify, and then select Delete.

Reference: Microsoft Documentation