Creating and Configuring Application Security Groups
In this tutorial, we will learn and understand about creating and configuring the application security groups with testing traffic filters.
Creating application security groups
An application security group gives you access to group together servers with relatable functions, such as web servers.
- Firstly, on the Azure portal menu or from the Home page, select Create a resource.
- Secondly, in the Search the Marketplace box, enter the Application security group. However, when the Application security group appears in the search results, select it, select Application security group again under Everything, and then select Create.
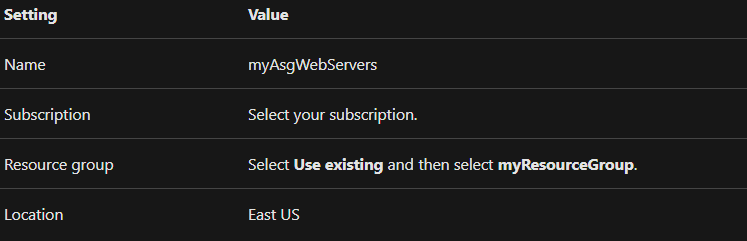
- Then, enter, or select, the following information, and then select Create:
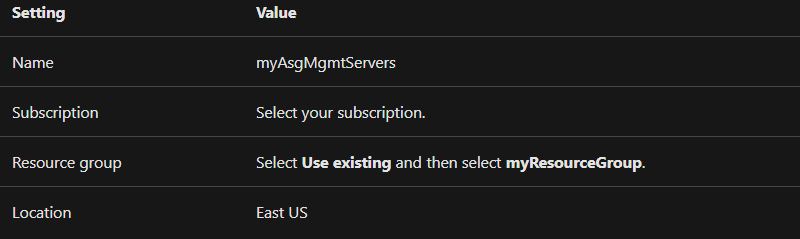
- After that, complete step 3 again, specifying the following values:
Associating network security group to subnet
- Firstly, in the Search resources, services, and docs box at the top of the portal, begin typing myNsg. And, when myNsg appears in the search results, select it.
- Secondly, under SETTINGS, select Subnets and then select + Associate.
- Lastly, under the Associate subnet, select Virtual network and then select myVirtualNetwork. And, Select Subnet, select mySubnet, and then select OK.

Associating network interfaces to an ASG
When the portal developed the VMs, then it created a network interface for each VM, and attached the network interface to the VM. However, add the network interface for each VM to one of the application security groups you created previously:
- Firstly, in the Search resources, services, and docs box at the top of the portal. And, then begin typing myVmWeb. Select the myVmWeb VM when it appears in the search results.
- Secondly, under SETTINGS, select Networking. Then, select Configure the application security groups and select myAsgWebServers for Application security groups, and then select Save.
- Lastly, complete steps 1 and 2 again, searching for the myVmMgmt VM and selecting the myAsgMgmtServers ASG.
Testing traffic filters
- Firstly, connect to the myVmMgmt VM. And, when myVmMgmt appears in the search results, select it. Select the Connect button.
- Secondly, select Download RDP file. Then, open the downloaded rdp file and select Connect. Here, enter the username and password you specified when creating the VM. And, select OK.
However, you may receive a certificate warning during the sign-in process. And, if you receive the warning, select Yes or Continue, to proceed with the connection.
- Thirdly, connect to the myVmWeb VM from the myVmMgmt VM by entering the following command in a PowerShell session:
mstsc /v:myVmWeb
However, you will be able to connect to the myVmWeb VM from the myVmMgmt VM as VMs in the same virtual network can communicate with each other over any port, by default. But, you can’t create a remote desktop connection to the myVmWeb VM from the internet as the security rule for the myAsgWebServers doesn’t allow port 3389 inbound from the internet.
- After that, for installing Microsoft IIS on the myVmWeb VM, enter the following command from a PowerShell session on the myVmWeb VM:
PowerShell
Install-WindowsFeature -name Web-Server -IncludeManagementTools
- After completing the IIS installation, disconnect from the myVmWeb VM that will leave you in the myVmMgmt VM remote desktop connection. Therefore, disconnect from the myVmMgmt VM.
- Next, in the Search resources, services, and docs box at the top of the Azure portal, start typing myVmWeb from your computer. When myVmWeb appears in the search results, select it.
- Lastly, for confirming that you can access the myVmWeb web server from the internet, open an internet browser on your computer and browse to http://<public-ip-address-from-previous-step>.
Cleaning up resources
When no longer required, delete the resource group and all of the resources it contains:
- Firstly, enter myResourceGroup in the Search box at the top of the portal. And, when you see myResourceGroup in the search results, select it.
- Then, select the Delete resource group.
- Lastly, enter myResourceGroup for TYPE THE RESOURCE GROUP NAME: and select Delete.

Reference: Microsoft Documentation