Configuring Diagnostic logging and Data retention
In this tutorial, we will learn about configuring diagnostic logging and data retention methods. Let’s begin.
Azure provides built-in diagnostics for assisting with debugging an App Service app.
Types
Enable application logging (Windows)
For enabling application logging for Windows apps in the Azure portal,
- Firstly navigate to your app and select App Service logs.
- Secondly, select On for either Application Logging (Filesystem) or Application Logging (Blob), or both.
- However, the Filesystem option is for temporary debugging purposes and turns itself off in 12 hours. Whereas, the Blob option is for long-term logging, and needs a blob storage container to write logs to.
- Lastly, the Blob option also includes additional information in the log messages like the ID of the origin VM instance of the log message (InstanceId), thread ID (Tid), and a more granular timestamp (EventTickCount).
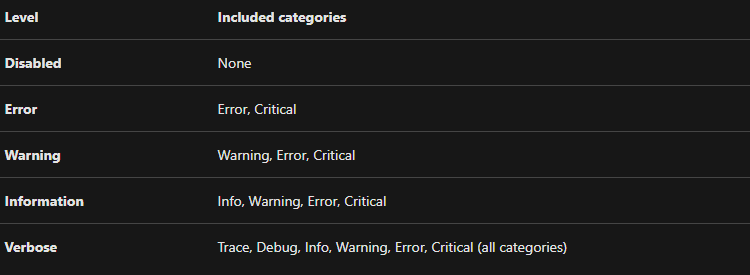
Select the Level, or the level of details to log. The table below shows the log categories included in each level:
And, after completing, select save.
Enable web server logging
- For enabling web server logging for Windows apps in the Azure portal, firstly, navigate to your app and select App Service logs.
- Whereas, for Web server logging, select Storage to store logs on blob storage, or File System to store logs on the App Service file system.
- Then, in Retention Period (Days), set the number of days the logs should retain.
- Lastly, after completing, select Save.
Log detailed errors
- For saving the error page or failed request tracing for Windows apps in the Azure portal, firstly, navigate to your app and select App Service logs.
- Then, under Detailed Error Logging or the Failed Request Tracing, select On, then select Save.
However, both types of logs are stored in the App Service file system in which up to 50 errors (files/folders) are retained. And, if the number of HTML files exceed 50, the oldest 26 errors are automatically deleted.

Add log messages in code
In your application code, use the usual logging facilities for sending log messages to the application logs.
ASP.NET applications can use the System.Diagnostics.Trace class for logging information to the application diagnostics log. For example,
C#
System.Diagnostics.Trace.TraceError(“If you’re seeing this, something bad happened”);
However, by default, ASP.NET Core uses the Microsoft.Extensions.Logging.AzureAppServices logging provider.
Stream logs
Before streaming logs in real time, enable the log type that you want. However, any information written to files ending in .txt, .log, or .htm that are stored in the /LogFiles directory (d:/home/logfiles) is streamed by App Service.
Access log files
If you want to configure the Azure Storage blobs option for a log type, then you require a client tool that works with Azure Storage.
However, for logs stored in the App Service file system, the easiest way is to download the ZIP file in the browser at:
- Firstly, Linux/container apps: https://<app-name>.scm.azurewebsites.net/api/logs/docker/zip
- Secondly, Windows apps: https://<app-name>.scm.azurewebsites.net/api/dump
For Linux/container apps, the ZIP file consists of console output logs for both the docker host and the docker container. On the other hand, for a scaled-out app, the ZIP file consists of one set of logs for each instance.
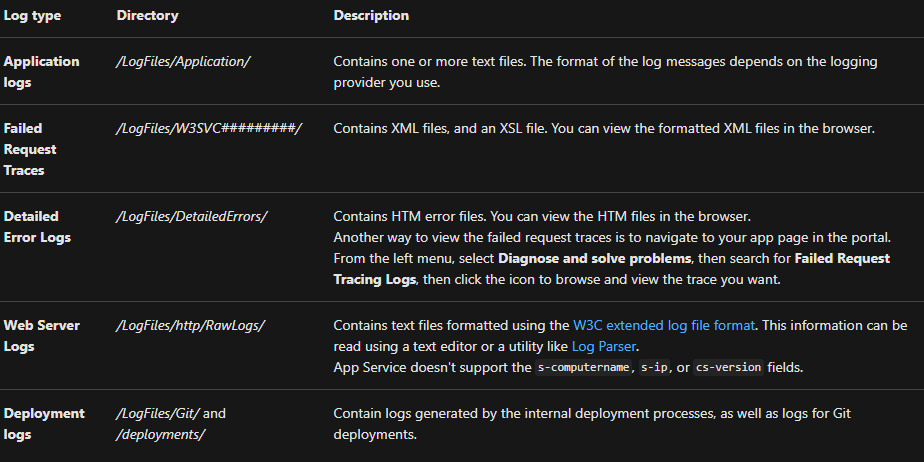
For Windows apps, the ZIP file consists of the contents of the D:\Home\LogFiles directory in the App Service file system. It has the following structure:
Changing the data retention period
The steps below will explain the configuration process of how long log data is kept in your workspace. However, Data retention can be configured from 30 to 730 days for all workspaces except if they are using the legacy Free pricing tier.
Default retention
For setting the default retention for your workspace,
- Firstly, in the Azure portal, from your workspace, select Usage and estimated costs from the left pane.
- Secondly, on the Usage and estimated costs page, click Data Retention from the top of the page.
- Lastly, on the pane, move the slider to increase or decrease the number of days and then click OK. However, if you are on the free tier, then you will not be able to modify the data retention period. And further, you will need to upgrade to the paid tier in order to control this setting.
When the retention is less, there is a several day grace period before the data older than the new retention setting is deleted. Moreover, the retention can be set with the Azure Resource Manager using the retentionInDays parameter. And, when you set the data retention to 30 days, then you can point to an immediate purge of older data using the immediatePurgeDataOn30Days parameter.
However, workspaces with 30 days retention may actually retain data for 31 days. And, if it is imperative that data be kept for only 30 days, then use the Azure Resource Manager to set the retention to 30 days and with the immediatePurgeDataOn30Days parameter.
There are two data types that include Usage and AzureActivity which are retained for a minimum of 90 days by default. And there is no charge for this 90 day retention. However, if the workspace retention is increased above 90 days, the retention of these data types will also be increased.
Retention by data type
It is also possible to identify different retention settings for individual data types from 30 to 730 days (except for workspaces in the legacy Free pricing tier). However, each data type is a sub-resource of the workspace. For example, the SecurityEvent table can address in Azure Resource Manager as:
/subscriptions/00000000-0000-0000-0000-00000000000/resourceGroups/MyResourceGroupName/providers/Microsoft.OperationalInsights/workspaces/MyWorkspaceName/Tables/SecurityEvent
Here, note that the data type (table) is case sensitive. For getting the current per data type retention settings of a particular data type (in this example SecurityEvent), use:
JSON
GET /subscriptions/00000000-0000-0000-0000-00000000000/resourceGroups/MyResourceGroupName/providers/Microsoft.OperationalInsights/workspaces/MyWorkspaceName/Tables/SecurityEvent?api-version=2017-04-26-preview
For getting the current per data type retention settings for all data types in your workspace, just omit the specific data type, for example,
JSON
GET /subscriptions/00000000-0000-0000-0000-00000000000/resourceGroups/MyResourceGroupName/providers/Microsoft.OperationalInsights/workspaces/MyWorkspaceName/Tables?api-version=2017-04-26-preview
For setting the retention of a particular data type (in this example SecurityEvent) to 730 days, do
JSON
PUT /subscriptions/00000000-0000-0000-0000-00000000000/resourceGroups/MyResourceGroupName/providers/Microsoft.OperationalInsights/workspaces/MyWorkspaceName/Tables/SecurityEvent?api-version=2017-04-26-preview
{
“properties”:
{
“retentionInDays”: 730
}
}
However, the valid values for retentionInDays are from 30 through 730.
You should know that the Usage and AzureActivity data types cannot be set with custom retention. Moreover, they will take on the maximum of the default workspace retention or 90 days.

Reference: Microsoft Documentation, Documentation 2